Data Source
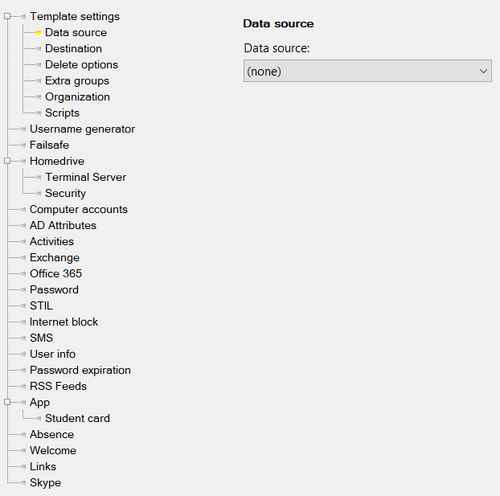
Data Source is where you set where you want your data to come from.
The setting can look different depending on the Data Source chosen.
None
None, UMS will get no data at all. This can be useful if you want to prepare a template, but not ready to deploy it yet.
Active Directory Employee
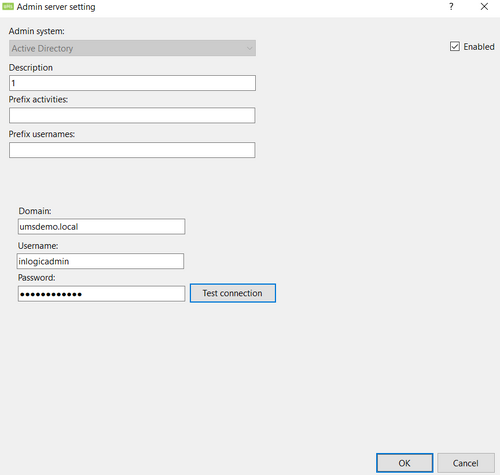
This setting will add another column beneath the Data Source setting, where you need to have a Admin Server setting ready.
These are the things previously mentioned Admin Server needs to work:
- A description, this should be something that describes what you intend to do with it, calling it "AD - Employee" would probably be the best name if you only have 1 employee template utilizing Active Directory as a Data Source
- You need to set what Domain it needs to contact to find these users
- Then a username and password in that or at least with access to that domain to read the user profiles it needs to work.
You can press "Test Connection" to see if you configured it properly.
Now that you have made the Admin Server you need to go back to the Data Source settings to finish configuring it.
After picking the Admin Server that you just created you will meet a 'Get User setting' screen. Here you add a description and Source OU, note that you can have multiple 'Get User settings' using the same Admin Server.
Active Directory Student
The configuration of this data source is exactly the same as Active Directory Employee, but UMS treats the data differently.
Fields in the database such as UserType will reflect the setting you choose for the template.
Easy Data Sources
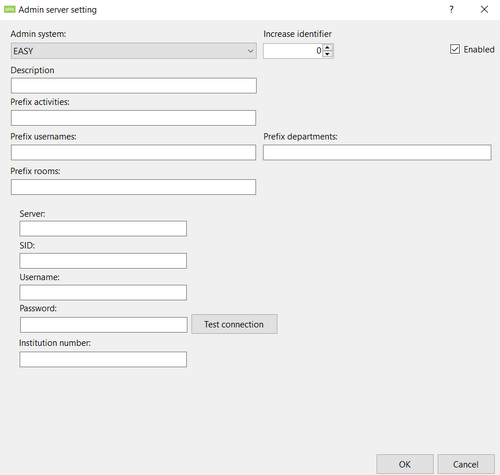
The various Easy data sources requires an Easy Admin Server setting. This will require an IP, SID, Username, Password and Institution number.
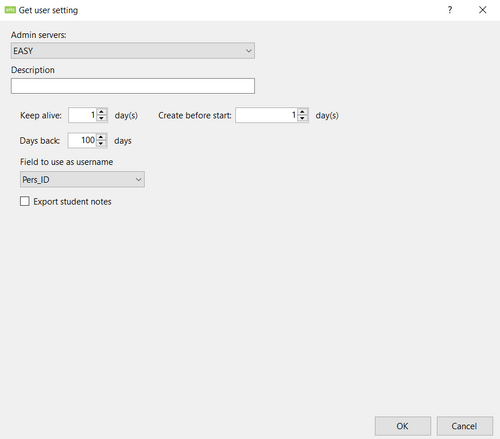
Once you have created the Admin Server setting you go to the template and select it. Here it will ask you to configure you Get User setting for the template.
The GetUser setting will allow you to set how many days the users 'Keep Alive' will be for the template. Keep alive is how many days the user will remain active past the resignation or general end date for the user.
It will also allow you to set how many days a user needs to be created before their start date, note this only works if there's data that states the user starts on a specific date.
Finally it will allow you to set how many days back the user will appear in different database tables after their end date has expired.
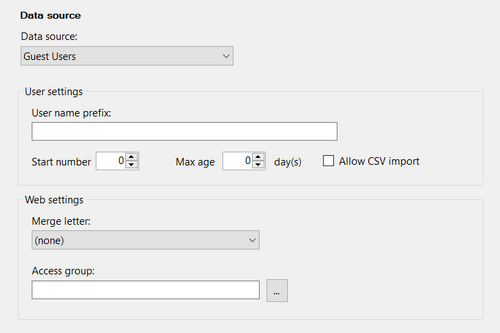
Guest Users
User settings
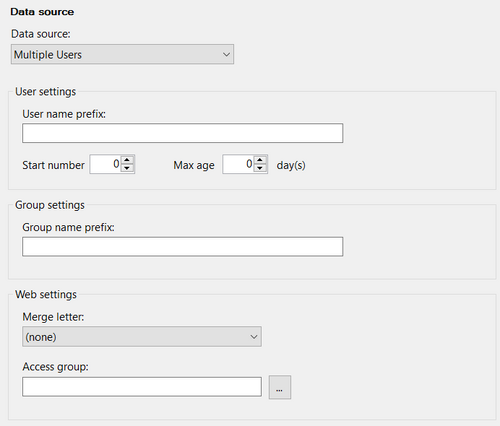
This sections controls how the users loginnames are generated. In this example, subsequent users are created as GUEST_16, GUEST_17, GUEST_18 and so on.
Max age indicates the max allowed duration for a guest user created by UMS to stay active.
Group settings
Enter a prefix for the groups created by multiple users module. Choose a prefix that will insure that groups created by multiple user module not will interfere with existing groups in Active directory.
Web settings
This sections controls which users can create multiple users on this template. Also its possible to indicate which mergelist template are default for users created with this template.
For more information visit the Guest Users specific wiki entry:
Lectio
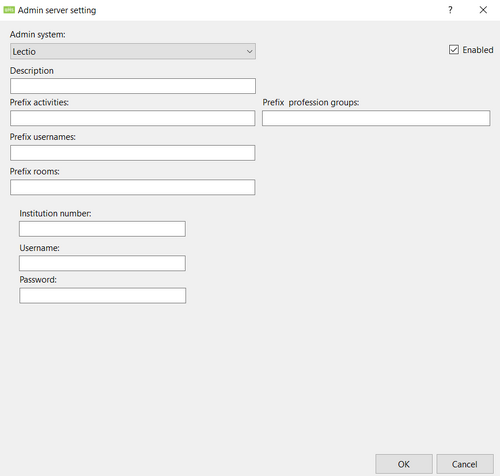
Lectio needs an Admin Server setting before you can configure it as a data source.
The Lectio Admin Server needs four things to work.
- A description, so you can differentiate between your Admin Server settings.
- An institution number.
- A username to a user in Lectio with permissions to view all users in the institution.
- A password to that user.
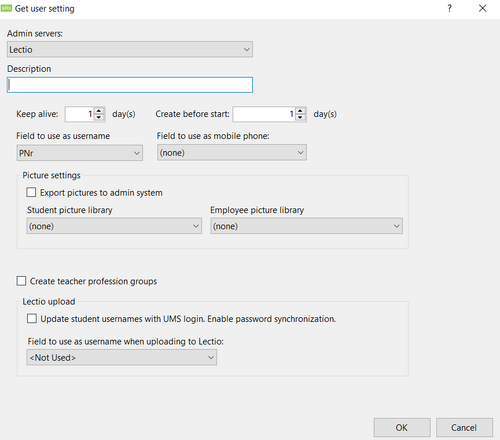
After picking the Admin Server setting you just made in the Data Source section of the Template Editor you will be asked to create a Get User setting for said Admin Server.
Keep Alive
The GetUser setting will allow you to set how many days the users 'Keep Alive' will be for the template. Keep alive is how many days the user will remain active past the resignation or general end date for the user.
Create Before Start
The GetUser setting will also allow you to set how many days a user needs to be created before their start date, note this only works if there's data that states the user starts on a specific date.
Field to use as username
This will allow you to choose what field in Lectio to use as a username. Note this will be disregarded if there's a Username Generator setting configured on the template.
Field to use as mobile phone
This will allow you to pick what field in Lectio to use for the mobile phone field in UMS. This will be the phone number used when utilizing several UMS features such as the Welcome module, Merge Letters, SMS Alarm and more.
Picture Settings
This will allow you to match photos to UMS Users when searching for them in UMS Web.
If the box "Export pictures to admin system" is ticked, then UMS will upload the pictures to Lectio and replace users profile pictures.
This requires a 'Picture Libary' setting where you configure where the pictures come from and how UMS matches the picture to a specific user. Read more about UMS Photo here: UMS Photo
Teacher profession groups
This will create teacher profession groups in the Teacher OU.
Lectio Upload
UMS will upload the username to Lectio and synchronize passwords if enabled. The dropdown menu let's you pick what field from the database you want to upload as the username.
Ludus
Ludus needs an Admin Server setting before you can configure it as a data source.
The Ludus Admin Server needs five things to work.
- A description, so you can differentiate between your Admin Server settings.
- Server IP.
- Which database to use.
- Username to an account with minimum read access to the database.
- Password to previously mentioned account.
Additionally you need a URL for the Ludus Web instance with username and password to an account with the right permissions in Ludus Web if you wish to use the Webservice connection.
Note that often it often requires a VPN to EG to be able to connect to their databases.
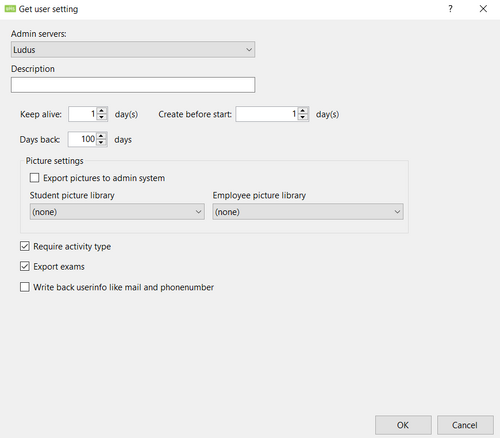
After picking the Admin Server setting you just made in the Data Source section of the Template Editor you will be asked to create a Get User setting for said Admin Server.
Keep Alive
The GetUser setting will allow you to set how many days the users 'Keep Alive' will be for the template. Keep alive is how many days the user will remain active past the resignation or general end date for the user.
Create Before Start
The GetUser setting will also allow you to set how many days a user needs to be created before their start date, note this only works if there's data that states the user starts on a specific date.
Days Back
The days back setting will allow you to set how many days back the user will appear in different database tables after their end date has expired.
Picture Settings
This will allow you to match photos to UMS Users when searching for them in UMS Web.
If the box "Export pictures to admin system" is ticked, then UMS will upload the pictures to Ludus.
This requires a 'Picture Libary' setting where you configure where the pictures come from and how UMS matches the picture to a specific user. Read more about UMS Photo here: UMS Photo
Require Activity Type
This setting will dictate whether users will be exported to UMS based on their activity type. If they have no Activity Type set, they won't get exported to UMS.
Export Exams
This setting will allow you to switch on or off exam exports.
Write Back UserInfo
This setting will allow users to set a new mail address or phone number which will be synchronized to Ludus.
Maze
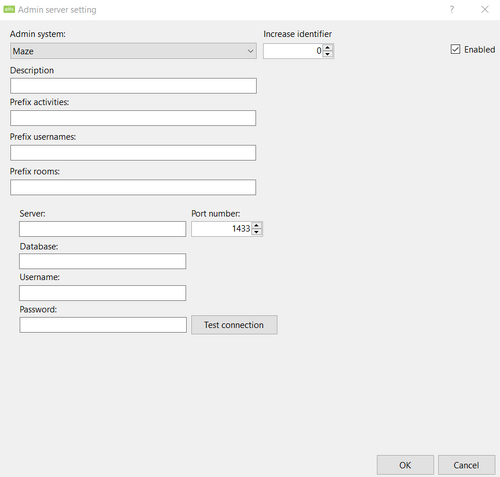
Maze needs an Admin Server setting before you can configure it as a data source.
The Maze Admin Server needs five things to work.
- A description, so you can differentiate between your Admin Server settings.
- Server IP.
- Which database to use.
- Username to an account with minimum read access to the database.
- Password to previously mentioned account.
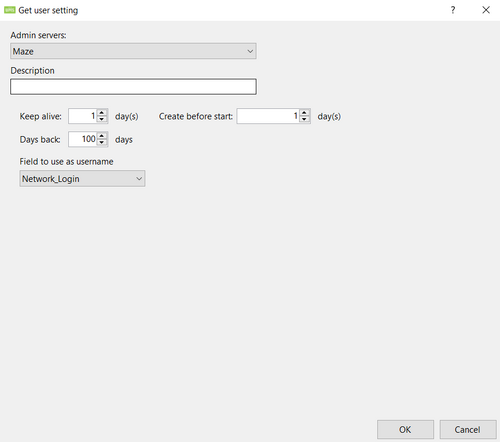
After picking the Admin Server setting you just made in the Data Source section of the Template Editor you will be asked to create a Get User setting for said Admin Server.
Keep Alive
The GetUser setting will allow you to set how many days the users 'Keep Alive' will be for the template. Keep alive is how many days the user will remain active past the resignation or general end date for the user.
Create Before Start
The GetUser setting will also allow you to set how many days a user needs to be created before their start date, note this only works if there's data that states the user starts on a specific date.
Days Back
The days back setting will allow you to set how many days back the user will appear in different database tables after their end date has expired.
Field to use as a username
Here you can choose in the dropdown menu what Maze database field to use for the username in UMS. Note that this will not take effect if you have a Username Generator setting applied on this template.
Multiple Users
User settings
This sections controls how the users LoginNames are generated.
Max age indicates the max allowed duration for a multiple user created by UMS.
Group settings
Enter a prefix for the groups created by multiple users module. Choose a prefix that will insure that groups created by multiple user module not will interfere with existing groups in Active directory.
Web settings
This sections controls which users can create multiple users on this template. Also its possible to indicate which MergeLetter template are default for users created with this template.
For more information about Multiple Users read: Multiple Users
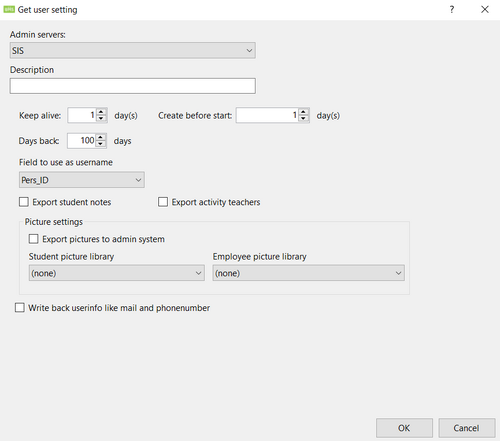
SIS
SIS needs an Admin Server setting before you can configure it as a data source.
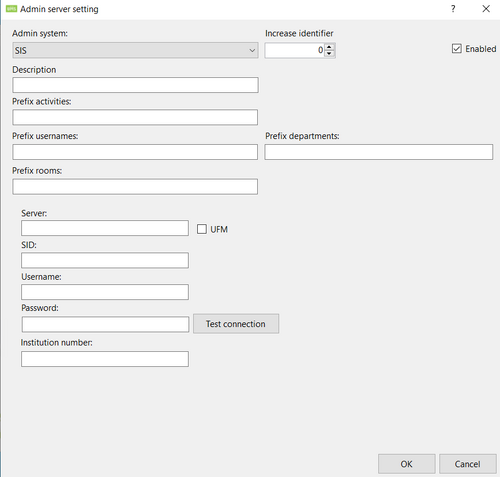
The SIS Admin Server needs six things to work.
- A description, so you can differentiate between your Admin Server settings.
- Server IP.
- SID
- Username to an account with minimum read access.
- Password to previously mentioned account.
- Institution number
After picking the Admin Server setting you just made in the Data Source section of the Template Editor you will be asked to create a Get User setting for said Admin Server.
Keep Alive
The GetUser setting will allow you to set how many days the users 'Keep Alive' will be for the template. Keep alive is how many days the user will remain active past the resignation or general end date for the user.
Create Before Start
The GetUser setting will also allow you to set how many days a user needs to be created before their start date, note this only works if there's data that states the user starts on a specific date.
Days Back
The days back setting will allow you to set how many days back the user will appear in different database tables after their end date has expired.
Field to use as a username
Here you can choose in the dropdown menu what SIS field to use for the username in UMS. Note that this will not take effect if you have a Username Generator setting applied on this template.
Export Student Notes
Exports student notes into UMS.
Export Activity Teachers
Exports activity teachers into UMS.
Picture Settings
This will allow you to match photos to UMS Users when searching for them in UMS Web.
If the box "Export pictures to admin system" is ticked, then UMS will upload the pictures to SIS.
This requires a 'Picture Libary' setting where you configure where the pictures come from and how UMS matches the picture to a specific user. Read more about UMS Photo here: UMS Photo
Write back userinfo like mail and phonenumber
This setting will allow users to set a new mail address or phone number which will be synchronized to SIS.
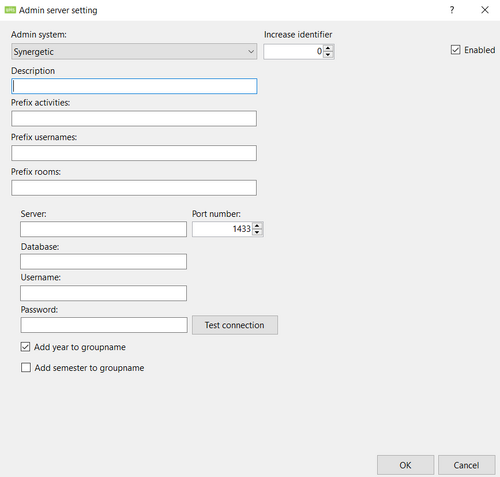
Synergetic
Synergetic needs an Admin Server setting before you can configure it as a data source.
The Synergetic Admin Server needs five things to work.
- A description, so you can differentiate between your Admin Server settings.
- Server IP.
- Which database to read from.
- Username to an account with minimum read access.
- Password to previously mentioned account.
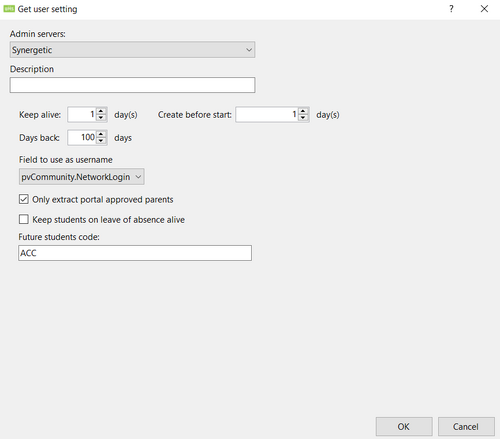
After picking the Admin Server setting you just made in the Data Source section of the Template Editor you will be asked to create a Get User setting for said Admin Server.
Keep Alive
The GetUser setting will allow you to set how many days the users 'Keep Alive' will be for the template. Keep alive is how many days the user will remain active past the resignation or general end date for the user.
Create Before Start
The GetUser setting will also allow you to set how many days a user needs to be created before their start date, note this only works if there's data that states the user starts on a specific date.
Days Back
The days back setting will allow you to set how many days back the user will appear in different database tables after their end date has expired.
Field to use as a username
Here you can choose in the dropdown menu what Synergetic field to use for the username in UMS. Note that this will not take effect if you have a Username Generator setting applied on this template.
Only extract portal approved parents
This let's you pick whether you want all parents or only portal approved parents imported from Synergetic.
Keep students on leave of absence alive
Normally if students don't have an active class, they will not get imported to UMS, similarly students who stop having active classes will begin the removal process. This setting will allow students to disregard that scenario, if they are on leave of absence.
Future students code
Enter the code that is used in Synergetic to mark new students as accepted.
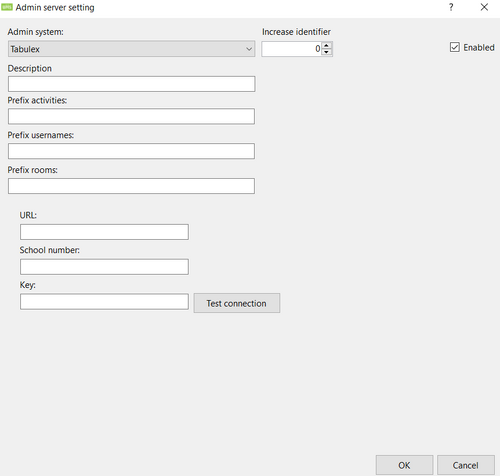
Tabulex / Tabulex Tea
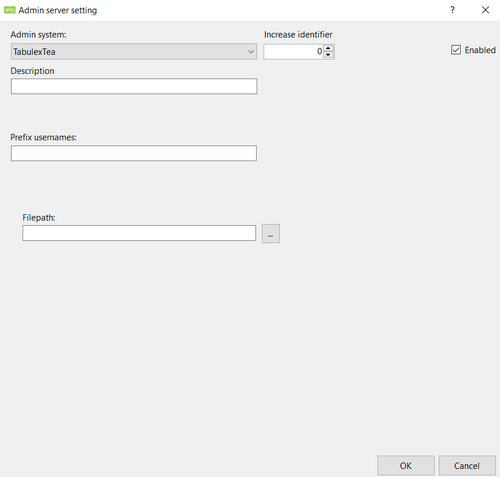
Tabulex and Tabulex Tea needs an Admin Server setting before you can configure it as a data source.
The Tabulex Admin Server needs four things to work.
- A description, so you can differentiate between your Admin Server settings.
- URL
- School Number
- Key
The Tabulex Tea Admin Server needs two things to work.
- A description, so you can differentiate between your Admin Server settings.
- A file path where the Tabulex Tea files are located
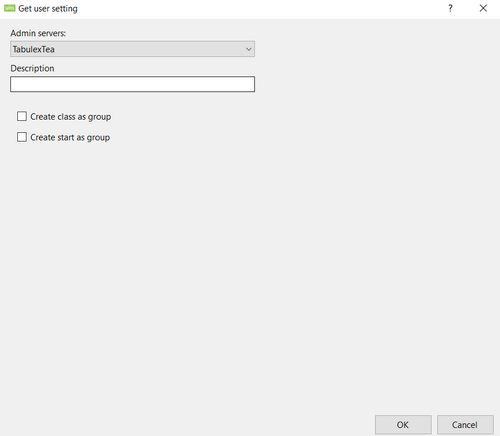
After picking the Admin Server setting you just made in the Data Source section of the Template Editor you will be asked to create a Get User setting for said Admin Server. Note that you can use Tabulex and Tabulex Tea with the same data source, but the Admin Server settings are not the same.
Add a description that you find fitting and choose whether you want to create 'class' and 'start' as groups.
UDDATA
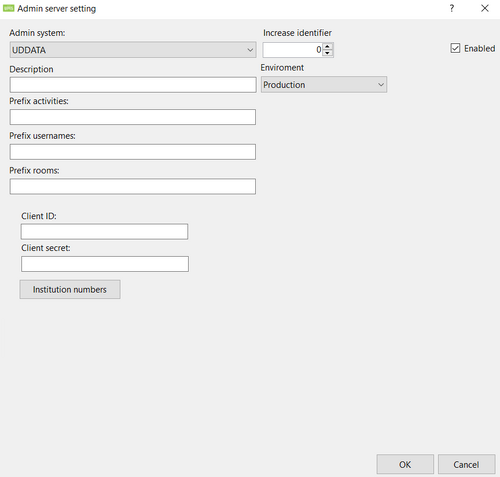
UDDATA needs an Admin Server setting before you can configure it as a data source.
The UDDATA Admin Server needs four things to work.
- A description, so you can differentiate between your Admin Server settings.
- Client ID.
- Client Secret.
- Institution number.
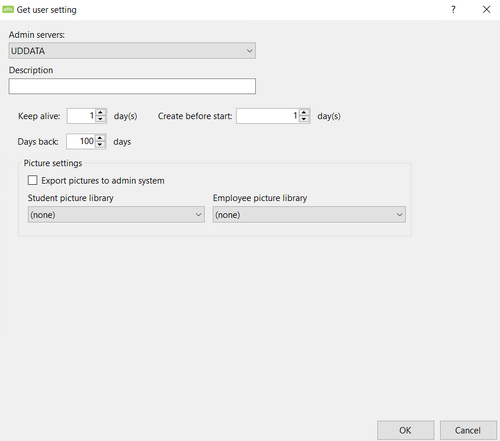
After picking the Admin Server setting you just made in the Data Source section of the Template Editor you will be asked to create a Get User setting for said Admin Server.
Keep Alive
The GetUser setting will allow you to set how many days the users 'Keep Alive' will be for the template. Keep alive is how many days the user will remain active past the resignation or general end date for the user.
Create Before Start
The GetUser setting will also allow you to set how many days a user needs to be created before their start date, note this only works if there's data that states the user starts on a specific date.
Days Back
The days back setting will allow you to set how many days back the user will appear in different database tables after their end date has expired.
Picture Settings
This will allow you to match photos to UMS Users when searching for them in UMS Web.
If the box "Export pictures to admin system" is ticked, then UMS will upload the pictures to SIS.
This requires a 'Picture Libary' setting where you configure where the pictures come from and how UMS matches the picture to a specific user. Read more about UMS Photo here: UMS Photo
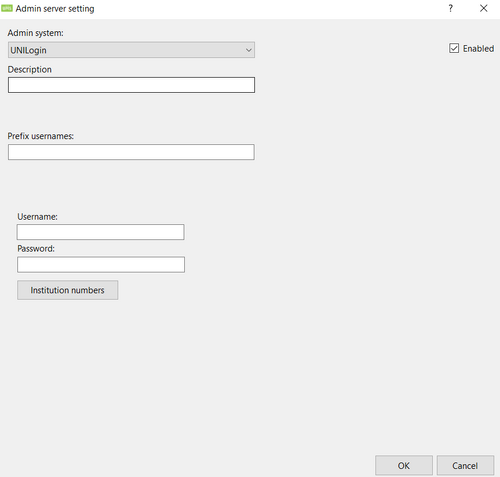
UniLogin
UniLogin needs an Admin Server setting before you can configure it as a data source.
The UniLogin Admin Server needs four things to work.
- A description, so you can differentiate between your Admin Server settings.
- Username to the ws10 user.
- Password.
- Institution number.
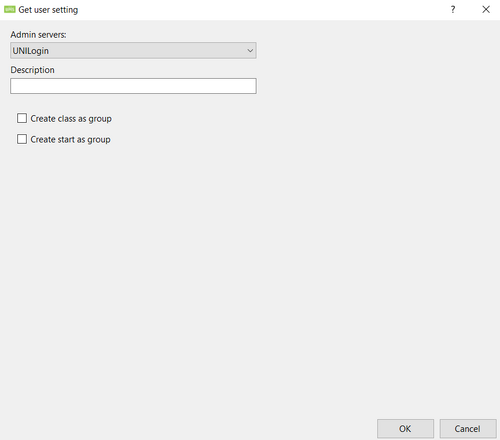
After picking the Admin Server setting you just made in the Data Source section of the Template Editor you will be asked to create a Get User setting for said Admin Server.
