App
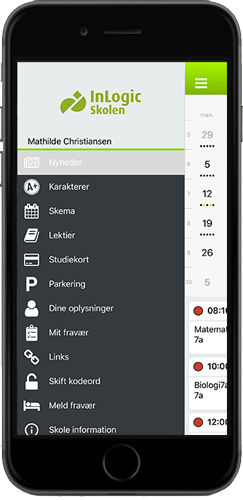
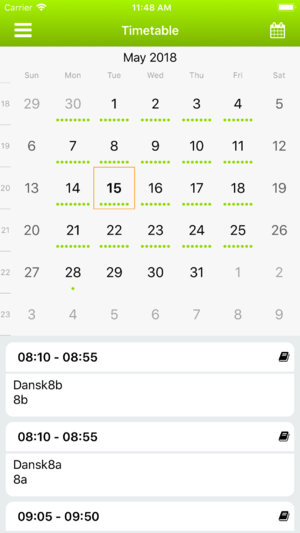
UMS School App is available for iPhone, Android. It will be designed with the school’s own logo, color and style. The app gives the basic functionality to see:
- News
- Timetable
- Homework
- Grades
- User information
Additional licenses gives the ability to create, edit and see more information from various modules. For an overview of module requirement see "Additional functionality"
Support
We target the following minimum versions when available:
- We support the same versions as Google provide security updates for. Find an overview here.
- We follow iOS appstore requirements for mininum version
Please note that it is possible to run older versions. If support for older versions is needed, we offer support at our hourly rate. Also some features may be locked behind certain versions, such as push notification support being locked behind android 11+
Prerequisites
Supported administrative systems
- Userinfo: Easy-A, SIS, LUDUS and Lectio (Only mobile number).
- Grades: Easy-A, Lectio and SIS
- Homework: Easy-A and SIS.
- Timetable: Easy-A and SIS
- Attendance registration: Timetable data is retrieved from Easy-A, SIS, LUDUS, Tabulex and Lectio. Howerver, absence is only registered to Easy-A
Module requirements
- UMS Web (contains and run all the webservice that is required for the app to receive information and communicate with the server)
Additional functionality
You get more functionality in the app by having the following modules, these are all optional:
- Attendance Registration: Gives “Your attendance”, which shows student statistics, the student are able to add absence reason and see their absence status in the timetable
- Attendance Registration for UMS School App: gives employee “attendance registration” and student the ability to "report absence"
- Homework: gives the employee the ability to create homework
- Link Collection: gives links/bookmarks the school can setup
- User info: gives “Your information” the ability to edit the information. This also adds the functionality for the user to upload a new profile image (a selfie) to be used in the student id card
- Student & Employee Id: Gives the students a “student id card” and the employees an “employee id card”. To update their student id card profile image you’ll need the “User info” module
- Parking: Parkzone & APCOA Integration. Gives the option to create and edit parking permits from Parkzone and APCOA
- User information (add/edit)
- SMSsend: Allows teachers to send messages to their students
- SMSAlert: Allows specifically chosen personnel to send out alerts to the school in case of emergencies.
- ExtendedMunicipalityAccess: Allows schools to show the current state of an enrolled student in regards to the municipality.
Note: All Attendance functionality requires Attendance Registration.
Testing after setup
The app will be tested internally at inLogic before release. The test requires access to a user with relevant data. You can either create a fictional student who is associated to a real course, or alternatively use a real student's account, if the person agrees that the account is being used for a system test of the school's APP.
What to have ready
- Important: The UMS site needs to use HTTPS and be public available. It needs a valid SSL certificate.
- App specific important: Icon(64x64), Logo(preferably png) and colors(primary and secondary) to be used in the app.
- Optional: Logo background if the dark/light theme background doesn't fit your logo.
Physical hardware requirements
Having a smartphone is a necessity, either an Android or iOS.
Should third party be contacted
If the school is using a dedicated hosting service, they have to be informed on how you wish the news feed should be setup.
Installation and setup
inLogic will publish and update the app.
Android and Windows Phone are published through inLogics account or your schools own account (if you have have a legacy app). To grant access to the app, inLogic needs the following information:
- UMS Web url address- This is the address that you use wen you access UMS Web. (If you are running any kind of gateway (TMG, UAG etc.) you will need to create rules for the services on UMS Web, contact us for more information)
- https://*****.dk/
My Education App
My Education App (Danish: My Education App) is the inLogic app that is hosted by inLogic, this lets your school get started using the app faster and cheaper, and also there is less maintenance for you.
What does this mean?
Pros:
- Lower start-up price.
- No need to set up an Apple Developer account.
- Upon contacting InLogic Support your app can be live within a few hours.
- You can change logo, images & colors after the app is deployed
Cons:
- The app will not be called your schools name on you phone and in AppStore/Google Play, but is instead called 'My Education App' (danish: My Education App), and its app icon cannot be customized.
- When students & teachers starts up the app for the first time, they will need to select their specific school before proceeding to login.
Setting up My Education App
Configurator -> Web setup -> App -> Setting
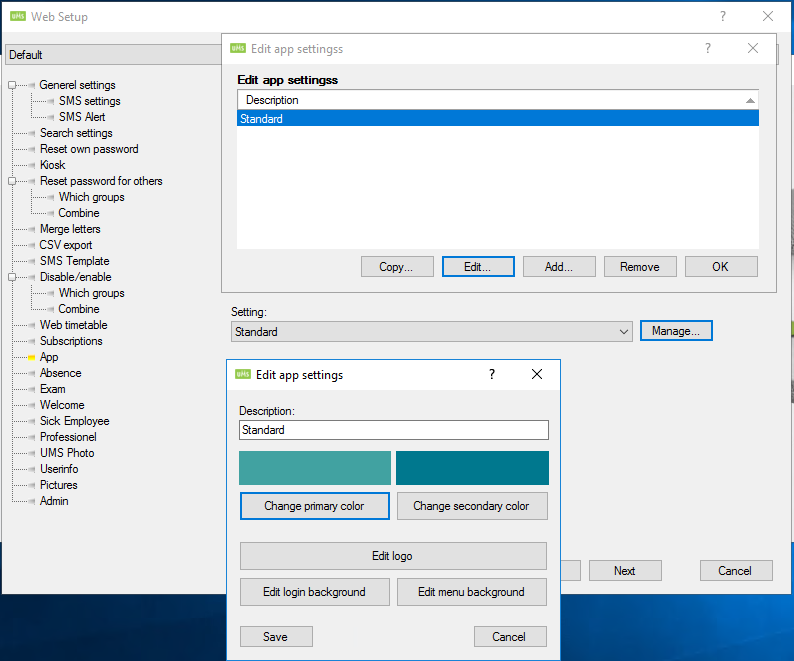
Here you need to configure a Primary and Secondary color, as well as a Logo. The Login background and Menu background images are optional. If you do use these we suggest using an image of a color, as the image is set to fill the entire background without considering aspect (meaning it will be squished if the aspect doesn't match the phone it is on).
The first time you set this up, you will need to contact InLogic support, and provide the following:
- A 64x64 pixels version of your logo (this logo is used in the the login dropdown, it will make it easier for users to find your school)
- UMS Web url (See Installation and Setup)
Styling
To style the app following is needed:
- Primary color
- Secondary color
- Logo (.png, vector file: .psd, .ai etc.)
- Aspect ratio shouldn't be much above a 2 to 1 difference as that can cause crashes on some phones.
- Icon for app logo (.png, vector file: .psd, .ai etc.)
The primary color will mostly be used as the default background color. The secondary color is the highlight color, and will be used when something is active or being activated like a button.
Optional:
- Background image for login (size 1080x1920)
- Aspect ratio shouldn't be much above a 2 to 1 difference as that can cause crashes on some phones.
- Background image for top bar of menu (size 1080x480)
- Aspect ratio shouldn't be much above a 2 to 1 difference as that can cause crashes on some phones.
Examples of styling
- Primary and secondary colors
- The schools logo - recommended max. 1024x576
- Aspect ration preferred to be max 2:1 so it isn't too wide or tall

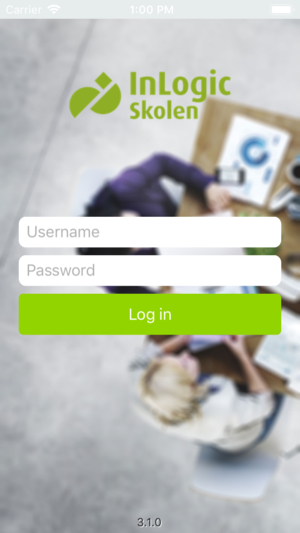
- Login background image - 1080x1920. If not supplied, a white background will be shown, with your logo on top
NOTE: The app will place your logo on top of the background image. This means when you supply a background image, it needs to be without logo on it.
- Menu top bar background image - 1080x480. If not supplied, a white background will be shown
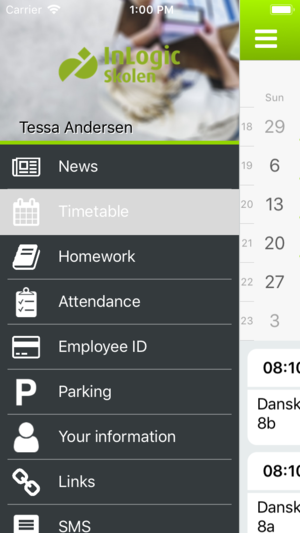
Technical settings
The following sections show how to configure the app. This information only applies to services that are directly connected to the app, i.e. how to set up schedule tasks in the app. The only exception is 'UMS RSS Feeds', which is a specific service for app. If a fully detailed setup guide is needed, please go to that specific module.
Some of the configurations are not set up specifically for app, i.e. ParkZone. If you cannot find the setup guide you are looking for, you can find it by searching or on the front page. Please note that some changes made in the configurator not only will affect the app but also UMS Web.
Important As many settings only loads once the website is initializing, most changes require an IIS reset on the server. The app retrieves settings from UMS once a day, which means that changes will be visible the next time you log in or the next day.
Menu Settings
You are able to set the order and which menu buttons should be shown per template for the users
- Open UMS Configurator
- Templates -> Edit -> select a template -> App
- Under Menu order select Manage -> Add
- Write a Description
- Drap and drop the menu you want
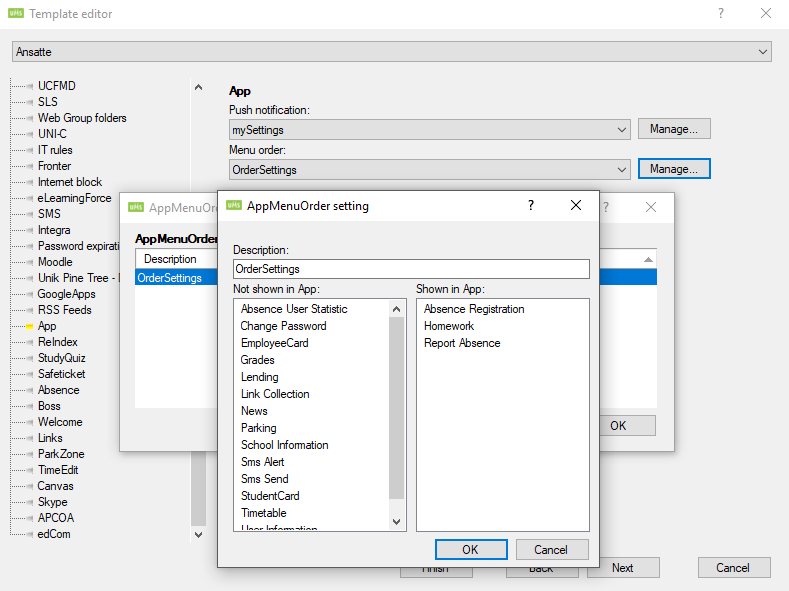
Here three menubuttons will be visible to the users on that specific template.
History
Before version 2.0.917, you used to choose the modules displayed in the app via the Configurator -> Web Setup.
We have moved the menu order into the Configurator -> Template Editor -> App -> Menu order.
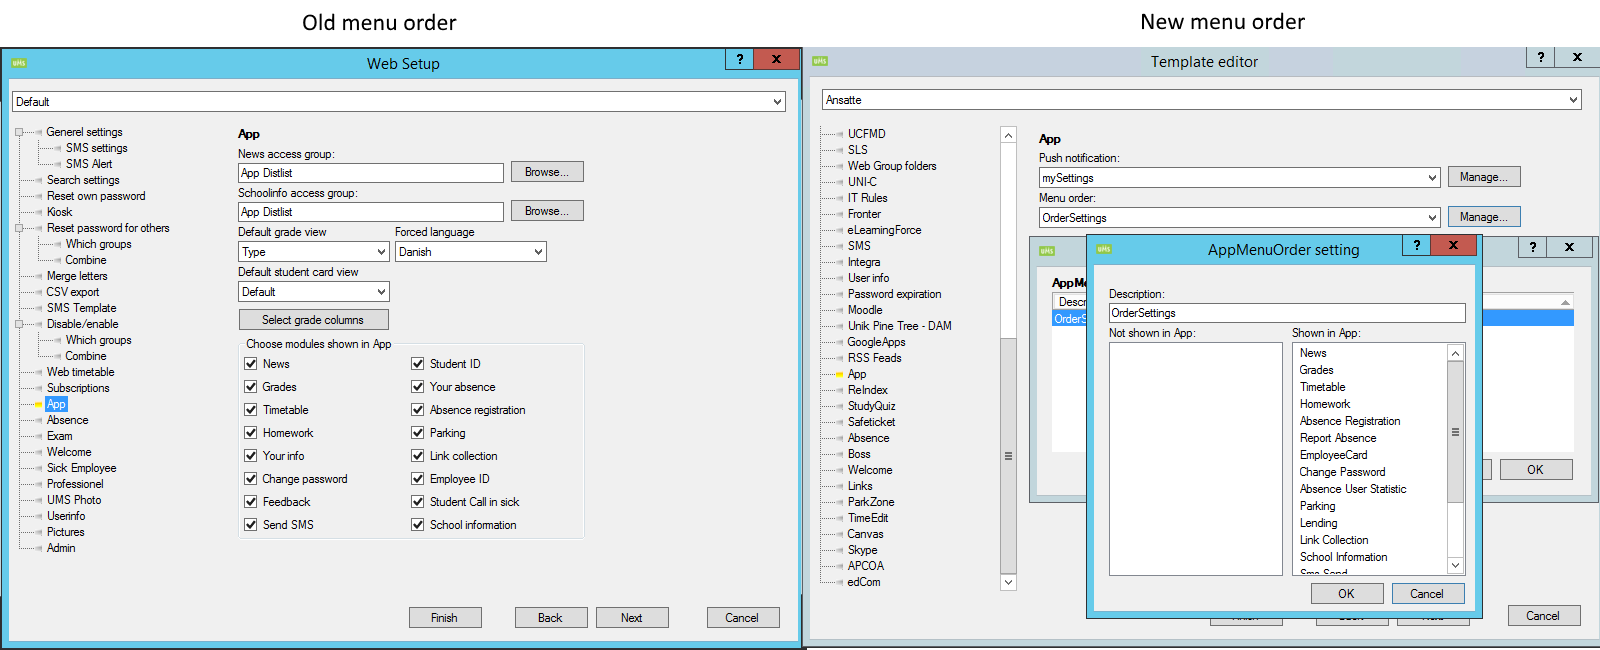
This change was made to allow a different menu items and orders on Templates.
Page requirements
All pages need to be in the app "Menu order" for the template to be able to show in the app, though some have various other requirements, such as licenses. Of course everything still requires setup in the configurator.
The following are the current requirements as of 28/01-2026:
- News
- Comes with the app, no further requirements.
- Grades
- Comes with the app, but only for "Student" usertypes.
- Timetable
- Comes with the app.
- Homework
- Comes with the app.
- AbsenceRegistration
- Requires the App_Absence license, that the user is an "Employee" and the user is in a group that is allowed to register absence.
- Studentcard
- Requires the "Studentcard" license and that the user is a "Student".
- EmployeeCard
- Requires the "Studentcard" license and that the user is a "Employee".
- Parking
- Requires one or more of the 3 parking licenses(ParkZone, APCOA or CityParking).
- UserInfo
- Comes with the app.
- AbsenceUserStatistic
- Requires the "Absence" license and the user to be a "Student"
- Links page
- Requires the "Links" license
- SMSSend
- Requires the "SMS_Web" license and the user to be an "Employee"
- SMSAlert
- Require the "SMSAlert" license, the "SMS_Web" license, the user must be an "Employee" and the user must have an assigned "SMSAlertLocation".
- ChangePassword
- Requires the "Reset_Password" licence.
- Report absence
- Requires the "Absence" license and the user to be a "Student"
- Lending
- Requires the "Boss" license.
- QrAttendance
- Requires the "QR_Attendance" license and the user to be a "Student"
- ExtendedMunicipalityAccess
- Requires the ExtendedMunicipalityAccess license and the user to be a "Student", as well as a frontend version newer than 22/6/2025
News
This describes how to setup news for the app.
- App News created from UMS Web
- Add a RSS feed
- Add Facebook feed
It is possible to use all three setups together. Combine as you like and set difference feed for difference templates.
Setup for App News from UMS Web
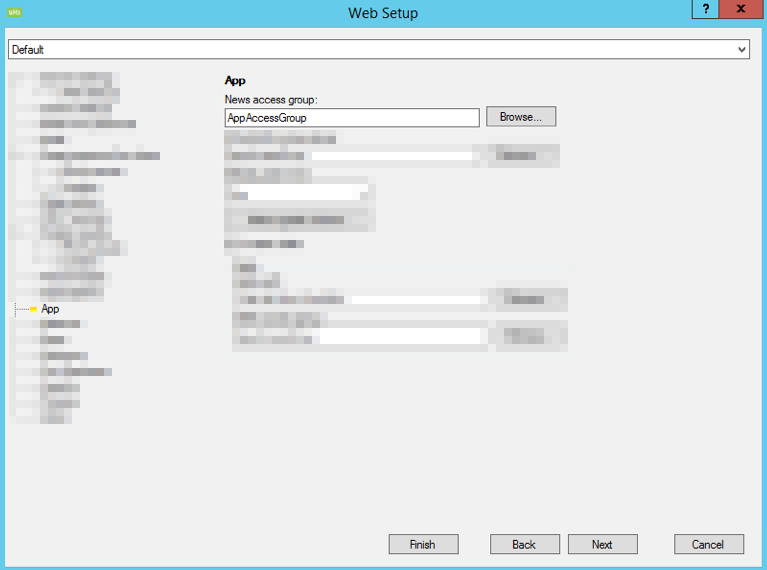
You need to create or use an existing AD group. This group will have access to create and modify news in App News on UMS Web.
- Open UMS Configurator
- Menu -> Web Setup -> Edit -> App
- Add the AD group for News Access group
Setup for RSS feed
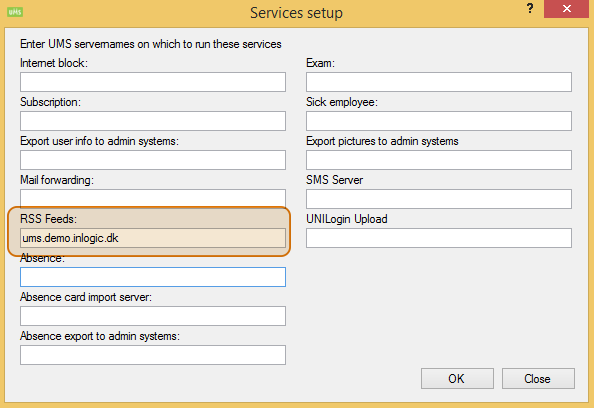
Add server name for the service for RSS feed in Menu -> Modules -> Settings -> RSS Feeds
To setup Rss feed you will need the url for the rss. (E.g. http://inlogic.dk/feed)
Menu -> Templates -> Edit -> select template -> Rss Feeds
Manage -> Add… -> Fill in description, feed url and access token
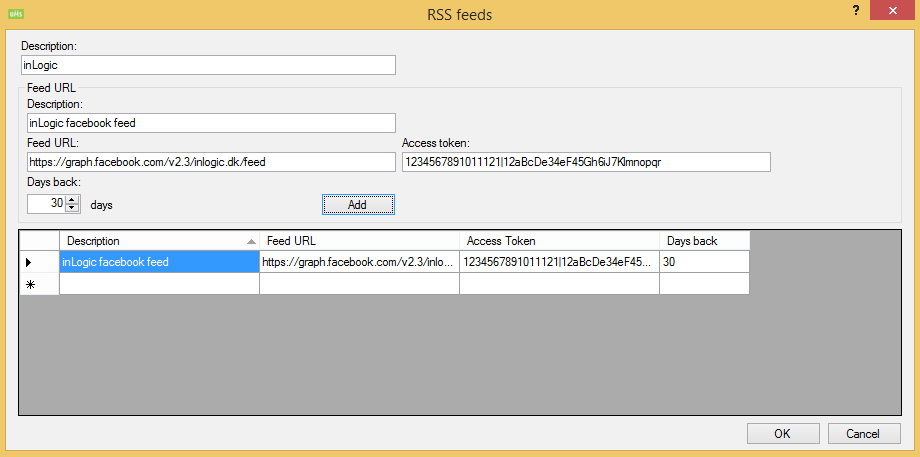
Note: You only need an access token if the feed is from Facebook
The RSS feed runs as a service called “UMS RSS Feeds”. Default running every 5 min.
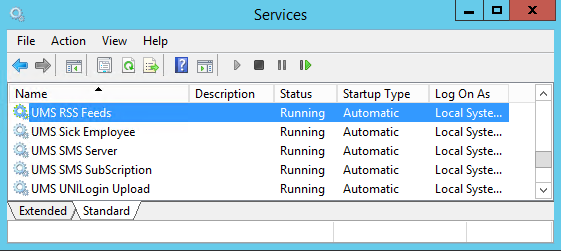
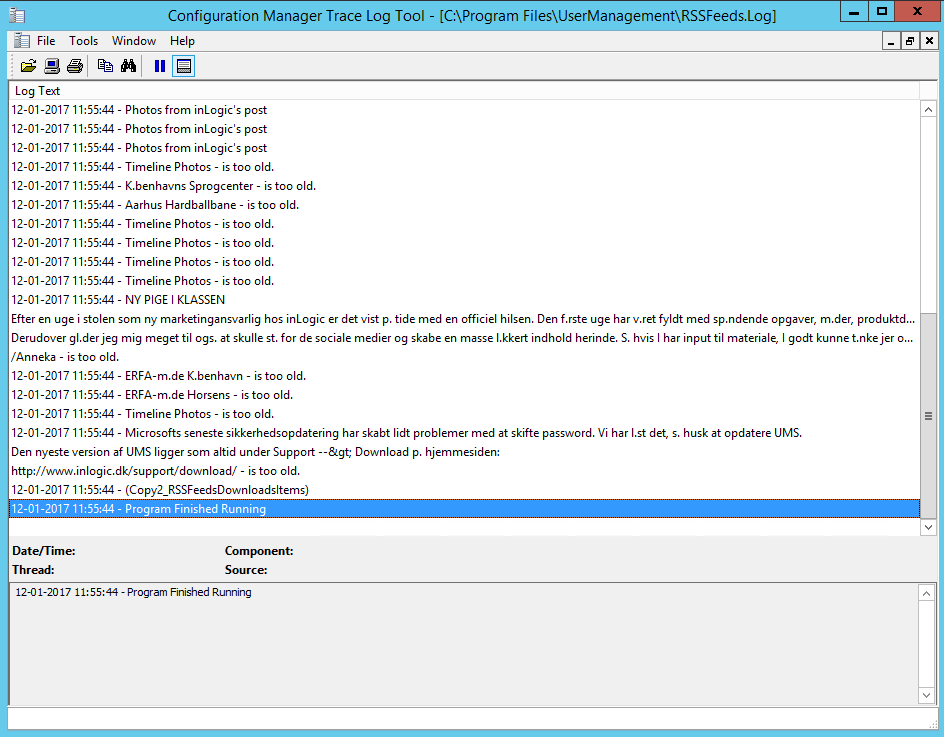
Restart the service to test it and check the output in /UserManagement/RSSFeeds.Log
Setup for Facebook news
If you want to use a Facebook page news feed, you need two things:
- Facebook Page Url Feed
- Access Token
Facebook Page Url Feed
To create the feed url
- Get your facebook page url
- Copy the name. E.g. “inlogic.dk”
- Note: this can also be a number “142642699097242”
- Replace “inlogic.dk” with your name in this url
- https://graph.facebook.com/v3.0/inlogic.dk/
Your facebook page url feed should look something like this:
- https://graph.facebook.com/v3.0/schoolname/
This is your feed URL.
Create a facebook access token
The personal Facebook account that you use to register as a developer does not need to be associated in any way with the page or group whose posts you want to display. You cannot log in to the Developer site using a Facebook Page or Business account. You must use the username and password from your personal Facebook profile. Facebook doesn’t allow businesses to register as developers, only individuals.
Please follow Facebook guide to enable yourself as developer on facebook.
When you have a facebook developer account and created an app go to Facebook Graph Explorer
- Select application
- Select “Get Token” and “Get App Token”
- Copy the Access Token

Now you have the access token you need to paste into the configurator.

Reload the service UMS Rss Feed in Services and look in the RSS Feed log to validate.
Grades
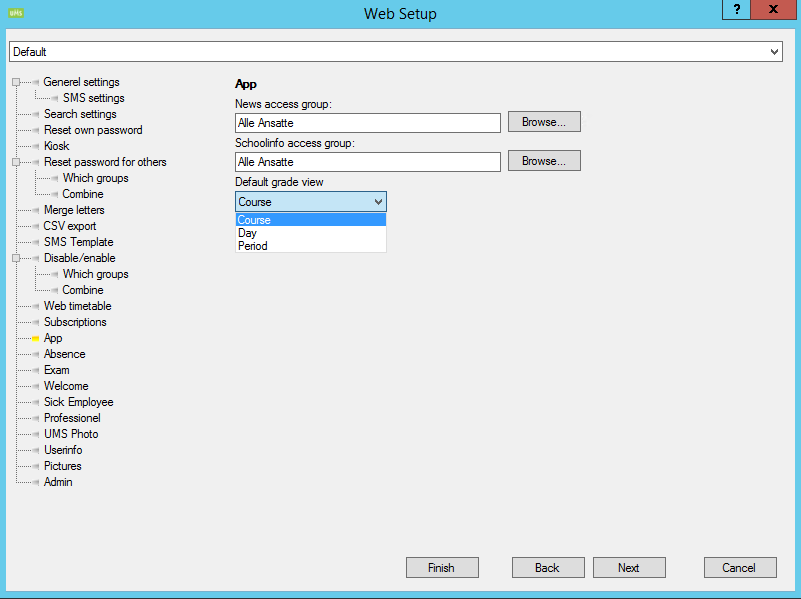
You can set the default view for grades, that filters the grades accordingly. The options are Course, Day and period.
Configurator -> Web Setup -> Edit -> App -> Default grade view
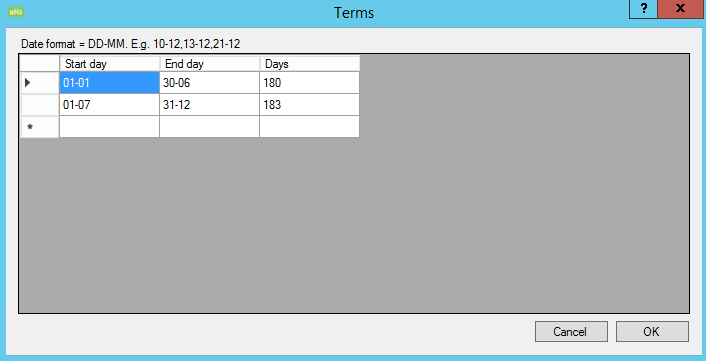
To specific the period you can set how your terms are set with start and end day for each period.
Configurator -> Modules -> Grades -> Select the Datasource -> Edit -> Terms
Depending on which administration system you’re exporting grades from the columns can vary. You can set which grades column should be used and in which order.
Configurator -> Web Setup -> Edit -> App -> Select grade columns
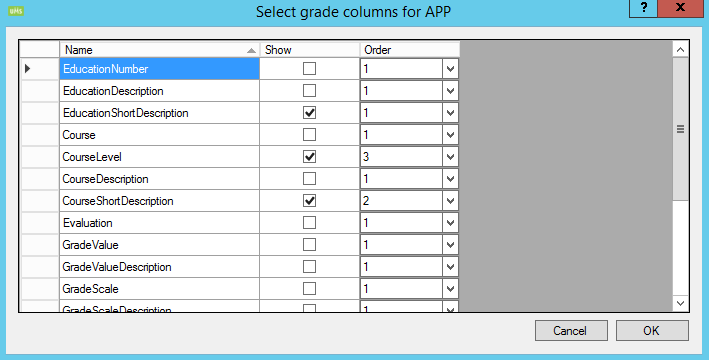
The grades view in the App will change accordingly to which columns chosen, a max of 4 columns will be shown in the App. The columns will be shown for each grade in order from 1 to 4.
If no grade columns settings is made the default columns will be selected in the following order:
- EducationDescription
- CourseDescription
- EvaluationFormDescription
- GradeValue
Your information
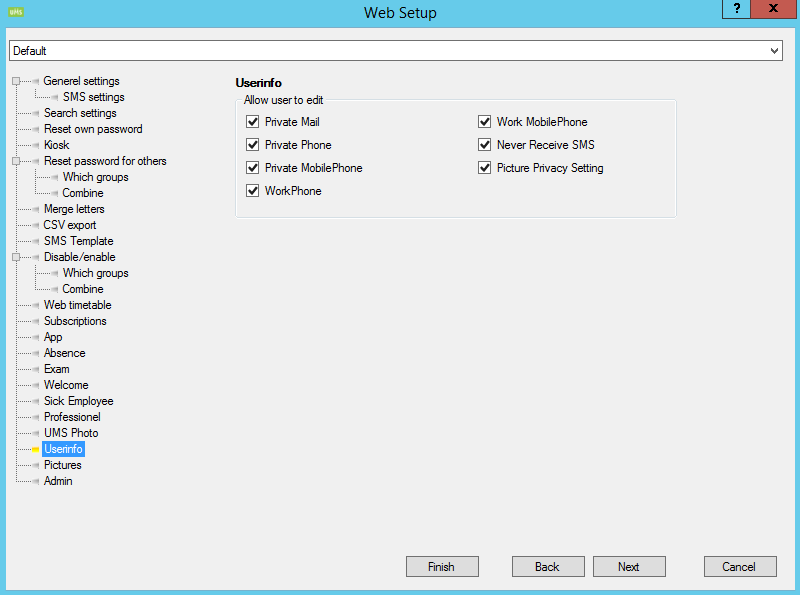
You can select which fields in user information that should be editable.
Configurator -> Web Setup -> Edit -> Userinfo
You need to set permission before the users are able to upload their own student photo (a selfie).
Configurator -> Web Setup -> Edit -> UMS Photo -> Enable Selfie in App
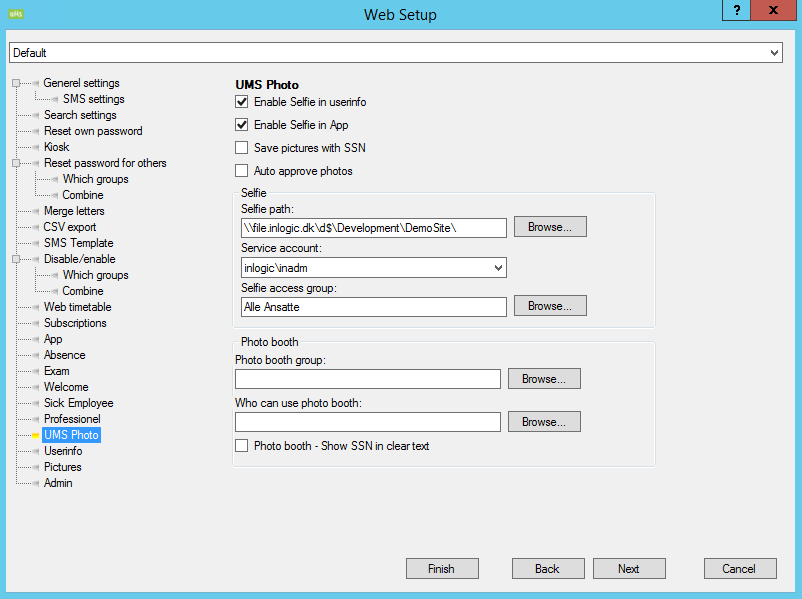
This will enable selfie function.
Student ID And Employee ID
This content has been moved to Student / Employee ID
My Absence
The students are able to write an absence reason on an already registered subject. This can be enabled in the template editor.
Select the template -> Absence -> Manage -> Create a new settings or select an existing one -> Add/Edit
Check "Allow students to register absence reason"
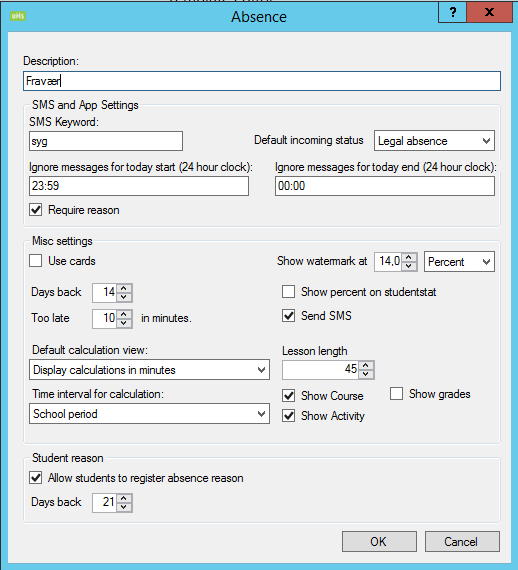
Allow students to register absence reason will allow the students to set an absence reason when a teacher has set the student as absent. The student can set an absence reason in "My absence".
Days back is the number of days back the students are allowed to set an absence reason.
Show Course will show the course view (this will effect both web and app).
Show Activity will show the activity view (this will effect both web and app).
Call in Sick
The page "Report absence" has 3 options
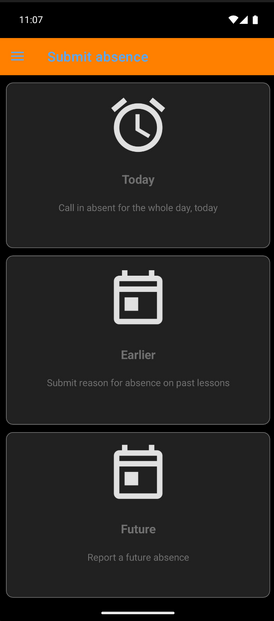
Today: Marks the rest of todays lessons as absent, with reason if the settings demand an absence reason.
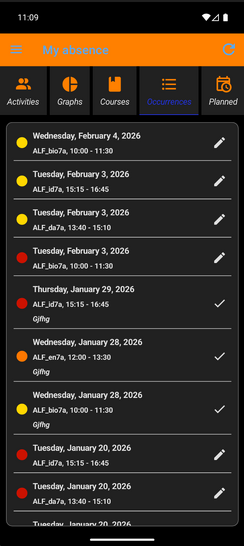
Earlier: Opens "My absence" tabbed page on the "Occurences" tab, where students can see their previous absence matching with the "Days back" setting. They can then add or edit their absence reason, up to the settings controlling how far back they are allowed to edit the reason.
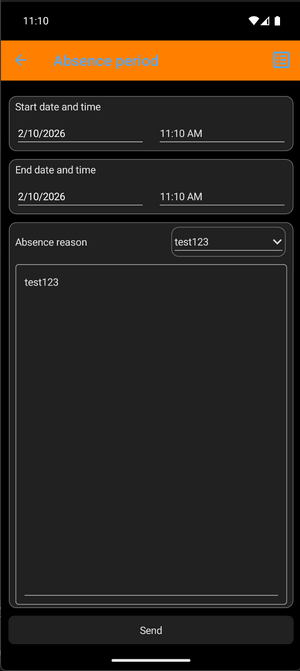
Future: Allows students to create a future absence period, which will take effect 15 minutes before the period is designated to start, which will apply to the timetables in the designated period(giving the student full absence or partial absence depending on whether it covers the entire timetable or not). The absence can be overwritten by teachers after it has taken effect, so they can adjust the absence for the student.
Students can also see a list of their existing future absence periods by clicking the list icon in the top right on the Future absence page.
Ground rules:
- Students can't create a future period that begins in the past or less than 10 minutes into the future.
- Students can't create a future absence period that has a start time later than its end time.
- Students can't have overlapping future absence periods.
Push Notification
Links
UMS Links can be used by both UMS Web and UMS App. Check the guide.
Homework
See UMS Homework
Parking
See Parking
Notify absence
See App settings for notify absence in attendance registration
Sms Alert
See SMS Alert
Privacy Policy
You can show custom Privacy policy in your apps Settingspage. Though the app store and google play will show InLogics privacy policy.
To add your own privary policy in the app go to Web Setup -> App
Insert into "Privacy Policy Url:"
If left empty privacy policy will not be shown in the app.
InLogic has a default privacy policy "https://inlogic.dk/datasikkerhed/privatlivspolitik/", you can refer to it, but we take no responsibility if you deviate from said policy.
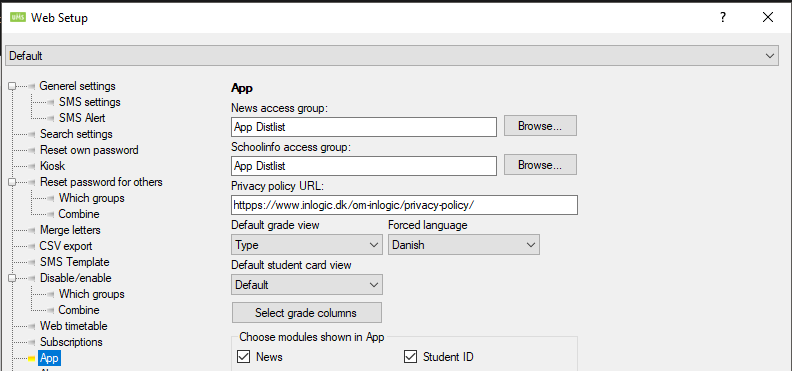
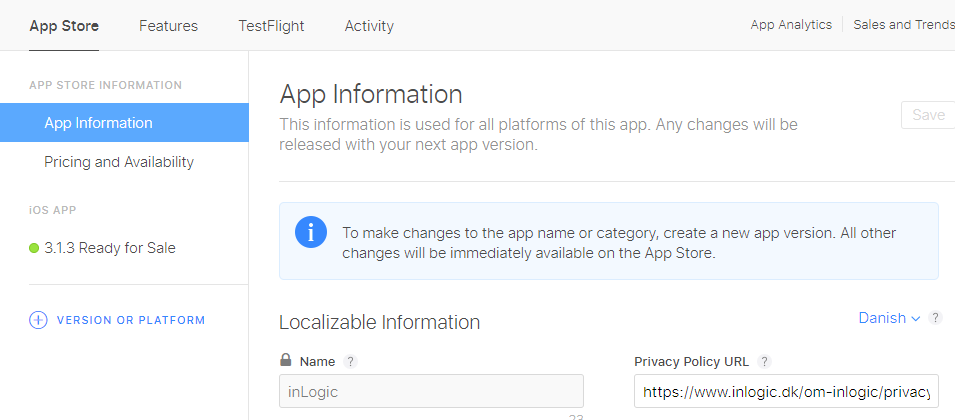
To add it to the App Store login
- https://appstoreconnect.apple.com/
- My Apps
- Select the app
- Select the top menu App Store
- Select App Information in the left menu
- Add your privacy policy url to "Privacy Policy URL"
Force language setting
Should you wish to, you have the option to force the language of the app to use a specific language, rather than the phones default language.
This is changed via the 'Forced language' feature in the Configurator.
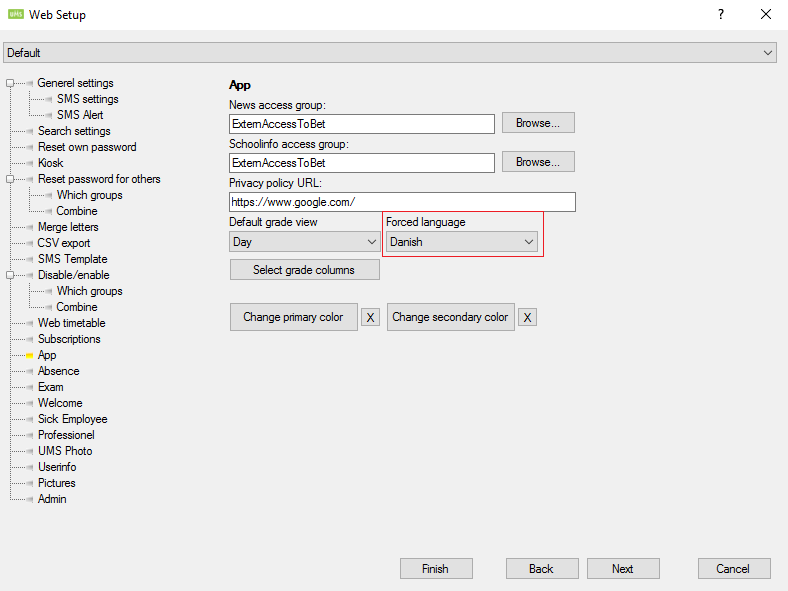
The list of languages will expand over time, as UMS adds support for new languages.
Custom localization resources
see Custom Terms and Localization
When changes take effect
Changes to settings are effectuated in the app and different times, depending on what kind of change it is. The vast amount of changes will be template changes and are more or less instant, though there are exceptions.
| Change Type | When change takes effect |
|---|---|
| Setup changes | IIS/Frontend Restart |
| Template changes | Instant (in app needs to reload the page it is on for that to update |
| Changes to links | Re-login |
FAQ
Certificates
We recommend Let's encrypt
The various devices each have their own lists of trusted root certificates, the most common we can find is ISRG Root X1 which is default used by Lets encrypt. Newer devices use both ISRG Root X1 and ISRG Root X2 certificates.
We make this recommendation as some customers have been noted to use other certificates that aren't trusted by a wide range of devices, some because the root-certificate is newer than the support-life of older devices.
Internet settings
If you use TDC the site may have issues with the internet filter. https://tdc.dk/kundeservice/mobil/internetfiltermobil/
Untrusted Certificate Error on Android
We do not recommend using Comodo certificates since they have been known to cause these issues.
Can't login on some Android devices? This could be due to an untrusted Comodo SSL Certificate. We were able to reproduced it on Android version 4.1, 4.4.2, 5.0.1 and 8.1.0, but it may be present on any number of versions.
You can test your SSL certificate on https://www.ssllabs.com/ssltest/analyze.html
Do the following on the server
- Delete the Comodo RSA Certification Authority issued by Comodo RSA Certification Authority with an expiration date of January 18, 2038.
- Enable automatic root certificate updates on the server
Please checkout the Comodo support site: https://support.comodo.com/index.php?/Knowledgebase/Article/View/1019/38/untrusted-certificate-error-on-android
For future conservation:
Certificate is not installed correctly; the certificate needs to be chained back to the Addtrust root certificate in order to be trusted on the Android.
The issue is that the Windows server is not presenting the complete certificate chain; clients which do not have the complete certificate chain will result in this error as encountered on the Android phone. In order to resolve this, on the server which this certificate is installed on, please open the MMC (Microsoft Management Console), and add the certificate snap-in for the computer account on the local computer.
In the Intermediate Certification Authorities folder, verify if the Comodo RSA Domain Validation Secure Server CA and Comodo RSA Certification Authority(issued to Comodo RSA Certification Authority, issued by AddTrustExternal CA Root) are installed in this certificate store.
In the Trusted Root Certification Authorities folder verify if the AddTrustExternal CA Root is installed. Also, if you see the Comodo RSA Certification Authority (issued to and issued by Comodo RSA Certification Authority with an expiration date of January 18, 2038) is present, if it is please delete this certificate.
If any of these certificates are missing the intermediate and root certificates were provided to you in the .zip file when the certificate was issued, or are available via this support article - https://support.comodo.com/index.php?/Default/Knowledgebase/Article/View/979/108/domain-validation-sha-2 .
If you had to delete the Comodo RSA Certification Authority from the Trusted Root Authorities folder, you will also need to disable automatic root certificate updates on the server - https://support.comodo.com/index.php?/Default/Knowledgebase/Article/View/769/17/turn-off-automatic-root-certificates-updates-server-2008
If you have performed these steps and the certificate chain has not updated on the server, to force IIS to update the certificate chain you will need to either change the certificate binding in IIS to another certificate, and then switch the certificate bindings to the correct certificate. Alternately, you will need to restart the server.
Conservation for https://support.comodo.com/index.php?/Default/Knowledgebase/Article/View/769/17/turn-off-automatic-root-certificates-updates-server-2008
To perform this procedure, you must be a member of the local Administrators group, or you must have been delegated the appropriate authority.
To turn off Automatic Root Certificates Update:
1. Click Start, and then click Run.
2. Type gpedit.msc, and then click OK.
3. If the User Account Control dialog box appears, confirm that the action it displays is what you want, and then click Continue.
4. Double-click Administrative Templates, double-click System, double-click Internet Communication Management, and then click Internet Communication settings.
5. Double-click Turn off Automatic Root Certificates Update, click Enabled, and then click OK.
6. Close the Local Group Policy Editor.
Note: You can use Group Policy to set policy settings that apply across a given site, domain, or organizational unit in Active Directory Domain Services.
Issues with the app
If you're facing issues with the app, please perform the following steps before contacting support:
- Check the AppStore/GooglePlay for app updates and install any present
- Shut down the app completely, and start it back up
- Restart the phone
- Clear cache if phone allows it to reset saved data/states.
- Uninstall the app, and redownload it from AppStore/GooglePlay
Known issues
A small incomplete list of known issues and potential workarounds that may resolve them, if you do not find your issue here please contact the inlogic support on helpdesk and we will investigate and fix it / explain the issue if it is setup related.
- Unable to startup app when it has previously been able to and was logged in
- 1 of the issues that causes this is the cached login token not working or the school website being down or a combo of these. To fix this you can reinstall the app.
- Other causes are being looked into.
- Android doesn't clear all data/settings when uninstalling/reinstalling
- We are trying to fix this issue with patch 3.7.1 by disabling the android cloud backup for the app.
- "Connection failure" error when selecting a school
- Usually caused by but not limited to certificate issues between the server and the phone.
- Includes vpn certificates and certificate chain access
- Crash on login screen after 2-3 seconds
- Fixed in 4.3.2 - caused by issue with size of school logo on available space.