UMS Web API
Introduction
UMS.Web.Api is a RESTful API developed by inLogic, designed to centralize data management for UMS installations.
This documentation provides operational guidelines for managing and utilizing the API effectively.
Key Features
- User Management: Create and manage API users, assign rights, and set up connections to UMS installations.
- Access Control: Define access rights for various endpoints (e.g., Students, Employees, Timetable blocks, Activities).
- Version Control: Support for multiple API versions to ensure compatibility and prevent integration issues.
- Logging: Comprehensive logging of all requests for monitoring and auditing purposes.
Description
UMS Web API opens up for exporting data from UMS system via API. Therefore it is not limited to a certain supplier.
You as customer can control data-source and access to the API, and the supplier can via the build-in swagger configurate their API connection.
Prerequisites and needed modules
Purchase requirements :
- UMS Web API module
Technical requirements :
- 1 x MS SQL database (additional to the existing UMS Database)
- 1 x IIS Web server (existing UMS Web server can be used to host API site) - module Websocket Protocol must be enabled on IIS for site to work
- 1 x SSL Certificate for the API Site (eg. umswebapi.yourdomain.dk)
- Internal and External DNS record to access site from Internet
Software requirements :
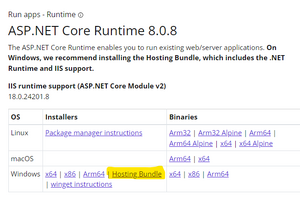
- ASP.Net Core Runtime Hosting Bundle - https://dotnet.microsoft.com/en-us/download/dotnet/9.0

Installation

Azure
- Deploy from External Git:
- Go to your newly created web app and select Deployment -> Deployment Center.
- Select External Git in the dropdown.
- Add this URL: https://inlogicdev.visualstudio.com/UMS.Web.Api.Public/_git/UMS.Web.Api.Public.
- Initial Setup:
- The first time the web app starts, it looks for an appsettings.json file.
- If the file is not found, an initial setup page will appear.
- Enter the required information.
- Database Configuration:


- Create the database and enter the information into the initial setup page.
- Save and restart the application. After restarting, you will see a login page.
On-Premise

- Initial Setup:
- Install IIS using the IIS_INSTALLSCRIPT.ps1.
- Set up DNS and certificates.
- Installation:
- Go to the downloads on our webpage and download UMS.Web.Api.zip.
- Install it into the selected IIS site.
- If the hosting bundle is not present on the server, it will be prompted during setup.
- Setup:
- The first time the web app starts, it looks for an appsettings.json file.
- If the file is not found, an initial setup page will appear.
- Enter the required information.
- Database Configuration:
- Create the database and enter the information into the initial setup page.
- Save and restart the application.
- After restarting, you will see a login page.
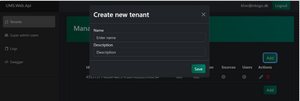
- Create a Tenant:
- Log in using the credentials entered during the initial setup.
- Create a new tenant by entering a name and description.
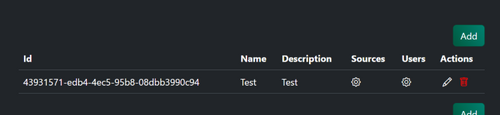
- Create a Connection to the UMS Database:
- After creating a tenant, click on the cogwheel under Sources.
- Click the Add button.
- Enter the information or the entire connection string and press Validate.
Create Webservice User
- Access the Management Interface:
- Navigate to the management interface in your browser.
- Create New User:
- Go to the Users section and click Create New User.
- Fill in the required details and assign appropriate rights.
- Save and Confirm:
- Save the new user and confirm the creation.
Configuration - Old
Go to UMS Web API URL in browser (e.g umswebapi.yourdomain.dk)
Create SuperAdmin user at 1. logon
Insert connection string to UMS Web API database (e.g Server=[myServerAddress];Database=[myDataBase];Username=[sql-username];Trusted_Connection=True/False;TrustServerCertificate=Yes;)
Troubleshooting
Common Issues:
- Database Connection Errors: Ensure the database server is running and the connection string in appsettings.json is correct.
- API Endpoint Errors: Verify that the user has the necessary rights for the endpoint being accessed.
Logs:
- Check the logs for detailed error messages and request histories.
Monitoring
API Usage:
- Regularly review the logs to monitor API usage and identify any unusual activity.
Performance Metrics:
- Track performance metrics such as response times and error rates to ensure the API is functioning optimally.