G Suite
UMS integrates to G Suite with the module G Suite Sync which:
- Creates users and their e-mail accounts
- Maintains users in G Suite, i.e. data changes are synchronised to UMS
- Synchronises passwords
- Deletes users who no longer attend the school
Integration to G Suite quickly becomes profitable. With UMS, the school saves resources by automating many manual tasks
- Avoid having to program scripts to synchronise the data
- Users are automatically created with data from your student administration system
- It reduces the workload for the IT-department
Prerequisites
Supported administrative systems
Module requirements
Additional functionality
Testing after setup
What to have ready
Is any physical item required
Should third party be contacted
Installation
Google Apps
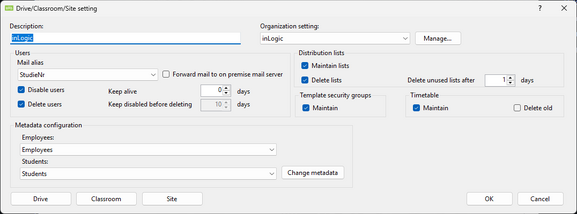
Organization settings
See description how to create/setup further down this page
Users
“Mail Alias”
Choose what to use as the users mail address (login).
“Disable users”
When marked the users will be disabled when they are no longer attending classes.
“Delete users”
Choose if users are to be deleted after grace period has ended.
“Forward mail to on premise mail server”
This will forward the users Office 365 mail to the primary mail address from AD (If user does not have a proxy address it will read it from the mail attribute)
“Keep inactive before deleting x days”
Specify a grace period where users are disabled.
Distribution lists
“Maintain lists”
Mark this to create distribution groups in Office 365. The groups will be created, updated and deleted if this is specified.
“Delete lists”
Mark this to delete distributions groups when they are no longer active in the administrative system. Check the data export manuals too when this happens
“Delete unused lists after x days”
Specify in days how long the distribution groups are to be kept alive in Office 365 before deletion.
“Only senders inside my organization”
With this marked only users in the domain will be able to send to distribution groups created by UMS.
Template security groups
“Maintain”
This will create the security group entered in the field “template security group” in the destination node in the template settings.
Timetable
“Maintain”
Mark this to create timetable blocks in Google Apps. They will be created, updated and deleted.
“Delete old”
Mark this to delete old timetable blocks from calendars.
Site
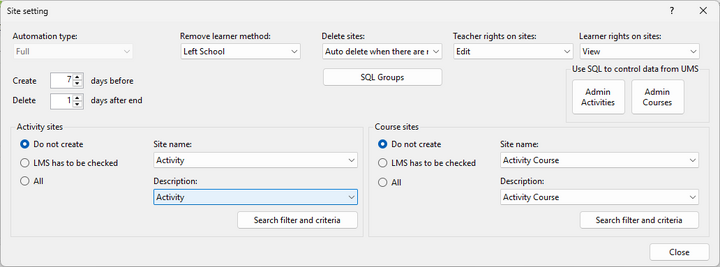
“Automation type”
Full: Means that site maintenance will be fully automated.
“Remove learner method”
“Deleted in AD”
Users will be removed from site when they are not active in UMS anymore
“Finished on activity/course”
Users will be removed when they have finished with the course.
“Delete sites”
“Auto delete”
Sites will be delete when the last student has left the site
“Manual Delete”
Sites will not be deleted by UMS. This has to be done by an administrator
“Send mail to teacher(s)”
Send mail notification to teachers when they are attached to a site.
“Create x days before”
Choose how many days before start that the sites are to be created.
“Delete x days after end”
Choose how many days after end that the sites are to be deleted.
“Teacher rights on sites”
Rights the teacher will have on the site when attached.
“Learner rights on sites”
Rights the student/learner will have on the site when attached.
SQL Groups
Members of these groups will be attached to all sites created with this setting as teachers

“Group name”
This can only be a group that is found in UMS
You get a list of these groups by running this SQL command:
Select Distinct Aktivitet As Activity From Students Order By Activity
“Activity Sites”
“Do not create”
It will not create any sites based on activities.
“LMS has to be checked”
The field Aktivitet_LMS in the students table has to be “True”. (Look in the documentation for the specific administrative system to see how this is set)
“Based on template filter”
Create sites based on a filter that is specified per template.
“All”
Create all sites.
Title
Title of the site. Changing this after a site has been created will cause it to be updated.
Description
Description of the site. Changing this after a site has been created will cause it to be updated.
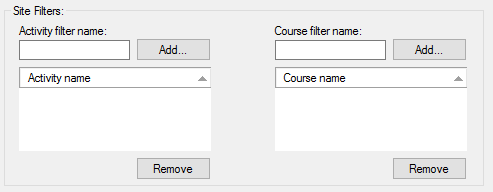
Search filter and criteria
This will enable you to concatenate sites that would have been created as to or more sites to be created as one site.
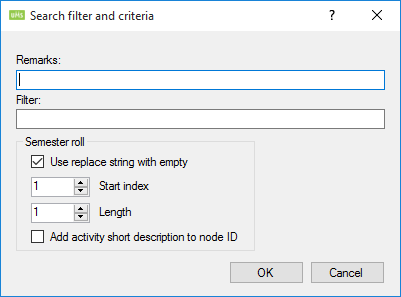
“Remarks”
This is just for description purposes.
“Filter”
The SQL like filter (regular expression). If an activity matches, it will be subject to the settings below in semester roll
“Semester roll”
“Use replace string with empty”
This will replace a section of the site with an empty string.
“Start index”
Determine where to start in string to remove.
“Length”
How many characters will be removed from the string.
“Add activity short description to node ID“
This will add the field Kort_Betegnelse (Short Description) from the students table to the node id.
Node id is the URL.
Examples
If you have three activities named English1, English2, English3 and you only want one SharePoint site.
Set the settings as shown below
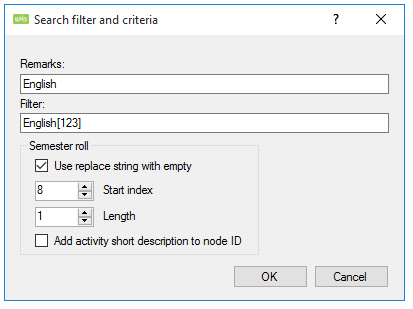
This filter ensures that it is only applied to activities that matches this SQL sentence.
“Course Sites”
Course URL’s will always be created as “activity_course”.
“Do not create”
It will not create any sites based on courses.
“LMS has to be checked”
The field Skolefag_LMS in the students table has to be “True”. (Look in the documentation for the specific administrative system to see how this is set)
“Based on template filter”
Create sites based on a filter that is specified per template.

“All”
Create all sites.
Title
Title of the site. Changing this after a site has been created will cause it to be updated.
Description
Description of the site. Changing this after a site has been created will cause it to be updated.
Search filter and criteria
This will enable you to concatenate sites that would have been created as two or more sites to be created as one site.
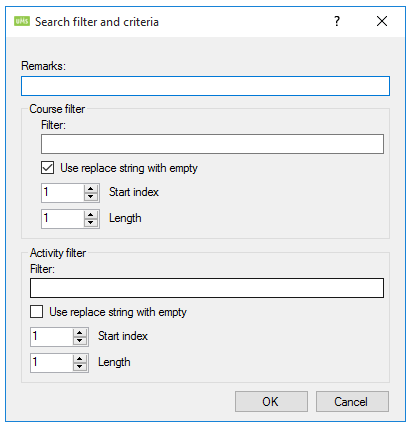
“Remarks”
This is just for description purposes.
“Course Filter”
The SQL like filter (regular expression). If an activity matches, it will be subject to the settings below in semester roll.
“Semester roll”
“Use replace string with empty”
This will replace a section of the site with an empty string.
“Start index”
Determine where to start in string to remove.
“Length”
How many characters will be removed from the string.
“Activity Filter”
The SQL like filter (regular expression). If an activity matches, it will be subject to the settings below in semester roll
“Semester roll”
“Use replace string with empty”
This will replace a section of the site with an empty string.
“Start index”
Determine where to start in string to remove.
“Length”
How many characters will be removed from the string.
Drive
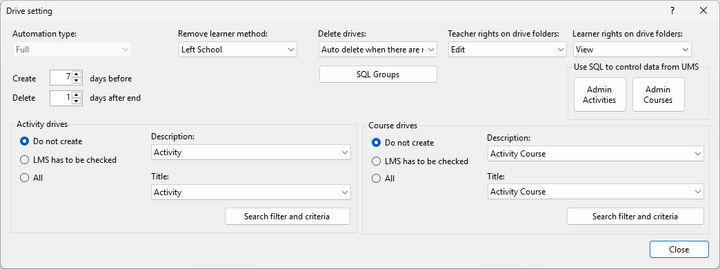
“Automation type”
Full: Means that drive maintenance will be fully automated.
“Remove learner method”
“Deleted in AD”
Users will be removed from drive when they are not active in UMS anymore
“Finished on activity/course”
Users will be removed when they have finished with the course.
“Delete drives”
“Auto delete”
Drives will be delete when the last student has left the drive
“Manual Delete”
Drives will not be deleted by UMS. This has to be done by an administrator
“Send mail to teacher(s)”
Send mail notification to teachers when they are attached to a drive.
“Create x days before”
Choose how many days before start that the drives are to be created.
“Delete x days after end”
Choose how many days after end that the drives are to be deleted.
“Teacher rights on drives”
Rights the teacher will have on the drive when attached.
“Learner rights on drives”
Rights the student/learner will have on the drive when attached.
“SQL Groups”
Members of these groups will be attached to all drives created with this setting as teachers

“Group name”
This can only be a group that is found in UMS
You get a list of these groups by running this SQL command:
Select Distinct Aktivitet As Activity From Students Order By Activity
“Activity Drives”
“Do not create”
It will not create any sites based on activities.
“LMS has to be checked”
The field Aktivitet_LMS in the students table has to be “True”. (Look in the documentation for the specific administrative system to see how this is set)
“Based on template filter”
Create sites based on a filter that is specified per template.

“All”
Create all drives.
Description
Description of the drive. Changing this after a drive has been created will cause it to be updated.
Search filter and criteria
This will enable you to concatenate drives that would have been created as to or more drives to be created as one drive.

“Remarks”
This is just for description purposes.
“Filter”
The SQL like filter (regular expression). If an activity matches, it will be subject to the settings below in semester roll
“Semester roll”
“Use replace string with empty”
This will replace a section of the drive with an empty string.
“Start index”
Determine where to start in string to remove.
“Length”
How many characters will be removed from the string.
“Add activity short description to node ID“
This will add the field Kort_Betegnelse (Short Description) from the students table to the node id.
Node id is the URL.
Examples
If you have three activities named English1, English2, English3 and you only want one SharePoint drive.
Set the settings as shown below

This filter ensures that it is only applied to activities that matches this SQL sentence.
“Course Drives”
Course URL’s will always be created as “activity_course”.
“Do not create”
It will not create any drives based on courses.
“LMS has to be checked”
The field Skolefag_LMS in the students table has to be “True”. (Look in the documentation for the specific administrative system to see how this is set)
“Based on template filter”
Create drives based on a filter that is specified per template.

“All”
Create all drives.
Description
Description of the drive. Changing this after a drive has been created will cause it to be updated.
Search filter and criteria
This will enable you to concatenate drives that would have been created as two or more drives to be created as one drive.

“Remarks”
This is just for description purposes.
“Course Filter”
The SQL like filter (regular expression). If an activity matches, it will be subject to the settings below in semester roll.
“Semester roll”
“Use replace string with empty”
This will replace a section of the drive with an empty string.
“Start index”
Determine where to start in string to remove.
“Length”
How many characters will be removed from the string.
“Activity Filter”
The SQL like filter (regular expression). If an activity matches, it will be subject to the settings below in semester roll
“Semester roll”
“Use replace string with empty”
This will replace a section of the drive with an empty string.
“Start index”
Determine where to start in string to remove.
“Length”
How many characters will be removed from the string.
=== Classroom ===
There can only be a maximum of 990 classrooms in total in one organization.
Google designed features (Not UMS)
If a teacher leaves the school, the material that he has put into classrooms will be deleted as well.
If a user has too many classrooms it will be very slow for this user.
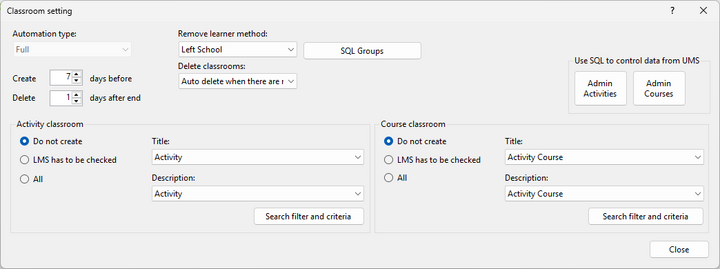
“Automation type”
Full: Means that classroom maintenance will be fully automated.
“Remove learner method”
“Deleted in AD”
Users will be removed from classroom when they are not active in UMS anymore
“Finished on activity/course”
Users will be removed when they have finished with the course.
“Delete classrooms”
“Auto delete”
Classrooms will be delete when the last student has left the classroom
“Manual Delete”
Classrooms will not be deleted by UMS. This has to be done by an administrator
“Send mail to teacher(s)”
Send mail notification to teachers when they are attached to a classroom.
“Create x days before”
Choose how many days before start that the classroom s are to be created.
“Delete x days after end”
Choose how many days after end that the classroom s are to be deleted.
“SQL Groups”
Members of these groups will be attached to all classrooms created with this setting as teachers

“Group name”
This can only be a group that is found in UMS
You get a list of these groups by running this SQL command:
Select Distinct Aktivitet As Activity From Students Order By Activity
“Activity Classroomss”
“Do not create”
It will not create any sites based on activities.
“LMS has to be checked”
The field Aktivitet_LMS in the students table has to be “True”. (Look in the documentation for the specific administrative system to see how this is set)
“Based on template filter”
Create sites based on a filter that is specified per template.

“All”
Create all classrooms.
Description
Description of the classroom. Changing this after a classroom has been created will cause it to be updated.
Search filter and criteria
This will enable you to concatenate classrooms that would have been created as to or more classrooms to be created as one classroom.

“Remarks”
This is just for description purposes.
“Filter”
The SQL like filter (regular expression). If an activity matches, it will be subject to the settings below in semester roll
“Semester roll”
“Use replace string with empty”
This will replace a section of the classroom with an empty string.
“Start index”
Determine where to start in string to remove.
“Length”
How many characters will be removed from the string.
“Add activity short description to node ID“
This will add the field Kort_Betegnelse (Short Description) from the students table to the node id.
Node id is the URL.
Examples
If you have three activities named English1, English2, English3 and you only want one SharePoint classroom.
Set the settings as shown below

This filter ensures that it is only applied to activities that matches this SQL sentence.
“Course Classrooms”
Course URL’s will always be created as “activity course”.
“Do not create”
It will not create any classrooms based on courses.
“LMS has to be checked”
The field Skolefag_LMS in the students table has to be “True”. (Look in the documentation for the specific administrative system to see how this is set)
“Based on template filter”
Create classrooms based on a filter that is specified per template.

“All”
Create all classrooms.
Description
Description of the classroom. Changing this after a classroom has been created will cause it to be updated.
Search filter and criteria
This will enable you to concatenate classrooms that would have been created as two or more classrooms to be created as one classroom.

“Remarks”
This is just for description purposes.
“Course Filter”
The SQL like filter (regular expression). If an activity matches, it will be subject to the settings below in semester roll.
“Semester roll”
“Use replace string with empty”
This will replace a section of the classroom with an empty string.
“Start index”
Determine where to start in string to remove.
“Length”
How many characters will be removed from the string.
“Activity Filter”
The SQL like filter (regular expression). If an activity matches, it will be subject to the settings below in semester roll
“Semester roll”
“Use replace string with empty”
This will replace a section of the classroom with an empty string.
“Start index”
Determine where to start in string to remove.
“Length”
How many characters will be removed from the string.
=== Organization Settings ===
When creating Google API refer to this lInk
http://wiki.inlogic.dk/index.php/Google_app_API
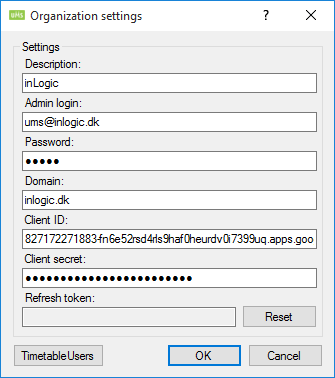
“Description”
Add a description to be able to identify the account.
“Admin login”
Mail address of an administrative user
“Password”
Password for the admin login specified
“Domain”
The google domain that is used.
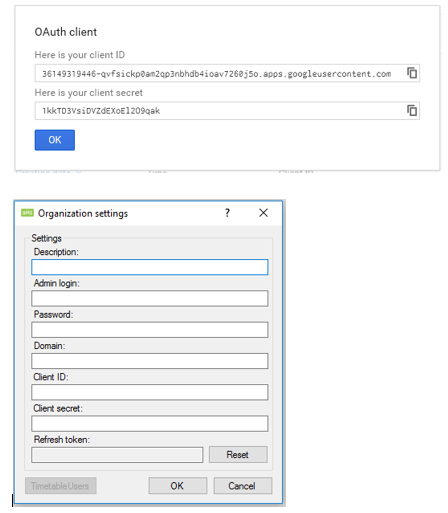
“Client ID”, “Client Secret”
This is obtained when following the instructions in the PDF document
“Refresh token”
This will be generated the first time google synchronization is started. If this is reset UMS will asked for it again when the next synchronization is run.
“Timetable Users”
This can be used when creating timetable blocks. Look in timetable documentation for this feature.
Template Settings
This is where you specify which templates are synchronized with Google and how.
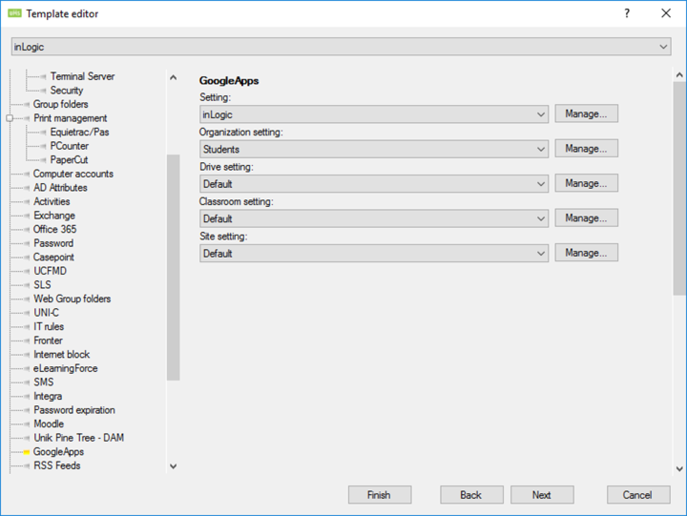
“Setting”
This is the setting described above
“Organization setting”
Specify where the users are created
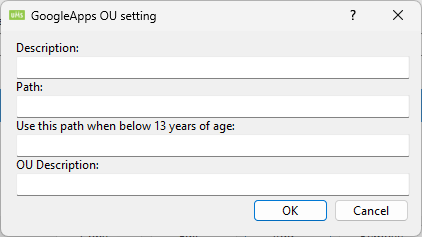
Path
This is where all users is placed
Use this path when below 13 years of age
This is where users that are under 13 years is placed. If this is not specified everyone will be placed under the path setting. (This is helpful when it comes to Google+)
OU Description
The description that is set on the OU when it is created.
Site settings
Settings used when creating sites from this template
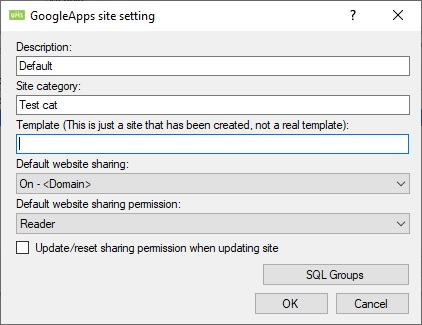
Site category
A list of categories added to the site when creating it separated with a ;
A category called UMS will be added aswell. (This cannot be change)
“SQL Groups”
Members of these groups will be attached to all sites created with this setting as teachers

“Group name”
This can only be a group that is found in UMS
You get a list of these groups by running this SQL command:
Select Distinct Aktivitet As Activity From Students Order By Activity
Drive settings
Settings used when creating drives from this template
“Path”
The path where the drives are created
Create user specific subfolder
Create a folder for each student that is attached to each drive
Suffix
A text string that is appended to the folder name
Create subfolder (Teacher Read/Write - Student Read)
A folder where teachers can upload data that students can only read
Suffix
A text string that is appended to the folder name
Create subfolder (Teacher Read/Write - Student Read/Write)
A folder where teachers and students can share data both with read/write
Suffix
A text string that is appended to the folder name
Example

“SQL Groups”
Members of these groups will be attached to all sites created with this setting as teachers

“Group name”
This can only be a group that is found in UMS
You get a list of these groups by running this SQL command:
Select Distinct Aktivitet As Activity From Students Order By Activity
Classroom settings
Settings used when creating classrooms from this template

“SQL Groups”
Members of these groups will be attached to all sites created with this setting as teachers

“Group name”
This can only be a group that is found in UMS
You get a list of these groups by running this SQL command:
Select Distinct Aktivitet As Activity From Students Order By Activity
Installation G Suite Sync
Steps to make UMS sync work with G Suite.
Log on https://console.developers.google.com with your Google Admin account.
Create a project

When created choose project and click the newly created project.
Choose “Enable and manage APIs”. Enable these APIs
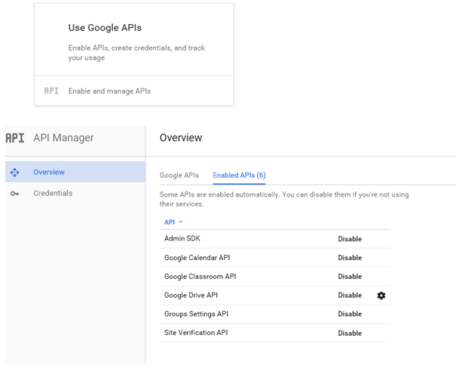
Click credentials
And choose “OAuth client ID”
Choose settings as show on below image. Name can be changed.
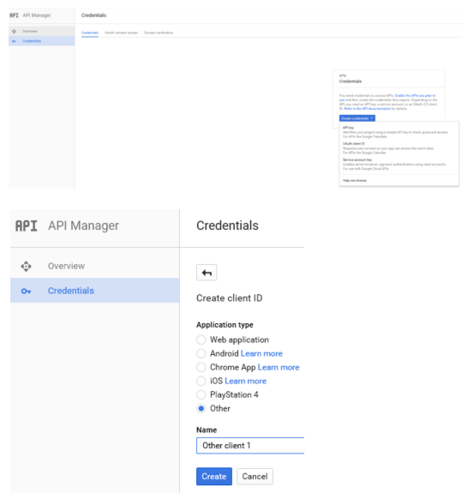
Then choose “Create”
Which creates an OAuth 2.0 client ID
Enter Client ID and Client Secret into UMS
Go back to “Overview” and choose “Enabled APIs”
Click on each API you added and choose Quota
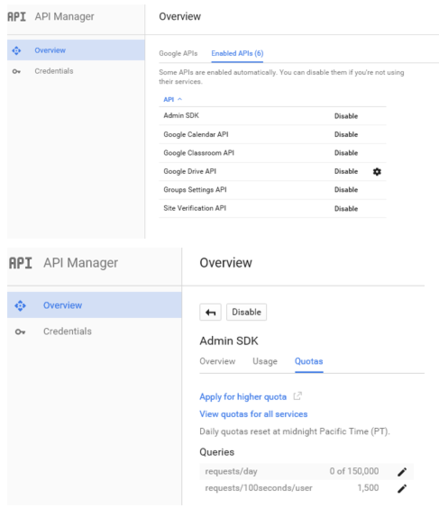
Set the number as high as you can without “apply for higher quota”
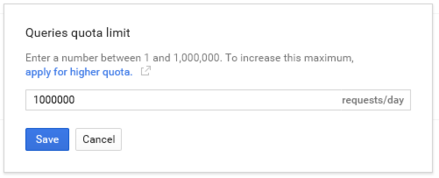
And you are done with this site.
Now Log on https://admin.google.com with your Google Admin account
Find “Other Google Services” - can be located under “More Controls” or under APPS aplaced at page bottom.
Click “add services” upper right corner
Then click “Add it now” on “Groups for Business”
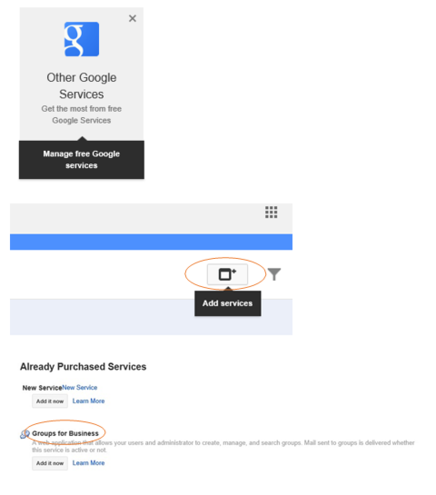
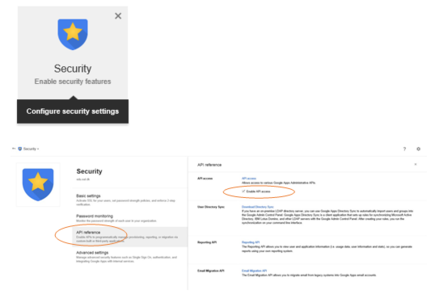
Back to start and choose “Security”
Choose “API reference” and check “Enable API access”
Go to the UMS “usermanagement folder” and run “GoogleApps_Sync.exe” manually.
Login to Google using credentials from Google Organization settings.
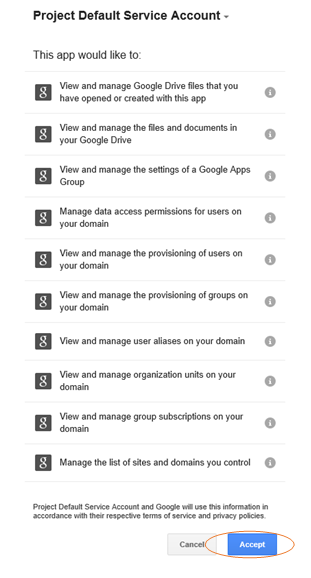
When logged in succesfully, “Accept” the following
If you get a “This page can’t be displayed”
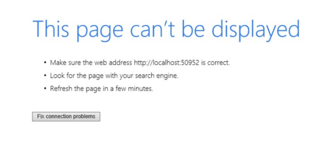
Do not be alarmed. The job has been activated and you can check your GoogleApps_Sync.log to confirm that the job has completed running.
Parameters
> GoogleApps_Sync.exe [<optional> Action]
Eg.
> GoogleApps_Sync.exe
> GoogleApps_Sync.exe UsersOnly
| Parameter | Description |
|---|---|
| UsersOnly | Runs all the parameters in this table |
| UpdateUsers | Update users |
| DisableUsers | Disable users |
| EnableUsers | Enable users |
| DeleteUsers | Delete users |
| CreateUsers | Create users |
| UpdateImmutableID | Update Immutable ID on users |
| UpdateOffice365SettingsIDForUsers | Update Office 365 settings for users if they have changed template |
| UpdateUsersObjectID | Get the object ID from office 365 and save it in UMS DB |
| Parameter | Description |
|---|---|
| GroupsOnly | Runs all the parameters in this table |
| UpdateUsers | Update users |
| DisableUsers | Disable users |
| EnableUsers | Enable users |
| DeleteUsers | Delete users |
| CreateUsers | Create users |
| UpdateImmutableID | Update Immutable ID on users |
| UpdateOffice365SettingsIDForUsers | Update Office 365 settings for users if they have changed template |
| UpdateUsersObjectID | Get the object ID from office 365 and save it in UMS DB |
Technical settings
FAQ
Why do I not get the drive/site created?
1. Activity
a. Is there a user on the activity with a primary template that has an office 365 setting attached
b. Is the flag Aktivitet_LMS = True
2. Course
a. Is there a user on the course with a primary template that has an office 365 setting attached
b. Is the flag Skolefag_LMS = True
CreateGroups Error
Get root folders [Inlogic_Alle 1e-elever]
(CreateGroups) Error Google.Apis.Requests.RequestError
Not Authorized to access this resource/api [403] Errors [ Message[Not Authorized to access this resource/api] Location[ - ] Reason[forbidden] Domain[global]
Get root folders
(CreateGroups) Error Google.Apis.Requests.RequestError
Not Authorized to access this resource/api [403]
Errors [ Message[Not Authorized to access this resource/api] Location[ - ] Reason[forbidden] Domain[global]
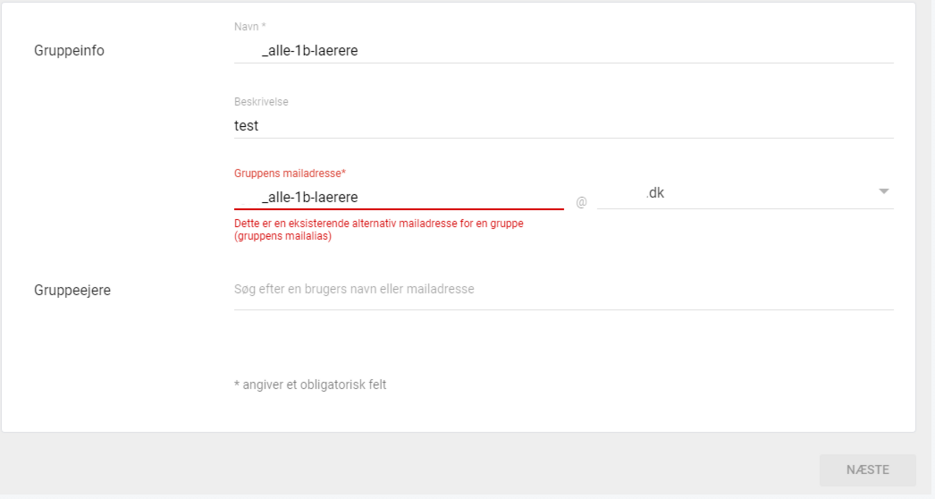
The reason why that error occurs is that the mail adr. is used by another group or user. Test by manually creating a group in google admin portal. The image below shows the error.
