Canvas: Difference between revisions
| Line 1: | Line 1: | ||
Our Canvas integration is developed for schools that want to avoid hour-long administrative tasks. The integration automatically creates, maintains, and deletes users based on data from your student administrative system. It also creates and maintains group rooms, which teachers and students can use for teaching purposes. The rooms automatically use the language you require and can be categorized according to your needs, making them easier to find. Rooms that are no longer in use are deleted automatically. | Our Canvas integration is developed for schools that want to avoid hour-long administrative tasks. The integration automatically creates, maintains, and deletes users based on data from your student administrative system. It also creates and maintains group rooms, which teachers and students can use for teaching purposes. The rooms automatically use the language you require and can be categorized according to your needs, making them easier to find. Rooms that are no longer in use are deleted automatically. | ||
=== Configuration in UMS === | ===Configuration in UMS=== | ||
This allows users to log into Canvas with the same password they use to access the school’s IT-system. The Canvas integration gives you an easy overview and ensures that the users’ data is always managed correctly, without requiring any manual updates. This frees up time for the IT-department so they can focus on other tasks. | This allows users to log into Canvas with the same password they use to access the school’s IT-system. The Canvas integration gives you an easy overview and ensures that the users’ data is always managed correctly, without requiring any manual updates. This frees up time for the IT-department so they can focus on other tasks. | ||
== Prerequisites == | ==Prerequisites== | ||
=== Module requirements === | ===Module requirements=== | ||
[[UMS]] | [[UMS]] | ||
=== What to have ready === | ===What to have ready=== | ||
URL to Canvas, typically http://"customer".instructure.com | URL to Canvas, typically http://"customer".instructure.com | ||
| Line 16: | Line 16: | ||
- IMPORTANT: Language for the UMS account MUST be set to english as this impacts API errors in the Canvas.log | - IMPORTANT: Language for the UMS account MUST be set to english as this impacts API errors in the Canvas.log | ||
== Installation == | ==Installation== | ||
Open UMS Configurator and go to Template > Canvas. Click the first manage button. | Open UMS Configurator and go to Template > Canvas. Click the first manage button. | ||
[[File:Canvas Template.jpg|none|thumb|791x791px]] | [[File:Canvas Template.jpg|none|thumb|791x791px]] | ||
| Line 22: | Line 22: | ||
[[File:Canvas Settings.jpg|none|thumb|556x556px]] | [[File:Canvas Settings.jpg|none|thumb|556x556px]] | ||
== Canvas settings == | ==Canvas settings== | ||
To configurate your settings, go to 'Edit existing template' and choose Canvas. Click 'Manage' and 'Add'. | To configurate your settings, go to 'Edit existing template' and choose Canvas. Click 'Manage' and 'Add'. | ||
[[File:Canvas Settings Edit.jpg|none|thumb|923x923px]] | [[File:Canvas Settings Edit.jpg|none|thumb|923x923px]] | ||
==== Description ==== | ====Description==== | ||
Give the Site settings a name. | Give the Site settings a name. | ||
==== Organization settings ==== | ====Organization settings==== | ||
Choose the Organization setting you want to use for this site setting. | Choose the Organization setting you want to use for this site setting. | ||
==== Users ==== | ====Users==== | ||
Options that define how users are created | Options that define how users are created | ||
===== Username ===== | =====Username===== | ||
Choose a column from the students table. Its default is <Not used>. This means that the username will be the same as in Active Directory. | Choose a column from the students table. Its default is <Not used>. This means that the username will be the same as in Active Directory. | ||
This column will be used as the login. | This column will be used as the login. | ||
===== Mail alias ===== | =====Mail alias===== | ||
Choose a column from the students table. Its default is <Not used>. This means that the mail alias will be the same as default username. | Choose a column from the students table. Its default is <Not used>. This means that the mail alias will be the same as default username. | ||
| Line 48: | Line 48: | ||
If the column from the database contains a @ it will use this mail and not add <Mail Domain from organization settings>. | If the column from the database contains a @ it will use this mail and not add <Mail Domain from organization settings>. | ||
===== SIS ID ===== | =====SIS ID===== | ||
Choose a column from the students table. Its default is <Not used>. This means that the SIS ID will be the same as default username. | Choose a column from the students table. Its default is <Not used>. This means that the SIS ID will be the same as default username. | ||
This column will be used as the SIS ID. | This column will be used as the SIS ID. | ||
===== Add organization domain as suffix to username ===== | =====Add organization domain as suffix to username===== | ||
If this is checked the mail domain from organization settings will be added as part of the login/username. | If this is checked the mail domain from organization settings will be added as part of the login/username. | ||
===== Set random password ===== | =====Set random password===== | ||
Enable this to set random password on users when they are created. This is used when you enable SSO in Canvas and you don't want them to login with anything else. | Enable this to set random password on users when they are created. This is used when you enable SSO in Canvas and you don't want them to login with anything else. | ||
===== Delete users ===== | =====Delete users===== | ||
Delete the users when they are no longer active | Delete the users when they are no longer active | ||
===== Keep inactive before deleting ===== | =====Keep inactive before deleting===== | ||
Wait this number of days before deleting inactive users | Wait this number of days before deleting inactive users | ||
===== Phone country code ===== | =====Phone country code===== | ||
Set the default country code for users in Canvas. This is only applied to phone numbers that are not already prefixed. | Set the default country code for users in Canvas. This is only applied to phone numbers that are not already prefixed. | ||
==== Distribution lists ==== | ====Distribution lists==== | ||
Check the box to create, update, and delete groups that has a Canvas setting attached. | Check the box to create, update, and delete groups that has a Canvas setting attached. | ||
===== Maintain lists ===== | =====Maintain lists===== | ||
Check this box to enable groups to be created in Canvas | Check this box to enable groups to be created in Canvas | ||
===== Delete lists ===== | =====Delete lists===== | ||
Check this box to delete groups from Canvas | Check this box to delete groups from Canvas | ||
===== Delete unused lists after ===== | =====Delete unused lists after===== | ||
Wait this number of days before deleting unused/old lists | Wait this number of days before deleting unused/old lists | ||
==== Template security groups ==== | ====Template security groups==== | ||
Check the box to create, update, and delete template security groups that has a Canvas setting attached. | Check the box to create, update, and delete template security groups that has a Canvas setting attached. | ||
==== Upload student information ==== | ====Upload student information==== | ||
Check these boxes to send and update information on students: | Check these boxes to send and update information on students: | ||
==== Upload employee information ==== | *Mobile Phone | ||
====Upload employee information==== | |||
Check these boxes to send and update information on employees: | Check these boxes to send and update information on employees: | ||
==== Upload Guardian information ==== | *Mobile Phone | ||
====Upload Guardian information==== | |||
===== Create Guardians ===== | =====Create Guardians===== | ||
Check this box to create guardians | Check this box to create guardians | ||
Check these boxes to send and update information on guardians: | Check these boxes to send and update information on guardians: | ||
=== Site === | *Mobile Phone | ||
===Site=== | |||
See [[LMS Settings]] for options that are not described below. | See [[LMS Settings]] for options that are not described below. | ||
[[File:Canvas Settings Edit Site Settings.jpg|none|thumb|895x895px]] | [[File:Canvas Settings Edit Site Settings.jpg|none|thumb|895x895px]] | ||
==== Activity sites ==== | ====Activity sites==== | ||
See [[Site selection settings]] | See [[Site selection settings]] | ||
==== Course sites ==== | ====Course sites==== | ||
See [[Site selection settings]] | See [[Site selection settings]] | ||
== Organization settings == | ==Organization settings== | ||
[[File:Canvas Organization Settings.jpg|none|thumb|556x556px]] | [[File:Canvas Organization Settings.jpg|none|thumb|556x556px]] | ||
[[File:Canvas Organization Settings Edit.jpg|none|thumb|339x339px]] | [[File:Canvas Organization Settings Edit.jpg|none|thumb|339x339px]] | ||
==== Description ==== | ====Description==== | ||
Give your Organization setting a name. | Give your Organization setting a name. | ||
==== URL ==== | ====URL==== | ||
URL of the Canvas installation. | URL of the Canvas installation. | ||
==== Mail domain ==== | ====Mail domain==== | ||
Mail domain for the Canvas installation. | Mail domain for the Canvas installation. | ||
==== Access token ==== | ====Access token==== | ||
Type the access token that is created with the help of this link https://community.canvaslms.com/docs/DOC-10806-4214724194. | Type the access token that is created with the help of this link https://community.canvaslms.com/docs/DOC-10806-4214724194. | ||
The user under which the access token is created '''must be set to English language''' | The user under which the access token is created '''must be set to English language''' | ||
==== SQL Criteria ==== | ====SQL Criteria==== | ||
This is an overall SQL sentence that is used when creating groups. It is used in conjunction with the sub account settings. This has no impact on sites being created. If left blank there are no criteria. | This is an overall SQL sentence that is used when creating groups. It is used in conjunction with the sub account settings. This has no impact on sites being created. If left blank there are no criteria. | ||
==== Root account ID ==== | ====Root account ID==== | ||
Enter the root account id from Canvas. This is default 1 | Enter the root account id from Canvas. This is default 1 | ||
==== Installation ID ==== | ====Installation ID==== | ||
This is not used yet | This is not used yet | ||
=== Sub accounts === | ===Sub accounts=== | ||
This section explains how to create a hierarchy in Canvas. | This section explains how to create a hierarchy in Canvas. | ||
[[File:Canvas Sub accounts.jpg|none|thumb|622x622px]] | [[File:Canvas Sub accounts.jpg|none|thumb|622x622px]] | ||
==== DisplayName ==== | ====DisplayName==== | ||
This is an overall SQL sentence that is used when creating groups. It is used in conjunction with the sub account settings. This has no impact on sites being created. | This is an overall SQL sentence that is used when creating groups. It is used in conjunction with the sub account settings. This has no impact on sites being created. | ||
==== Database field ==== | ====Database field==== | ||
Select a column from the students table use the contents of that column to build the hierarchy. | Select a column from the students table use the contents of that column to build the hierarchy. | ||
==== SQL Criteria ==== | ====SQL Criteria==== | ||
Select only rows that match the SQL sentence. If left blank there are no criteria. | Select only rows that match the SQL sentence. If left blank there are no criteria. | ||
==== Add staff as ==== | ====Add staff as==== | ||
Add staff to the sub account node with this role | Add staff to the sub account node with this role | ||
==== Require parent criterias ==== | ====Require parent criterias==== | ||
Staff will only be added to the node if they meet all the criteria's from the parent nodes | Staff will only be added to the node if they meet all the criteria's from the parent nodes | ||
==== Example of how UMS will build a hierarchy ==== | ====Example of how UMS will build a hierarchy==== | ||
The account "Byggeriuddannelserne" comes from the '<nowiki/>Sub accounts' settings "Education" | The account "Byggeriuddannelserne" comes from the '<nowiki/>Sub accounts' settings "Education" | ||
The account "Architectural Technology and Construction" comes from the 'Sub accounts' settings "Department" | The account "Architectural Technology and Construction" comes from the 'Sub accounts' settings "Department" | ||
[[File:Canvas hierarchy.jpg|none|thumb|1421x1421px]] | [[File:Canvas hierarchy.jpg|none|thumb|1421x1421px]] | ||
== Site Settings == | ==Site Settings== | ||
You need to attach a site setting to a template. This will tell UMS that sites will be created from this template. | You need to attach a site setting to a template. This will tell UMS that sites will be created from this template. | ||
[[File:Canvas Site Template Settings.jpg|none|thumb|556x556px]] | [[File:Canvas Site Template Settings.jpg|none|thumb|556x556px]] | ||
[[File:Canvas Site Template Settings Edit.jpg|none|thumb|422x422px]] | [[File:Canvas Site Template Settings Edit.jpg|none|thumb|422x422px]] | ||
==== Description ==== | ====Description==== | ||
Enter a description for this setting. | Enter a description for this setting. | ||
==== | ====Add censors==== | ||
Add staff where the timetable blocks are of type Censors. | |||
==== Add examiners ==== | |||
Add staff where the timetable blocks are of type ExamEvent. | |||
==== SQL Groups ==== | ====SQL Groups==== | ||
See [[LMS Settings]] for this option. | See [[LMS Settings]] for this option. | ||
== FAQ == | ==FAQ== | ||
Revision as of 08:21, 27 December 2018
Our Canvas integration is developed for schools that want to avoid hour-long administrative tasks. The integration automatically creates, maintains, and deletes users based on data from your student administrative system. It also creates and maintains group rooms, which teachers and students can use for teaching purposes. The rooms automatically use the language you require and can be categorized according to your needs, making them easier to find. Rooms that are no longer in use are deleted automatically.
Configuration in UMS
This allows users to log into Canvas with the same password they use to access the school’s IT-system. The Canvas integration gives you an easy overview and ensures that the users’ data is always managed correctly, without requiring any manual updates. This frees up time for the IT-department so they can focus on other tasks.
Prerequisites
Module requirements
What to have ready
URL to Canvas, typically http://%22customer%22.instructure.com
Admin User access for Canvas (preferably a separate account for UMS)
- IMPORTANT: Language for the UMS account MUST be set to english as this impacts API errors in the Canvas.log
Installation
Open UMS Configurator and go to Template > Canvas. Click the first manage button.
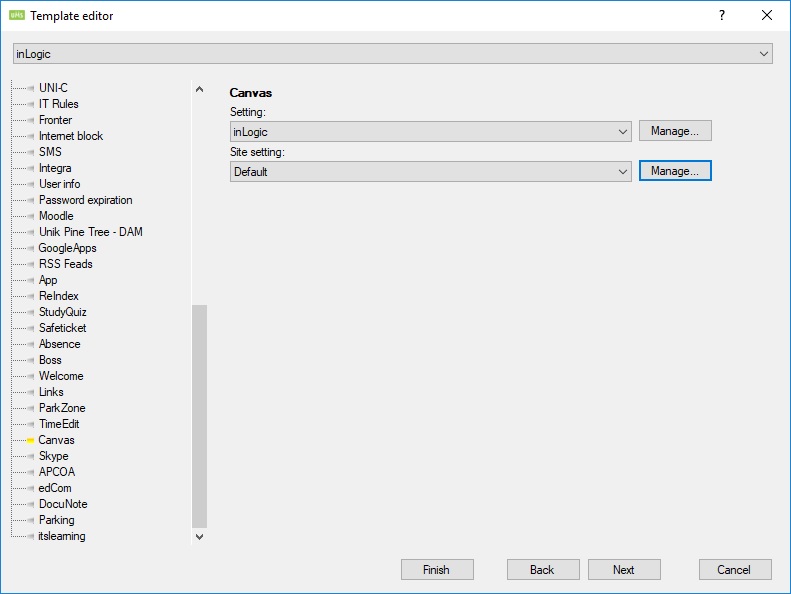
You will now see an overview of your Canvas settings.
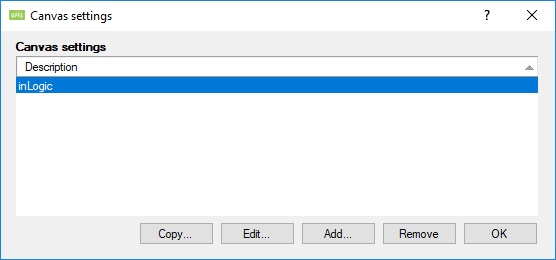
Canvas settings
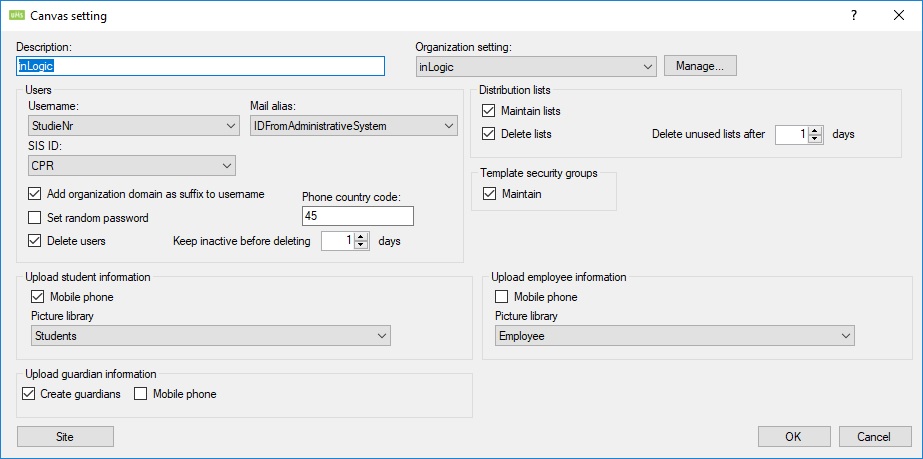
To configurate your settings, go to 'Edit existing template' and choose Canvas. Click 'Manage' and 'Add'.
Description
Give the Site settings a name.
Organization settings
Choose the Organization setting you want to use for this site setting.
Users
Options that define how users are created
Username
Choose a column from the students table. Its default is <Not used>. This means that the username will be the same as in Active Directory.
This column will be used as the login.
Mail alias
Choose a column from the students table. Its default is <Not used>. This means that the mail alias will be the same as default username.
This column will be used as the <Mail alias>@<Mail Domain from organization settings>.
If the column from the database contains a @ it will use this mail and not add <Mail Domain from organization settings>.
SIS ID
Choose a column from the students table. Its default is <Not used>. This means that the SIS ID will be the same as default username.
This column will be used as the SIS ID.
Add organization domain as suffix to username
If this is checked the mail domain from organization settings will be added as part of the login/username.
Set random password
Enable this to set random password on users when they are created. This is used when you enable SSO in Canvas and you don't want them to login with anything else.
Delete users
Delete the users when they are no longer active
Keep inactive before deleting
Wait this number of days before deleting inactive users
Phone country code
Set the default country code for users in Canvas. This is only applied to phone numbers that are not already prefixed.
Distribution lists
Check the box to create, update, and delete groups that has a Canvas setting attached.
Maintain lists
Check this box to enable groups to be created in Canvas
Delete lists
Check this box to delete groups from Canvas
Delete unused lists after
Wait this number of days before deleting unused/old lists
Template security groups
Check the box to create, update, and delete template security groups that has a Canvas setting attached.
Upload student information
Check these boxes to send and update information on students:
- Mobile Phone
Upload employee information
Check these boxes to send and update information on employees:
- Mobile Phone
Upload Guardian information
Create Guardians
Check this box to create guardians
Check these boxes to send and update information on guardians:
- Mobile Phone
Site
See LMS Settings for options that are not described below.
Activity sites
Course sites
Organization settings

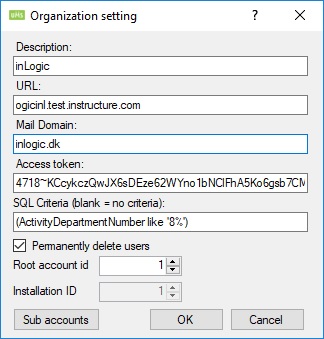
Description
Give your Organization setting a name.
URL
URL of the Canvas installation.
Mail domain
Mail domain for the Canvas installation.
Access token
Type the access token that is created with the help of this link https://community.canvaslms.com/docs/DOC-10806-4214724194.
The user under which the access token is created must be set to English language
SQL Criteria
This is an overall SQL sentence that is used when creating groups. It is used in conjunction with the sub account settings. This has no impact on sites being created. If left blank there are no criteria.
Root account ID
Enter the root account id from Canvas. This is default 1
Installation ID
This is not used yet
Sub accounts
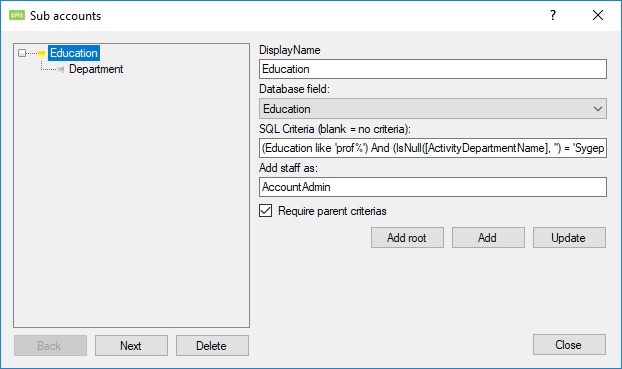
This section explains how to create a hierarchy in Canvas.
DisplayName
This is an overall SQL sentence that is used when creating groups. It is used in conjunction with the sub account settings. This has no impact on sites being created.
Database field
Select a column from the students table use the contents of that column to build the hierarchy.
SQL Criteria
Select only rows that match the SQL sentence. If left blank there are no criteria.
Add staff as
Add staff to the sub account node with this role
Require parent criterias
Staff will only be added to the node if they meet all the criteria's from the parent nodes
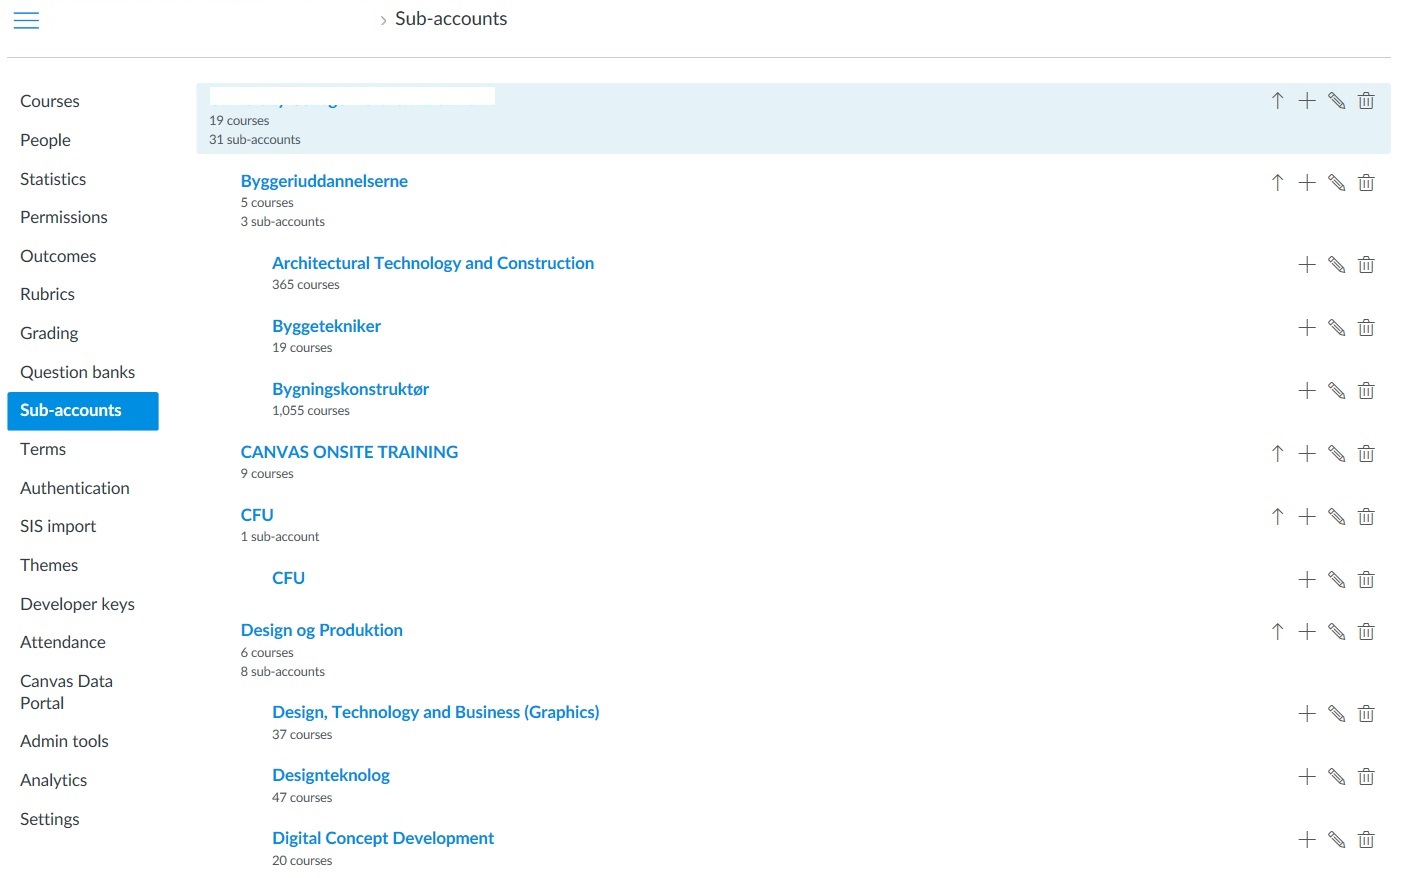
Example of how UMS will build a hierarchy
The account "Byggeriuddannelserne" comes from the 'Sub accounts' settings "Education"
The account "Architectural Technology and Construction" comes from the 'Sub accounts' settings "Department"
Site Settings
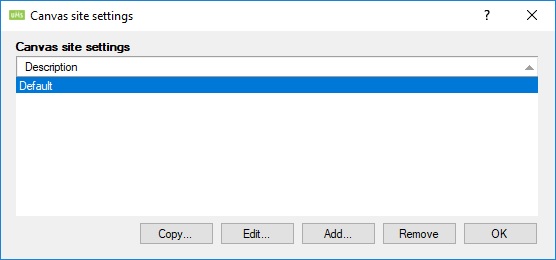
You need to attach a site setting to a template. This will tell UMS that sites will be created from this template.
Description
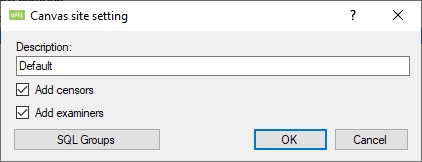
Enter a description for this setting.
Add censors
Add staff where the timetable blocks are of type Censors.
Add examiners
Add staff where the timetable blocks are of type ExamEvent.
SQL Groups
See LMS Settings for this option.