ELEARNINGFORCE SharePoint LMS
Our ELEARNINGFORCE SharePoint LMS integration automatically creates and maintains data in SharePoint, based on data from your student administration system. It automatically creates and maintains teams and sites, as well as teachers and students on sites. It supports templates and it is up to you to decide when a site becomes visible. It is possible to make different setting for different courses or branches of study.
Prerequisites
Module requirements
Installation
Maintain ELEARNINGFORCE sites with students and teachers.
Organization settings
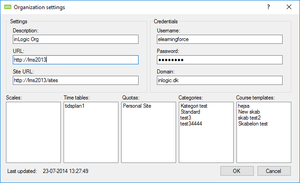
“URL”
Where is the top URL of ELEARNINGFORCE
“Site URL”
Where is the site URL of ELEARNINGFORCE
“Username/Password/Domain”
Credentials used when connecting to ELEARNINGFORCE. This is a windows account in the domain.
“Scales/Time tables/Quotas/Categories/Course templates”
Show what the service running on the frontend server found during last scan of ELEARNINGFORCE.
“Last updated”
Tell when the last successful scan was run.
Site settings
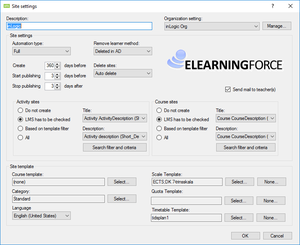
“Organization setting”
Specify which organization setting to use for this site setting.
“Automation type”
Full: Means that site maintenance will be fully automated.
“Remove learner method”
“Deleted in AD”
Users will be removed from site when they are not active in UMS anymore
“Finished on activity/course”
Users will be removed when they have finished with the course.
“Delete sites”
“Auto delete”
Sites will be delete when the last student has left the site
“Manual Delete”
Sites will not be deleted by UMS. This has to be done by an administrator
“Send mail to teacher(s)”
Send mail notification to teachers when they are attached to a site.
“Create x days before”
Choose how many days before start that the sites are created.
“Start publishing x days before”
Choose how many days before start that the sites are published to students.
“Stop publishing x days after”
Choose how many days after end that the sites are unpublished.
Sites are delete when there are no more students on it.
Activity Sites
“Do not create”
It will not create any sites based on activities.
“LMS has to be checked”
The field Aktivitet_LMS in the students table has to be “True”. (Look in the documentation for the specific administrative system to see how this is set)
“Based on template filter”
Create sites based on a filter that is specified per template.
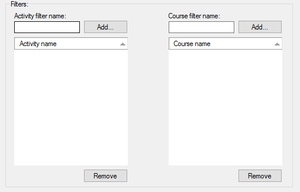
“All”
Create all sites.
Title
Title of the site. Changing this after a site has been created will cause it to be updated.
Description
Description of the site. Changing this after a site has been created will cause it to be updated.
Search filter and criteria
This will enable you to concatenate sites that would have been created as to or more sites to be created as one site.
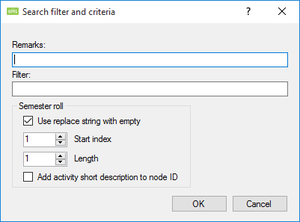
“Remarks”
This is just for description purposes.
“Filter”
The SQL like filter (regular expression). If an activity matches, it will be subject to the settings below in semester roll
“Semester roll”
“Use replace string with empty”
This will replace a section of the site with an empty string.
“Start index”
Determine where to start in string to remove.
“Length”
How many characters will be removed from the string.
“Add activity short description to node ID“
This will add the field Kort_Betegnelse (Short Description) from the students table to the node id.
Node id is the URL.
Examples
If you have three activities named English1, English2, English3 and you only want one SharePoint site.
Set the settings as shown below
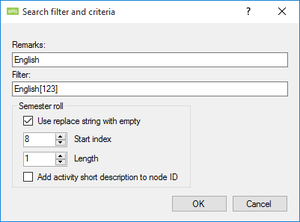
This filter ensures that it is only applied to activities that matches this SQL sentence.
“Course Sites”
Course URL’s will always be created as “activity_course”.
“Do not create”
It will not create any sites based on courses.
“LMS has to be checked”
The field Skolefag_LMS in the students table has to be “True”. (Look in the documentation for the specific administrative system to see how this is set)
“Based on template filter”
Create sites based on a filter that is specified per template.

“All”
Create all sites.
Title
Title of the site. Changing this after a site has been created will cause it to be updated.
Description
Description of the site. Changing this after a site has been created will cause it to be updated.
Search filter and criteria
This will enable you to concatenate sites that would have been created as two or more sites to be created as one site.
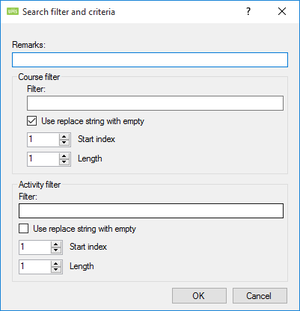
“Remarks”
This is just for description purposes.
“Course Filter”
The SQL like filter (regular expression). If an activity matches, it will be subject to the settings below in semester roll.
“Semester roll”
“Use replace string with empty”
This will replace a section of the site with an empty string.
“Start index”
Determine where to start in string to remove.
“Length”
How many characters will be removed from the string.
“Activity Filter”
The SQL like filter (regular expression). If an activity matches, it will be subject to the settings below in semester roll
“Semester roll”
“Use replace string with empty”
This will replace a section of the site with an empty string.
“Start index”
Determine where to start in string to remove.
“Length”
How many characters will be removed from the string.
Site template
“Course template”
Specify which template to use when creating new sites
“Category”
Specify which category to use when creating new sites
“Scale template”
Specify which scale templates to put on sites when creating them
“Quota template”
Specify which quota template to use when creating new sites
“Timetable template”
Specify which timetable template to use when creating new sites
“Language”
Specify which language to use when creating new sites
Template setting
After you have created the ELEARNINGFORCE setting you put in on a template.
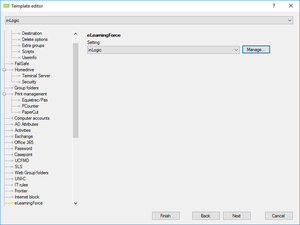
This will created the activities on this template as sites in ELEARNINGFORCE
Installation requirements
You need to install a setup package on the ELEARNINGFORCE frontend server.
eLearningForce Setup 2013.msi -> ELEARNINGFORCE 2013
eLearningForce Setup.msi -> ELEARNINGFORCE version 2010
These files can be found in the UMS Backend installation folder.
After installation on the ELEARNINGFORCE frontend server you need to configure the windows service to use the account specified in the organization settings
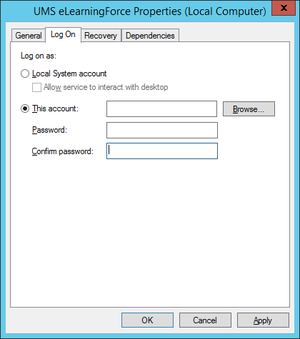
This has to be done after every update of the package
You need a license file for this server and a copy of the usermanagement.ini file from the backend UMS installation folder.
This service is scans ELEARNINGFORCE and puts the data in UMS. This is used for configuration on the site settings.
Technical settings
FAQ
How to get groups visible in OneDrive and Classroom
Remove the checkbox from Only senders inside my organization
Why do I not get the site created?
- Activity
- Is there a user on the activity with a primary template that has an office 365 setting attached
- Is the flag Aktivitet_LMS = True
- Course
- Is there a user on the course with a primary template that has an office 365 setting attached
- Is the flag Skolefag_LMS = True