SSO: Difference between revisions
m Corrected spelling error on Set-AdfsSslCertificate -Thumbprint |
No edit summary |
||
| Line 34: | Line 34: | ||
Where ID = <The id of the active setting> | Where ID = <The id of the active setting> | ||
It is the signing certificate the UMS needs from the ADFS. | It is the signing certificate the UMS needs from the ADFS. | ||
It is needed to be exported in base64 format, otherwise the UMS can't load the certificate. | |||
Now delete the old certificate files from your UMS folder, do an iisreset to let the UMS resolve the newly entered information in the databse. | Now delete the old certificate files from your UMS folder, do an iisreset to let the UMS resolve the newly entered information in the databse. | ||
Revision as of 13:17, 14 September 2023

Our Single Sign-on (SSO) module is designed for schools that would like to make it easy for employees and students to use the school's various electronic systems. With the SSO module, users get one login and password that logs them into all the associated services at once.
For example, students can Access the school's LMS system, library system, digital dictionaries and databases with scientific publications - all by signing in with SSO once and for all.
This saves time and effort whenever users need to use one of the school's systems. At the same time, it gives users a simpler everyday life because they do not have to worry about having to keep in mind several logins.
Prerequisite and purpose
Prerequisite
This requires that:
- An installed Active Directory federation services (AD FS) server.
- Access to configuration snap in. Either via Remote PowerShell or directly on the server.
- An UMS installation, licensed to SSO from inLogic.
- A star or new certificate for the address that the AD FS server needs.
purpose
Installation
Installation
Change ADFS certificates in UMS
The UMS server also needs the certificates from the ADFS server. This is done by consuming the metadata. You can use https://samlmd2cert.azurewebsites.net/ to get the certificate files.
When you have the new and updated certificates from ADFS it needs to be in rootfolder of the UMS Application.
Physical path (C:\inetpub\wwwroot).
And we need to update the records in the UMS database, if the name of the file has changed.
Update SSOSetting set PartnerCertificateFile = 'TheNameOfCertificate_signing.cer'
Where ID = <The id of the active setting>
It is the signing certificate the UMS needs from the ADFS.
It is needed to be exported in base64 format, otherwise the UMS can't load the certificate.
Now delete the old certificate files from your UMS folder, do an iisreset to let the UMS resolve the newly entered information in the databse.
Changing the Self Signed Certificate in SSO.
- Get started by clicking on the house icon in the menu. Search for IIS and click on Internet Information Services (IIS) Manager.
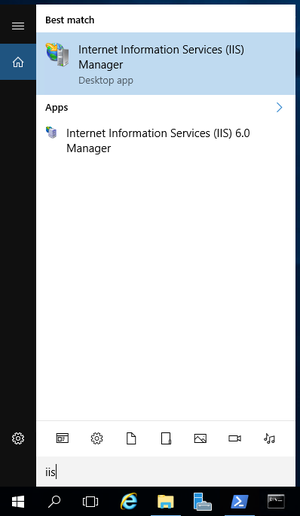
- In the Connections column on the left, click on the name of the server. Double-click on Server Certificates.
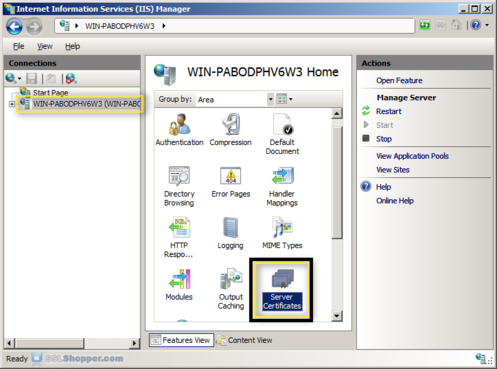
- In the Actions column on the right, click on Create Self-Signed Certificate.
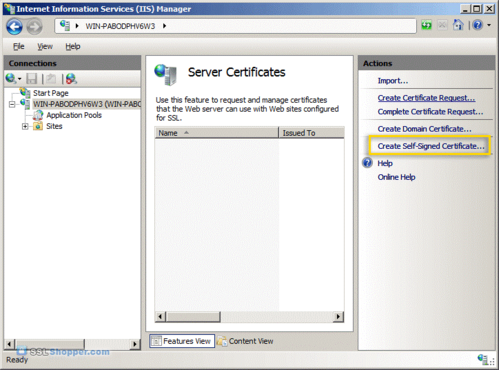
- Enter any friendly name and then click OK.
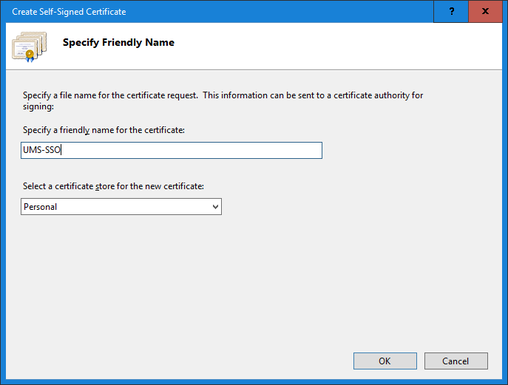
- You will now have an IIS Self Signed Certificate valid for 1 year listed under Server Certificates.
- Right click on the new create certificate and then click Export.
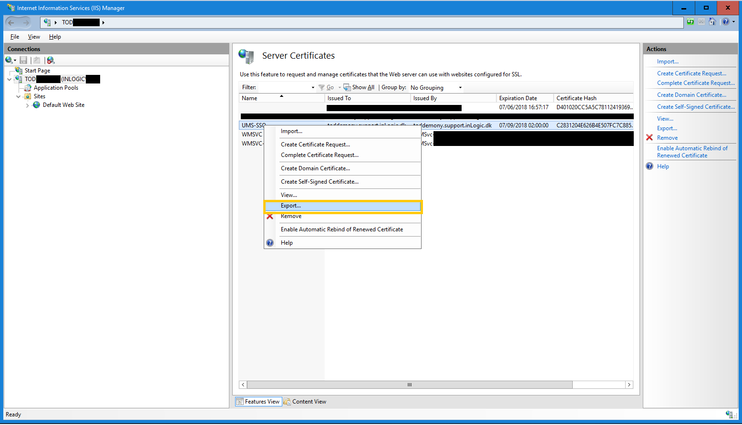
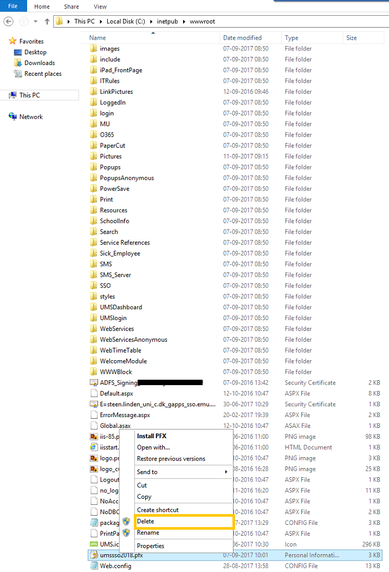
- Remember to delete the old self signed certificate (C:\inetpub\wwwroot).
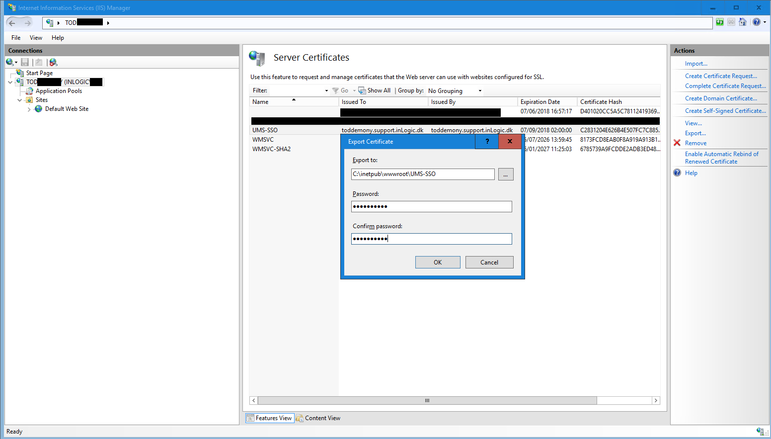
- Enter the path (C:\inetpub\wwwroot\UMS-SSO). The new password you type will be used later on when you set up your environment. Please remember this password. Click OK.
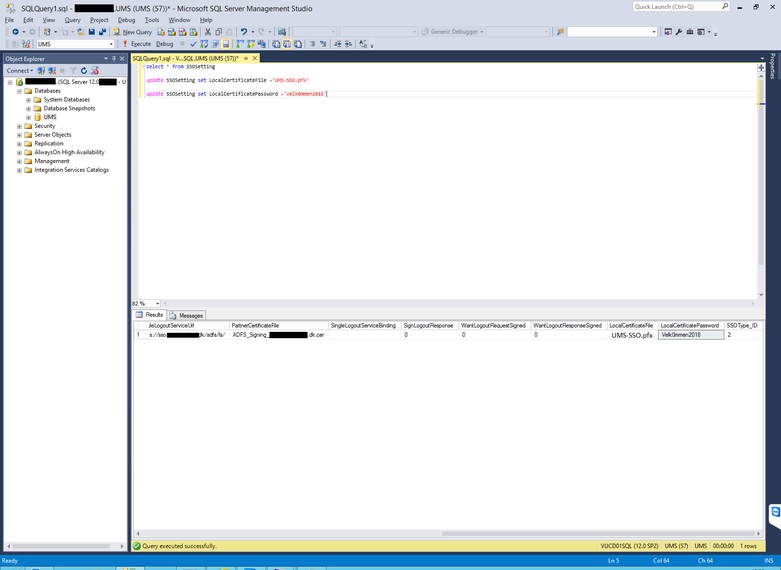
- Open SQl Management Studio and type “select * from SSOSetting”. You will see all settings for UMS SSO.
- Update the Certificate by typing “update SSOSetting set LocalCertificateFile ='UMS-SSO.pfx”
- Update the Password by typing “update SSOSetting set LocalCertificatePassword ='Velk0mmen2018”.
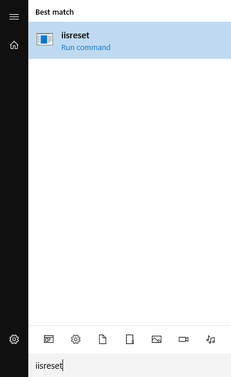
- Open the IIS Server and click Start. Click Run type IISReset and then click OK.
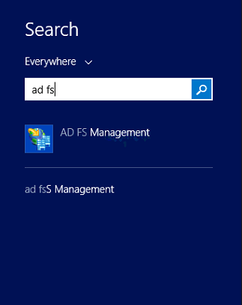
- Open the AD FS Server and search for AD FS. Click on AD FS Management.
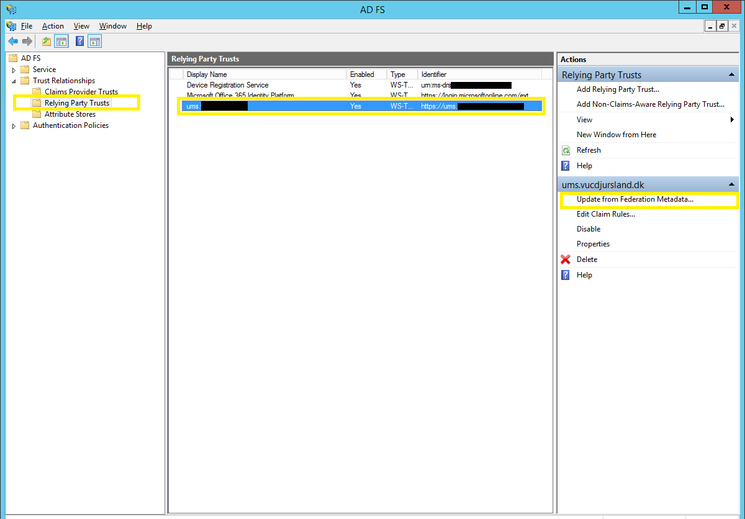
- Click on the Trust Relationships folder and then click on Relying Party Trusts.
- In the details panel, click the relying party trust that you want to update from federation metadata.
- In the Action panel, click Update from Federation Metadata.
- In the properties dialog box for the trust, click Update to start the update.
- When the update is complete, click OK.
Certificates - Update Service Communication Certificate
Things to have ready:
A new updated certificate with private key - <file>.pfx
A connection to AD FS server, with administrator rights.
First install the certificate on the server, select my computer when asked.
Now go to AD FS -> Service -> Certificates -> Set Service Communications Certificate...
Now select "view more" -> And select the new certificate
And now we need to set the certificate on the http.sys on adfs
Set-AdfsSslCertificate -Thumbprint xxxxxxxxxxxxxxxxxxxxxxxxxxxxxxxxxxxxxxxxx
Now go to Services and restart the AD FS Service
Certificates - Automatic rollover
Out of the box, ADFS generates two self-signed certificates that are good for one year. One certificate for token signing, and one for token encryption.
The token signing certificate is for signing the tokens used in the user sign on process, and it is considered the “bedrock of security” for ADFS. If someone gained access to this certificate (the public/private key pair), they could impersonate your ADFS environment.
The token decryption certificate is used for encrypting the tokens used in the user sign on process. This certificate isn’t used very often.
For more information about AD FS Certificates see https://blogs.technet.microsoft.com/askpfeplat/2015/01/26/adfs-deep-dive-certificate-planning/
Token Certificate Validity Periods
By default, ADFS is configured to generate self-signed token certificates with a duration of one year. This duration can be changed, but keep in mind that the token-signing certificate is the foundation of the sign on process, and therefore, it really shouldn’t have a duration longer than 3 years.
ADFS Federation Metadata
The public key portion of both certificates are included in the ADFS Federation Metadata, and are available from a public URL endpoint on all ADFS servers in the farm. Relying Party (RP) applications that can consume federation metadata will automatically pick up certificate changes whenever they pull the federation metadata file (FederationMetadata.xml) from your ADFS environment.
Example URL
https://adfs.contoso.com/FederationMetadata/2007-06/FederationMetadata.xml
Before performing a token certificate rollover, you will want to reach out to your RP partners (application owners) to see how often their application pulls the federation metadata so that they will experience little to no downtime before trusting the new certificates.
However, most applications do not automatically retrieve the federation metadata on a schedule. Instead, an application owner will need to import the federation metadata from an XML file, or manually force the application to retrieve the federation metadata from the URL endpoint.
And then there’s the applications that don’t consume federation metadata at all — they have to be manually updated. This means you will need to send the public key portion of the new certificates to the application owners.
Certificate and Rollover Settings
Run the following PowerShell command on the primary ADFS server to view the properties related to certificates:
Get-AdfsProperties | FL AutoCert*, Certificate*
ADFS Properties Related to Certificate Renewal
Auto Certificate Rollover
When the auto-rollover process is enabled (set to “True”), ADFS will automatically generate new “Secondary” certificates before the current ones expire, and then eventually promote them to be “Primary”. For a manual renewal process, this should be set to “False” until you’re ready to generate new “Secondary” certificates.
Certificate Generation Threshold
New certificates will be generated this number of days before the expiration of the current “Primary” certificates.
Certificate Promotion Threshold
Number of days the newly generated certificate will exist before being promoted from the “Secondary” certificate to the “Primary” certificate.
Certificate Critical Threshold
Number of days prior to expiry of the certificates before a new certificate is generated and promoted to the “Primary” certificate.
Certificate Duration
Validity period of the auto-generated certificates. Default is 1 year.
Certificate Rollover Interval
Number of minutes at which ADFS checks to see if a new certificate needs to be generated.
Token Certificate Rollover Process
There are 3 approaches for rolling over the token certificates. Which one to use will depend on the number of relying party trusts you have, the level of control you wish to exert upon the process, and the timing of the certificate expirations.
Automatic Staged Rollover
You would use this process when ADFS controls when the new self-signed token certificates are generated, and when they are promoted to become the “Primary” certificates.
Manual Staged Rollover
You would use this process to manually control when the new self-signed token certificates are generated, and when they are promoted to become the “Primary” certificates.
Immediate Manual Rollover
Think of this as a certificate cut-over process. You would do this if you wanted to roll over your certificates immediately without having a set of primary and secondary certificates. You would also do this if your current certificates expired and you need to renew immediately.
Keep in mind that there will be outage when Token certificates are immediately generated & promoted. The relying parties (application owners) must update their configuration with the new certificates, but until they do so, single sign-on will not work.
Automatic Staged Rollover
This process should only be used if you have already communicated to all your relying party application owners with information about the schedule for which the new certificates will be generated, when they will be promoted to the “Primary” certificate, and when the old certificates will expire.
Note that an ADFS administrator will need to export the public portion of the new certificates and send them to the application owners.
Additionally, you can use this process if all of the relying party applications pull your ADFS federation metadata automatically on a schedule. However, this is very rare because most SaaS providers do not want to incur the expense of querying federation metadata changes for hundreds, thousands, or even millions of endpoints. More than likely, you will need to coordinate with the application owners to update their applications.
Permissions: Domain Admin & Local Admin on the primary ADFS server in the farm.
Step 1: Certificate Duration
Set the number of days that will become the validity period of the new self-signed token certificates.
- 1 Year: 365
- 3 Years: 1095
- 5 Years: 1827
Set-ADFSProperties -CertificateDuration 1095
Step 2: Certificate Generation Threshold
Set the number of days before the expiration date of the current certificates that ADFS should generate the new certificates. Thirty days is usually a good number, but you could make it more.
Set-ADFSProperties -CertificateGenerationThreshold 30
Step 3: Certificate Promotion Threshold
When ADFS generates the new self-signed certificates, they are initially set as “Secondary” certificates. ADFS will then use the value of this property to determine the number of days after the new certificates are generated to promote them to be the “Primary” certificates.
Set-ADFSProperties -CertificatePromotionThreshold 25
Step 4: Certificate Critical Threshold
If for some reason ADFS has not generated new self-signed certificates, or newly generated certificates have not been promoted to “Primary”, ADFS will perform these actions within the number of days set in this property prior to expiry of the current primary certificates. Leaving the default 2 days is usually best.
Set-ADFSProperties -CertificateCriticalThreshold 2
Step 5: Auto Certificate Rollover
This enables/disables the ADFS certificate rollover process, which uses the properties configured in the previous steps to rollover (renew & promote) the token certificates. This needs to be enabled.
Set-ADFSProperties -AutoCertificateRollover $true
Step 6: Export the New Certificates
If needed by the application owners, export the new certificates without their private keys. You can do this while the new certificates are set as “Secondary”.
Open the ADFS Management Console: ADFS > Service > Certificates
For each token certificate, perform the following:
- Right-click the certificate > View Certificate…
- In the new window > Details (tab) > Copy to File (button) > Next
- Select: DER Encoded Binary X.509 (.CER) -or- Base-64 Encoded X.509 (.CER)
- Next > Browse to a location to save the file and give it a name
- Next > Finish
Note: To export the certificate in .PEM format, choose Base-64 Encoded X.509 (.CER), and then rename the saved file with the .pem file extension.
Step 7: Export the Federation Metadata XML
If needed by the application owners, run the below PowerShell commands on the ADFS server to export the new ADFS Federation Metadata XML file. Make sure you modify the File Path before running the commands.
# Set the file path
$FilePath = "C:\Users\ADFSAdmin\Desktop\ADFS-MetaData.xml"

# Export MetaData XML
$mUrl = (Get-ADFSEndpoint | where Protocol -eq "Federation Metadata").FullUrl.ToString()
$httpHelper = new-object System.Net.WebClient
$metadataAsString = $httpHelper.DownloadString($mUrl)
$httpHelper.DownloadFile($mUrl , "$($FilePath)")
Note: If you export the metadata while there are both primary and secondary certificates, both of the certificates will be included in the XML file. After the secondary certificates are promoted to primary, and the old certificates are deleted, you should generate a new XML file for future use.
Manual Staged Rollover
You would use this process to manually control when the new self-signed token certificates are generated, and when they are promoted to become the “Primary” certificates. You will have full control over the rollover process. ADFS will not do anything automatically.
Permissions: Domain Admin & Local Admin on the primary ADFS server in the farm.
Step 1: Auto Certificate Rollover
This enables/disables the ADFS certificate rollover process, which uses the properties configured in the below steps to rollover (renew & promote) the token certificates automatically. This should be set to False. If not, run the following command.
Set-ADFSProperties -AutoCertificateRollover $false
Step 2: Certificate Duration
Set the number of days that will become the validity period of the new self-signed token certificates.
- 1 Year: 365
- 3 Years: 1095
- 5 Years: 1827
Set-ADFSProperties -CertificateDuration 1095
Step 3: Certificate Generation Threshold
Set the number of days before the expiration date of the current certificates that ADFS should generate the new certificates. Depending on when you plan to manually generate the new certificates, this number should be greater than the number of days between when you generate the new certificates, and when the old certificates expire.
You need to set this because you have to enable the ADFS auto rollover process in order to generate the new certificates. After you generate the new certificates, you will immediately disable the auto rollover process.
Assuming you will generate the new certificates 30 days before the old ones expire, you could set this to 40.
Set-ADFSProperties -CertificateGenerationThreshold 40
Step 4: Certificate Promotion Threshold
When ADFS generates the new self-signed certificates, they are initially set as “Secondary” certificates. ADFS will then use the value of this property to determine the number of days after the new certificates are generated to promote them to be the “Primary” certificates.
Even though the ADFS auto rollover process will be disabled, this property should be set to a number lower than the above Certificate Generation Threshold property.
Set-ADFSProperties -CertificatePromotionThreshold 35
Step 5: Certificate Critical Threshold
If for some reason ADFS has not generated new self-signed certificates, or newly generated certificates have not been promoted to “Primary”, ADFS will perform these actions within the number of days set in this property prior to expiry of the current primary certificates. Leaving the default 2 days is usually best.
Set-ADFSProperties -CertificateCriticalThreshold 2
Step 6: Generate the New Certificates
When you are ready to generate the new token certificates as “Secondary” certificates, use the below PowerShell commands. Both the current “Primary” certificates and the new “Secondary” certificates will be available to the relying party applications.
Note that you cannot manually generate the new token certificates when the ADFS auto rollover process is disabled. Therefore, the commands enable the process, generates the new certificates as “Secondary”, and then disables the process.
Set-ADFSProperties -AutoCertificateRollover $true

Update-AdfsCertificate -CertificateType Token-Decrypting
Update-AdfsCertificate -CertificateType Token-Signing

Set-ADFSProperties -AutoCertificateRollover $false
Step 7: Export the Certificates
If needed by the application owners, export the certificates without their private keys.
Open the ADFS Management Console: ADFS > Service > Certificates
For each token certificate, perform the following:
- Right-click the certificate > View Certificate…
- In the new window > Details (tab) > Copy to File (button) > Next
- Select: DER Encoded Binary X.509 (.CER) -or- Base-64 Encoded X.509 (.CER)
- Next > Browse to a location to save the file and give it a name
- Next > Finish
Note: To export the certificate in .PEM format, choose Base-64 Encoded X.509 (.CER), and then rename the saved file with the .pem file extension.
Step 8: Export the Federation Metadata XML
If needed by the application owners, run the below PowerShell commands on the ADFS server to export the ADFS Federation Metadata XML file. Make sure you modify the File Path before running the commands.
# Set the file path
$FilePath = "C:\Users\ADFSAdmin\Desktop\ADFS-MetaData.xml"

# Export MetaData XML
$mUrl = (Get-ADFSEndpoint | where Protocol -eq "Federation Metadata").FullUrl.ToString()
$httpHelper = new-object System.Net.WebClient
$metadataAsString = $httpHelper.DownloadString($mUrl)
$httpHelper.DownloadFile($mUrl , "$($FilePath)")
Note: Both primary and secondary certificates will be included in the XML file. After you promote the new certificates and delete the old certificates, you should generate a new XML file for future use.
Step 9: Promote the New Certificates
Before the old certificates expire, you need to promote the new certificates to “Primary”.
ADFS Management Console: ADFS > Service > Certificates
For each “Secondary” token certificate, perform the following:
- Right-click the certificate > Set as Primary
Step 10: Delete the Old Certificates
After the old certificates have expired, you can delete them from the ADFS Management Console. Note that you only have the option to delete “Secondary” certificates. You cannot delete a “Primary” certificate.
ADFS Management Console: ADFS > Service > Certificates
For each “Secondary” token certificate, perform the following:
- Right-click the certificate > Delete
Immediate Manual Rollover
When doing an immediate rollover, you force ADFS to immediately generate new certificates, promote them to “Primary”, and delete the old certificates.
You would use these steps if you have a few relying party trusts and the application owners are ready to pull the new federation metadata from the ADFS public endpoint after a rollover. You would also use these steps if the ADFS auto rollover process is disabled, and your token certificates have expired.
After the rollover, you can export the new certificates & federation metadata, and send them to your relying party application owners.
Permissions: Domain Admin & Local Admin on the primary ADFS server in the farm.
Step 1: Certificate Duration
Set the number of days that will become the validity period of the new self-signed token certificates.
- 1 Year: 365
- 3 Years: 1095
- 5 Years: 1827
Set-ADFSProperties -CertificateDuration 1095
Step 2: Generate the New Certificates
Note that you cannot generate the new token certificates when the ADFS auto rollover process is disabled. Therefore, the below commands enable the process, generate the new certificates, and then disable the process. The -Urgent switch indicates that the certificate rollover process should happen immediately, and remove older certificates.
Set-ADFSProperties -AutoCertificateRollover $true

Update-AdfsCertificate -CertificateType Token-Decrypting -Urgent
Update-AdfsCertificate -CertificateType Token-Signing -Urgent

Set-ADFSProperties -AutoCertificateRollover $false
Step 3: Export the Certificates
If needed by the application owners, export the certificates without their private keys.
Open the ADFS Management Console: ADFS > Service > Certificates
For each token certificate, perform the following:
- Right-click the certificate > View Certificate…
- In the new window > Details (tab) > Copy to File (button) > Next
- Select: DER Encoded Binary X.509 (.CER) -or- Base-64 Encoded X.509 (.CER)
- Next > Browse to a location to save the file and give it a name
- Next > Finish
Note: To export the certificate in .PEM format, choose Base-64 Encoded X.509 (.CER), and then rename the saved file with the .pem file extension.
Step 4: Export the Federation Metadata XML
If needed by the application owners, run the below PowerShell commands on the ADFS server to export the ADFS Federation Metadata XML file. Make sure you modify the File Path before running the commands.
# Set the file path
$FilePath = "C:\Users\ADFSAdmin\Desktop\ADFS-MetaData.xml"

# Export MetaData XML
$mUrl = (Get-ADFSEndpoint | where Protocol -eq "Federation Metadata").FullUrl.ToString()
$httpHelper = new-object System.Net.WebClient
$metadataAsString = $httpHelper.DownloadString($mUrl)
$httpHelper.DownloadFile($mUrl , "$($FilePath)")
FAQ
How to set SPN
http://www.gatepoint.ch/cmdreferenz/html/9341c753-11ff-4acc-993c-b05d50f32330.htm#bkmk_examples
- Update metadata to Office365. (Update-MsolFederatedDomain -DomainName mydomain.com -SupportMultiDomain)
FOCES certificate til STIL OIOSAML 3.0
https://www.nets.eu/dk-da/l%C3%B8sninger/nemid/funktionssignatur
Final
