Office 365: Difference between revisions
| Line 689: | Line 689: | ||
|UpdateUsersObjectID | |UpdateUsersObjectID | ||
|Get the object ID from office 365 and save it in UMS DB | |Get the object ID from office 365 and save it in UMS DB | ||
|} | |} | ||
{| class="wikitable" | {| class="wikitable" | ||
Revision as of 10:01, 27 June 2022
Our Office 365 SharePoint Portal is a dedicated solution for school, which want an easy-to-use learning portal. Students and teachers are often presented with advanced and complex solutions that does everything they need and then some and as a result, they are difficult to use. We have decided to do things differently and therefore the Office 365 SharePoint Portal gives you the features you need to get the most out of SharePoint. Nothing more, nothing less. The portal is simple and easy to use. This way you avoid confusion and having to navigate yet another complex system. In terms of design, you have two options: the portal can use our standard skin, as pictured above, or our second skin, which we made for primary schools.
Prerequisites
Module requirements
Testing after setup
Users get created in Office 365
Then run these powershell commands
Install Powershell 7
- Run in Powershell : iex "& { $(irm https://aka.ms/install-powershell.ps1) } -UseMSI"
- https://docs.microsoft.com/en-us/powershell/scripting/install/installing-powershell-on-windows
Run these commands in Powershell 7 administrator mode:
#Enable TLS 1.2 for Powershell commands
[Net.ServicePointManager]::SecurityProtocol = [Net.SecurityProtocolType]::Tls12

$NugetPackageProvider = Get-PackageProvider -ListAvailable -Name NuGet -ErrorAction SilentlyContinue
if (!$NugetPackageProvider) {Install-PackageProvider -Name NuGet -RequiredVersion 2.8.5.201 -Scope AllUsers -Force}

$ExchangeOnlineManagement = Get-Module -ListAvailable -Name ExchangeOnlineManagement -ErrorAction SilentlyContinue
if (!$ExchangeOnlineManagement) {Install-Module -Name ExchangeOnlineManagement -Scope AllUsers -Force}
Use this command only if no repository is available
Register-PSRepository -Default -Verbose
Installation
Office 365
Enter Admin credentials for a service account with administrator privileges to access Office 365.
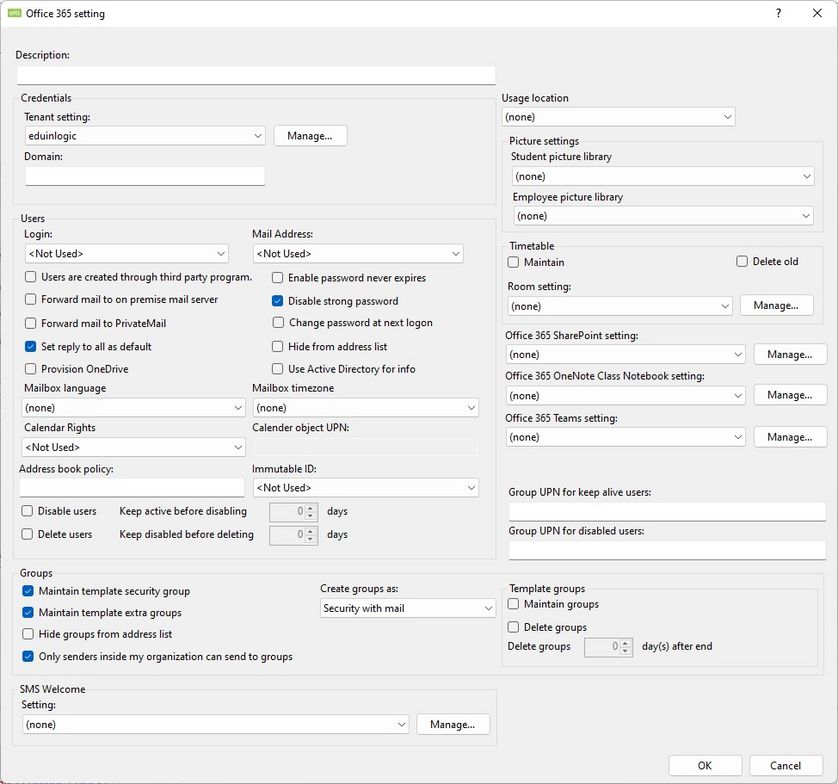
Credentials
Tenant setting
Choose a tenant setting used for connection to Office 365-
Domain
Enter the domain that you want the users and groups to have when they are created. E.g. <Username>@<Domain>
Users
Login
Choose what the users shall use to log in to Office365.
Mail Address
Choose what to use as the users mail address.
Enable password never expires
When marked the password will never expire for the users.
Disable strong password
Use this to bypass the default password complexity.
Users are created through third party program
This normally means ADFS is used to synchronize users
Forward mail to on premise mail server
This will forward the users Office 365 mail to the primary mail address from AD (If user does not have a proxy address it will read it from the mail attribute)
Use Active Directory for info
This tells UMS to take Department, Title and Organization from AD instead of AD Attributes in UMS.
Provision OneDrive
This will provision the users OneDrive after he has been created so the user will not have to wait for this when he accesses the OneDrive the first time.
You will need to setup permissions for this to work.
MSGraphPermissions#Setup SharePoint permissions
Usage location
This will tell UMS to set usage location when creating a user
Disable users
When marked the users will be disabled when they are no longer attending classes.
Keep active before disabling x days
Specify a grace period where users are active before disabling.
Delete users
Choose if users are to be deleted after grace period has ended.
Keep disabled before deleting x days
Specify a grace period where users are disabled.
Hide from address list
Hide the newly created item from address list.
Mailbox language
Specify which language is to be default for the users.
Mailbox time zone
Specify which time zone is to be default for the users.
Calendar Rights
Set the calendar rights on a user when he is created
Calendar object UPN
Specify the UPN to put on the users calendar with the rights specified below
If using a group then it must be of type "Mail enabled security".
Group UPN for keep alive users
Specify a group where users that is kept alive is a member of.
This must be a Microsoft 365 group.
UMS will create the group if it doesn't exist.
Group UPN for disabled users
Specify a group where users that is disabled is a member of.
This must be a Microsoft 365 group.
UMS will create the group if it doesn't exist.
Template groups
Maintain security group
This will create the security group entered in the field template security group in the destination node in the template settings.
Maintain extra groups
This will create all the groups from the extra groups template tab. All users will have direct group member ship.
Distribution lists
Maintain lists
Mark this to create distribution groups in Office 365. The groups will be created, updated and deleted if this is specified.
Delete lists
Mark this to delete distributions groups when they are no longer active in the administrative system. Check the data export manuals too when this happens
Delete unused lists after x days
Specify in days how long the distribution groups are to be kept alive in Office 365 before deletion.
Only senders inside my organization
With this marked only users in the domain will be able to send to distribution groups created by UMS.
Disabling this will allow the groups to be visible in OneDrive and Classroom
Picture settings
This takes the picture privacy setting that the user has set into consideration. The picture will not be uploaded if the user has chosen not to allow his picture to be shared. The picture will not be removed again if it has been uploaded.
Student picture library
Define where the pictures are for the students that uses this template. If this is not set, no pictures will be uploaded to Office 365.
Employee picture library
Define where the pictures are for the employees that uses this template. If this is not set, no pictures will be uploaded to Office 365.
Timetable
Maintain
Mark this to create timetable blocks in Office 365. They will be created, updated and deleted.
Delete old
Mark this to delete old timetable blocks from calendars.
Room setting
Create rooms with timetable blocks.
Manage
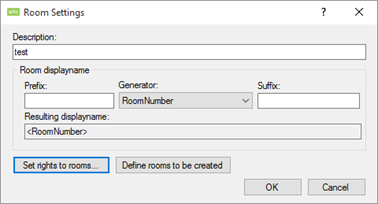
Room displayname
Prefix
Text that can be added to the start of what is chosen in Generator.
Generator
Choose what is to define the room.
Suffix
Text that can be added to the end of what is chosen in Generator.
Resulting displayname
Summary of the chosen display name as it will be shown in Office 365.
Set rights to rooms
Sets the rights on rooms when created
This has to be a Distribution Group Otherwise it won't work
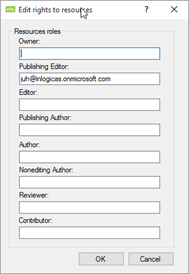
Owner
Users will be able to create, read, modify and delete all items and files, and create sub-folders. As the folder owner, they can change the permission levels others have for the folder. (Does not apply to delegates.).
Publishing Editor
Users can create, read, modify and delete all items and files, and create sub-folders. (Does not apply to delegates.).
Editor
Users can create, read, modify and delete all items and files..
Publishing Author
Users can create and read items and files, create sub-folders, and modify and delete items and files they create. (Does not apply to delegates.).
Author
Users can create and read items and files and modify and delete items and files you create.
Nonediting Author
Users have full read details. Can create items and delete own items. Folder visible.
Reviewer
Users can read items and files only.
Contributor
Users can create items and files only. The contents of the folder does not appear. (Does not apply to delegates.).
Note With author or editor permissions, a delegate has send-on-behalf-of permission. Sent messages contain both the managers and delegates names. Message recipients see the managers name in the Sent On Behalf Of box and the delegates name in the From box.
Define rooms to be created
Specify the rooms to be created based on a filter. If nothing is entered, every room will be created.
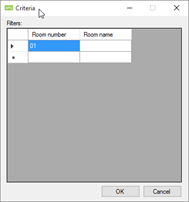
Room number and Room name
Can be found in the skemabrikker_rooms table in SQL.
Office 365 SharePoint site setting
This will create SharePoint sites
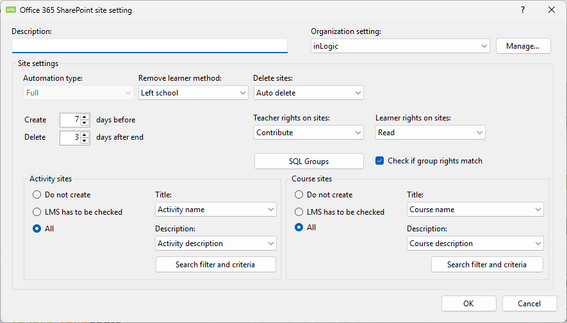
Site settings
Automation type
Full: Means that site maintenance will be fully automated.
Remove learner method
Deleted in AD
Users will be removed from site when they are not active in UMS anymore
Finished on activity/course
Users will be removed when they have finished with the course.
Delete sites
Auto delete
Sites will be delete when the last student has left the site
Manual Delete
Sites will not be deleted by UMS. This has to be done by an administrator
Send mail to teacher(s)
Send mail notification to teachers when they are attached to a site.
Create x days before
Choose how many days before start that the sites are to be created.
Delete x days after end
Choose how many days after end that the sites are to be deleted.
Teacher rights on sites
Rights the teacher will have on the site when attached.
Learner rights on sites
Rights the student/learner will have on the site when attached.
Check if group rights match
When UMS looks for UMS-groups on the site, it will do so based on two criteria’s.
The correct rights and the correct name. Unchecking this will disable the first criteria and only look for a group with the right name. (This is when users change the UMS-group rights on a site manually)
SQL Groups
Members of these groups will be attached to all sites created with this setting as teachers
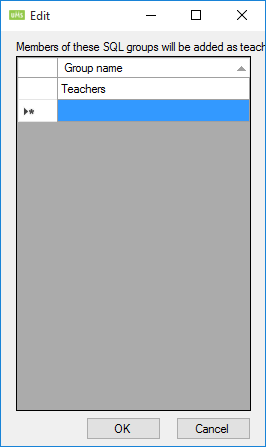
Group name
This can only be a group that is found in UMS
You get a list of these groups by running this SQL command:
Select Distinct Aktivitet As Activity From Students Order By Activity
Activity Sites
Do not create
It will not create any sites based on activities.
LMS has to be checked
The field Aktivitet_LMS in the students table has to be True. (Look in the documentation for the specific administrative system to see how this is set)
Based on template filter
Create sites based on a filter that is specified per template.
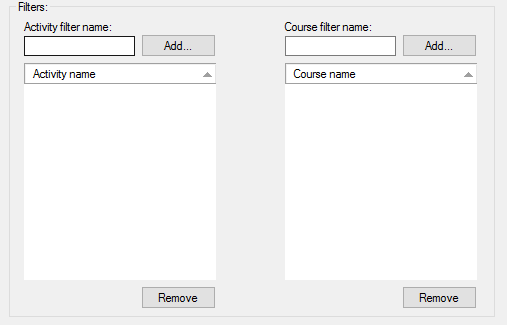
All
Create all sites.
Title
Title of the site. Changing this after a site has been created will cause it to be updated.
Description
Description of the site. Changing this after a site has been created will cause it to be updated.
Search filter and criteria
This will enable you to concatenate sites that would have been created as to or more sites to be created as one site.
Remarks
This is just for description purposes.
Filter
The SQL like filter (regular expression). If an activity matches, it will be subject to the settings below in semester roll
Semester roll
Use replace string with empty
This will replace a section of the site with an empty string.
Start index
Determine where to start in string to remove.
Length
How many characters will be removed from the string.
Add activity short description to node ID
This will add the field Kort_Betegnelse (Short Description) from the students table to the node id.
Node id is the URL.
Examples
If you have three activities named English1, English2, English3 and you only want one SharePoint site.
Set the settings as shown below
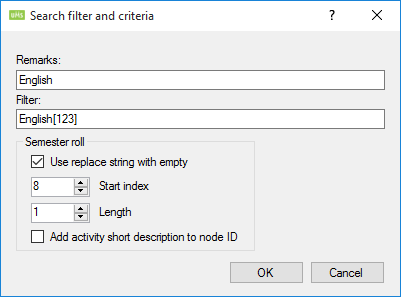
This filter ensures that it is only applied to activities that matches this SQL sentence.
Course Sites
Course URL’s will always be created as activity_course.
Do not create
It will not create any sites based on courses.
LMS has to be checked
The field Skolefag_LMS in the students table has to be True. (Look in the documentation for the specific administrative system to see how this is set)
Based on template filter
Create sites based on a filter that is specified per template.

All
Create all sites.
Title
Title of the site. Changing this after a site has been created will cause it to be updated.
Description
Description of the site. Changing this after a site has been created will cause it to be updated.
Search filter and criteria
This will enable you to concatenate sites that would have been created as two or more sites to be created as one site.
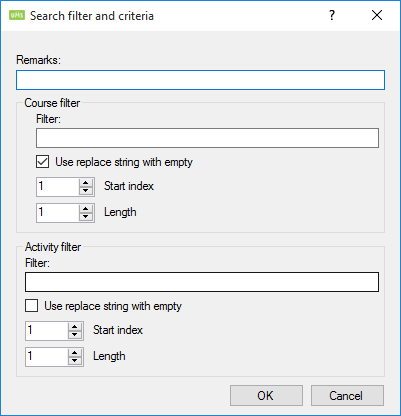
Remarks
This is just for description purposes.
Course Filter
The SQL like filter (regular expression). If an activity matches, it will be subject to the settings below in semester roll.
Semester roll
Use replace string with empty
This will replace a section of the site with an empty string.
Start index
Determine where to start in string to remove.
Length
How many characters will be removed from the string.
Activity Filter
The SQL like filter (regular expression). If an activity matches, it will be subject to the settings below in semester roll
Semester roll
Use replace string with empty
This will replace a section of the site with an empty string.
Start index
Determine where to start in string to remove.
Length
How many characters will be removed from the string.
After you have created the Office 365 setting you put in on a template.
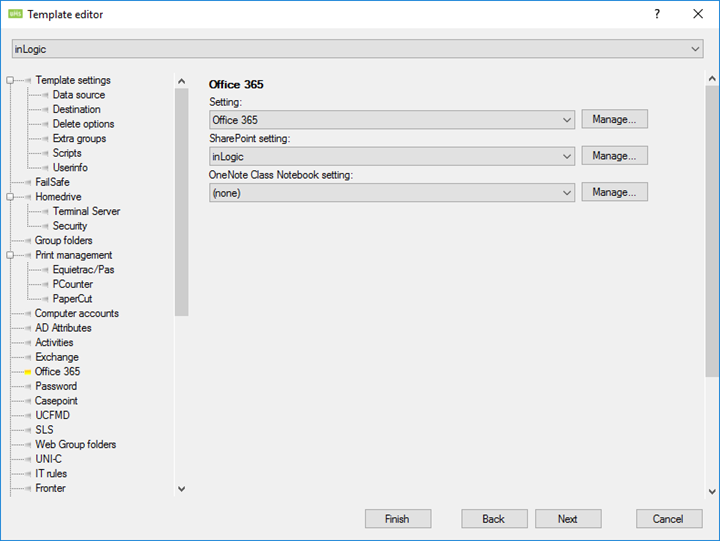
Setting: This will created the users with on this template in Office 365 with these settings
SharePoint settings
Sites created with setting. If this is not specified no activities/courses on this template will be created.

Site URL
Which site collection is used when creating sites
Language: The default language of the created site
Course Template
Standard SharePoint: Use a standard template from SharePoint
Course template: Enter a name of a template that resides in the site collection. If nothing is entered it will default to the Team site template
UMS SharePoint Portal: Create sites based on the UMS SharePoint Portal product
OneNote Class Notebook setting
Choose a Class Notebook setting. This will create a Class Notebook created in the SharePoint site.
SQL Groups
Members of these groups will be attached to all sites created with this setting as teachers

Group name
This can only be a group that is found in UMS
You get a list of these groups by running this SQL command:
Select Distinct Aktivitet As Activity From Students Order By Activity
OneNote Class Notebook setting
Define settings for OneNote Class Notebooks.
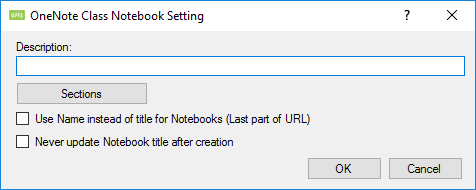
Sections
Define the section the Class Notebook will be created with. Students that are attached to this Class Notebook will have these sections.
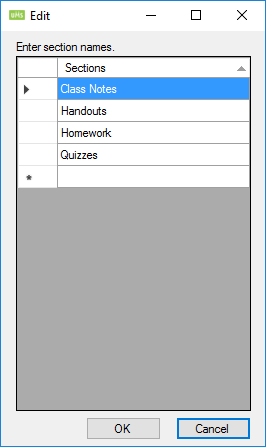
Use Name instead of title for Notebooks (Last part of URL)
This will make the title of the NoteBook be the same as the last part of the URL of the SharePoint site that the NoteBook is created in. It never changes unless this is unchecked.
Never update Notebook title after creation
The NoteBook will never update the title after it has been created, even though the SharePoint site changes title. it will be created with the title that SharePoint site has at createin time.
OneNote Class Notebook setting
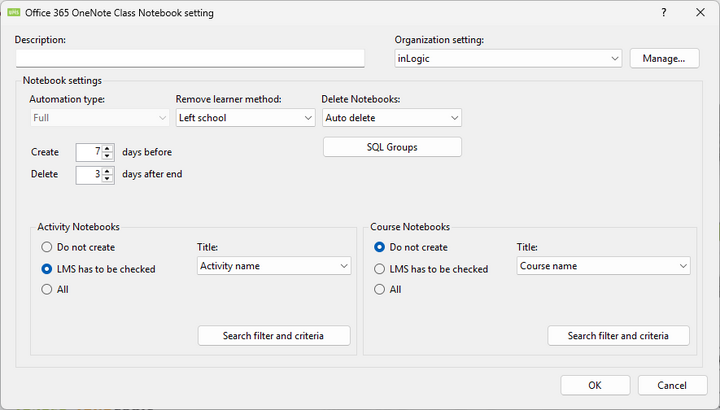
Notebook settings
Automation type
Full: Means that Notebooks maintenance will be fully automated.
Remove learner method
Deleted in AD
Users will be removed from Notebooks when they are not active in UMS anymore
Finished on activity/course
Users will be removed when they have finished with the course.
Delete Notebooks
Auto delete
Notebooks will be delete when the last student has left the Notebook
Manual Delete
Notebooks will not be deleted by UMS. This has to be done by an administrator
Send mail to teacher(s)
Send mail notification to teachers when they are attached to a Notebook.
Create x days before
Choose how many days before start that the Notebooks are to be created.
Delete x days after end
Choose how many days after end that the Notebooks are to be deleted.
SQL Groups
Members of these groups will be attached to all Notebooks created with this setting as teachers

Group name
This can only be a group that is found in UMS
You get a list of these groups by running this SQL command:
Select Distinct Aktivitet As Activity From Students Order By Activity
Activity Notebooks
Do not create
It will not create any Notebooks based on activities.
LMS has to be checked
The field Aktivitet_LMS in the students table has to be True. (Look in the documentation for the specific administrative system to see how this is set)
Based on template filter
Create Notebooks based on a filter that is specified per template.

All
Create all Notebooks.
Title
Title of the Notebook. Changing this after a Notebook has been created will cause it to be updated.
Search filter and criteria
This will enable you to concatenate Notebooks that would have been created as to or more Notebooks to be created as one Notebook.

Remarks
This is just for description purposes.
Filter
The SQL like filter (regular expression). If an activity matches, it will be subject to the settings below in semester roll
Semester roll
Use replace string with empty
This will replace a section of the Notebook with an empty string.
Start index
Determine where to start in string to remove.
Length
How many characters will be removed from the string.
Add activity short description to node ID
This will add the field Kort_Betegnelse (Short Description) from the students table to the node id.
Node id is the URL.
Examples
If you have three activities named English1, English2, English3 and you only want one Notebook.
Set the settings as shown below

This filter ensures that it is only applied to activities that matches this SQL sentence.
Course Notebooks
Course URL’s will always be created as activity course.
Do not create
It will not create any Notebooks based on courses.
LMS has to be checked
The field Skolefag_LMS in the students table has to be True. (Look in the documentation for the specific administrative system to see how this is set)
Based on template filter
Create Notebook based on a filter that is specified per template.

All
Create all Notebooks.
Title
Title of the Notebook. Changing this after a Notebook has been created will cause it to be updated.
Search filter and criteria
This will enable you to concatenate Notebooks that would have been created as two or more Notebooks to be created as one Notebook.

Remarks
This is just for description purposes.
Course Filter
The SQL like filter (regular expression). If an activity matches, it will be subject to the settings below in semester roll.
Semester roll
Use replace string with empty
This will replace a section of the Notebook with an empty string.
Start index
Determine where to start in string to remove.
Length
How many characters will be removed from the string.
Activity Filter
The SQL like filter (regular expression). If an activity matches, it will be subject to the settings below in semester roll
Semester roll
Use replace string with empty
This will replace a section of the Notebook with an empty string.
Start index
Determine where to start in string to remove.
Length
How many characters will be removed from the string.
After you have created the Office 365 setting you put in on a template.

Setting: This will created the users with on this template in Office 365 with these settings
OneNote Class Notebook settings
Notebooks created with setting. If this is not specified no activities/courses on this template will be created.
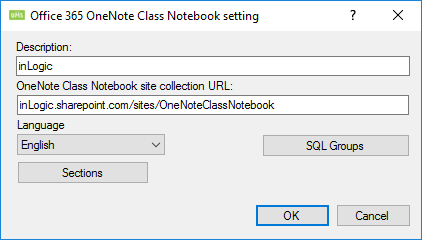
Site collection URL
Which Notebook collection is used when creating Notebooks
Language
The default language of the created Notebook
Sections
Define the section the Class Notebook will be created with. Students that are attached to this Class Notebook will have these sections.

SQL Groups
Members of these groups will be attached to all Notebooks created with this setting as teachers

Group name
This can only be a group that is found in UMS
You get a list of these groups by running this SQL command:
Select Distinct Aktivitet As Activity From Students Order By Activity
Organization Settings

Site settings
Description
Add a description to be able to identify the account.
SharePoint administration URL
URL of the SharePoint administration site for the tenant.
Credentials settings
Username
Username used to connect to SharePoint.
Password
Password used to connect to SharePoint.
Parameters
> LiveAtEdu.exe [<optional> Action]
Eg.
> LiveAtEdu.exe
> LiveAtEdu.exe UsersOnly
| Parameter | Description |
|---|---|
| UsersOnly | Runs all the parameters in this table |
| UpdateUsers | Update users |
| DisableUsers | Disable users |
| EnableUsers | Enable users |
| DeleteUsers | Delete users |
| CreateUsers | Create users |
| UpdateImmutableID | Update Immutable ID on users |
| UpdateOffice365SettingsIDForUsers | Update Office 365 settings for users if they have changed template |
| UpdateUsersObjectID | Get the object ID from office 365 and save it in UMS DB |
| Parameter | Description |
|---|---|
| GroupsOnly | Runs all the parameters in this table |
| RemoveGroupMembers | Remove group members from groups |
| AddGroupMembers | Add members to groups |
| DeleteGroups | Delete groups |
| CreateGroups | Create groups |
| UpdateGroupsObjectID | Get the object ID from office 365 and save it in UMS DB |
| GetUPNsForGroups | Get the UPN of template groups from Office 365 |
| Parameter | Description |
|---|---|
| TemplateGroupsOnly | Runs all the parameters in this table |
| RemoveUsersFromTemplateGroups | Remove users from template security groups |
| AddUsers2TemplateGroups | Add users to template security groups |
| DeleteTemplateGroups | Delete groups that are no longer template security groups |
| UpdateTemplateGroupsObjectID | Get the object ID from office 365 and save it in UMS DB |
| GetUPNsForTemplateGroups | Get the UPN of template security groups from Office 365 |
| Parameter | Description |
|---|---|
| TemplateExtraGroupsOnly | Runs all the parameters in this table |
| CreateTemplateExtraGroups | Create groups from template extra group |
| DeleteTemplateExtraGroups | Delete groups that are no longer in extra groups |
| AddTemplateExtraGroupMembers | Add users to template extra groups |
| UpdateTemplateExtraGroupsObjectID | Get the object ID from office 365 and save it in UMS DB |
| Parameter | Description |
|---|---|
| KeepAliveGroupsOnly | Runs all the parameters in this table |
| CreateKeepAliveGroups | Create keep alive groups |
| DeleteKeepAliveGroups | Delete keep alive groups if they are no longer in UMS |
| UpdateSetMailAddressOnKeepAliveGroups | Update the mail address on keep alive groups |
| AddKeepAliveGroupMembers | Add users to keep alive groups |
| RemoveKeepAliveGroupMembers | Remove users from keep alive groups |
| Parameter | Description |
|---|---|
| DisabledGroupsOnly | Runs all the parameters in this table |
| CreateDisabledGroups | Create disabled groups |
| DeleteDisabledGroups | Delete disabled groups if they are no longer in UMS |
| UpdateSetMailAddressOnDisabledGroups | Update the mail address on disabled groups |
| AddDisabledGroupMembers | Add users to disabled groups |
| RemoveDisabledGroupMembers | Remove users from disabled groups |
| Parameter | Description |
|---|---|
| TeamsOnly | Runs all the parameters in this table |
| AddTeams2DB | Add Teams to UMS DB |
| CreateTeams | Create Teams |
| AddTeamToGroup | Add teams to groups |
| ActivateTeams | Activate teams |
| UpdateTeams | Update Teams |
| DeleteTeams | Delete Teams |
| AddTeachers2TeamsDBTable | Add teachers to Office365Teams_Teachers table in UMS DB |
| AddTeachers2Teams | Add teachers to Teams |
| AddLearners2TeamsDBTable | Add learners to Office365Teams_Learners table in UMS DB |
| AddLearners2Teams | Add learners to Teams |
| TeamsDeleteTeachers | Delete teachers in Teams |
| TeamsDeleteLearners | Delete learners in Teams |
| TeamsUpdateNeedToBeUpdated | Set update on next run flag |
| UpdateLearnersExternalID | Retrieve the learners object id from Office 365 and save it in UMS DB |
| UpdateTeachersExternalID | Retrieve the teachers object id from Office 365 and save it in UMS DB |
| UpdateSchoolsExternalID | Retrieve the schools object id from Office 365 and save it in UMS DB |
| UpdateTeamsExternalID | Retrieve the teams object id from Office 365 and save it in UMS DB |
| Parameter | Description |
|---|---|
| SharepointOnly | Runs all the parameters in this table |
| CreateSites | Create sites |
| AddSites2DB | Add sites in UMS DB |
| DeleteSites | Delete sites |
| UpdateSites | Update sites |
| AddLearners2SitesInDB | Add learners to UMS DB |
| DeleteTeachers | Delete teachers |
| AddTeachers2Sites | Add teachers to sites |
| DeleteSiteGroups | Delete site groups |
| AddTeachers2SitesInDB | Add teachers to UMS DB |
| DeleteLearners | Delete learners |
| AddLearners2Sites | Add learners to sites |
| UpdateSiteURL | Update sites with new URL |
| AddNoteBooks2Sites | Add OneNote Class NoteBooks to sites |
| SharePointDeleteNoteBooks | Delete OneNote Class NoteBooks from sites |
| UpdateNeedToBeUpdated | Set the update on next run flag |
| UpdateSitesIsActive | Update site active/inactive status |
| SharePoint_OneNoteClassNotebook_AddMissingTeachers | Add missing Teachers to OneNote Class NoteBooks |
| SharePoint_OneNoteClassNotebook_AddMissingLearners | Add missing Learners to OneNote Class NoteBooks |
| ReAddLearners2Sites | Re-add learners to sites if ReAdd is true in DB |
| ReAddTeachers2Sites | Re-add teachers to sites if ReAdd is true in DB |
| Parameter | Description |
|---|---|
| OneNoteClassNotebookOnly | Runs all the parameters in this table |
| AddNotebooks2DB | Add OneNote Class NoteBooks to UMS DB |
| CreateNotebooks | Create OneNote Class NoteBooks |
| UpdateOneNotes | Update OneNote Class NoteBooks |
| DeleteOneNotes | Delete OneNote Class NoteBooks |
| AddTeachers2OneNotesInDB | Add teachers to OneNote Class NoteBooks in UMS DB |
| AddTeachers2OneNotes | Add teachers to OneNote Class NoteBooks |
| AddLearners2OneNotesInDB | Add learners to OneNote Class NoteBooks in UMS DB |
| AddLearners2OneNotes | Add learners to OneNote Class NoteBooks |
| OneNoteDeleteTeachers | Delete teachers in OneNote Class NoteBooks |
| OneNoteDeleteLearners | Delete learners in OneNote Class NoteBooks |
| OneNoteUpdateNeedToBeUpdated | Set update on next run flag |
Technical settings
Maintenance
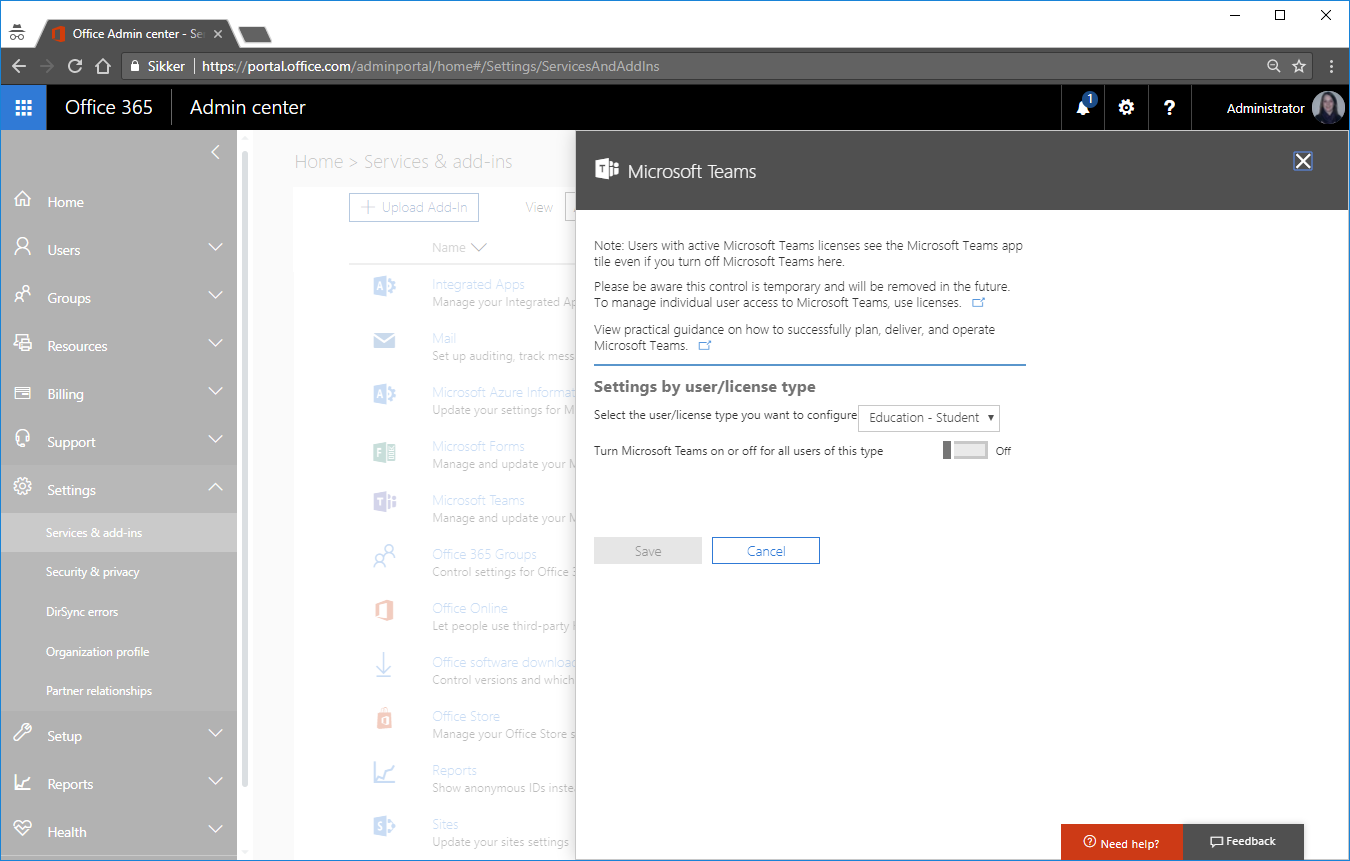
portal.office.com
Teams
Go to Office Portal and login with your admin account( the same UMS uses).
Select settings Services and add-ins and click Teams.
FAQ
Office 365 Licens (Unable to assign this license) How to troubleshoot this error
Error message from UMS Job log (LiveAtEdu)
Error = Unable to assign this license
Set-MsolUserLicense -UserPrincipalName 'khhi3275@ums.dk' -AddLicenses "inLogic:STANDARDWOFFPACK_IW_STUDENT" -LicenseOptions $MyO365Sku
Error = Unable to assign this license.
29-01-2019 13:23:00 - at Utilities.Office365.SetLicenseForUser(String UPN, List`1 Licenses, SqlConnection& LocalSQLDBConnection)
at LiveAtEdu_Sync.LiveAtEdu_Sync.PerformFunctionUserSettings(String SQLStr, UserFunctions Office365Function, MethodInfo StackFrame)
29-01-2019 13:23:00 - khhi3275- UPN = khhi3275@ums.dk
29-01-2019 13:23:01 - (UpdateLicenseInfoOnUsers) Error. Could not set license for user - khhi3275@ums.dk
- Try adding the same licenses manually to a single user in office365. You could see if that is possible

- The error shows that it is not possible to put the same licenses together

- Change your licenses in UMS and run the LiveAtEdu job again
Groups
How to get groups visible in OneDrive and Classroom
Remove the checkbox from Only senders inside my organization
Why do I not get the site created?
- Activity
- Is there a user on the activity with a primary template that has an office 365 setting attached
- Is the flag Aktivitet_LMS = True
- Course
- Is there a user on the course with a primary template that has an office 365 setting attached
- Is the flag Skolefag_LMS = True
Disable or enabling user
Error = Message: Insufficient privileges to complete the operation.
This could be the result of the user trying to be disabled/enabled has roles that does not allow the action like Global Administrator.
The term 'Set-UnifiedGroup' is not recognized as a name of a cmdlet, function, script file, or executable program.
Run this command to check which roletypes are needed
Get-ManagementRole -Cmdlet Set-UnifiedGroup
A parameter cannot be found that matches parameter name 'type'.

Run this command to check which roletypes are needed
Get-ManagementRole -Cmdlet Get-DistributionGroup