Axpoint: Difference between revisions
| Line 1: | Line 1: | ||
Integration with Axpoint's Office 365 SharePoint-based document management system. | Integration with Axpoint's Office 365 SharePoint-based document management system. | ||
== Prerequisites == | ==Prerequisites== | ||
=== Module requirements === | ===Module requirements=== | ||
[[UMS]] | [[UMS]] | ||
== Template settings == | ==Template settings== | ||
This is where you connect an Axpoint Setting to a template. Users that are on this template will be synchronized with Axpoint.[[File:Axpoint Template.jpg|none|thumb|694x694px|This is where you connect an Axpoint Setting to a template.]]Start by selecting the setting you want to change or add a new one.[[File:Axpoint Settings.jpg|none|thumb|556x556px|Start by selecting the setting you want to change or add a new one.]] | This is where you connect an Axpoint Setting to a template. Users that are on this template will be synchronized with Axpoint.[[File:Axpoint Template.jpg|none|thumb|694x694px|This is where you connect an Axpoint Setting to a template.]]Start by selecting the setting you want to change or add a new one.[[File:Axpoint Settings.jpg|none|thumb|556x556px|Start by selecting the setting you want to change or add a new one.]] | ||
== Settings == | ==Settings== | ||
This is where you set up your Axpoint setting. The fields are described below.[[File:Axpoint Setting.jpg|none|thumb| | This is where you set up your Axpoint setting. The fields are described below.[[File:Axpoint Setting.jpg|none|thumb|796x796px|This is where you set up your Axpoint settings.]] | ||
=== Security options === | ===Security options=== | ||
=== Disable/Enable === | *Site Collection URL: Insert the URL for the work area | ||
*Security token: Value obtained from Axpoint | |||
*Site type: Value obtained from Axpoint | |||
*User account: The user who is allowed to access the site collection | |||
*Waid: Value obtained from Axpoint | |||
===Disable/Enable=== | |||
Please note that the key and values are different for each customer. | Please note that the key and values are different for each customer. | ||
=== Disable options === | *Key: This is the key that Axpoint will look at when checking if a user is enabled or disabled (do not include this key in your metadata) | ||
* Disable users: Check this if users should be disabled when they leave the school. If left unchecked, users will not be disabled. | *User enabled value: The value which defines the user as active | ||
* Disable after: Choose how many days a user should be active before being disabled | *User disabled value: The value which defines the user as inactive | ||
===Disable options=== | |||
*Disable users: Check this if users should be disabled when they leave the school. If left unchecked, users will not be disabled. | |||
*Disable after: Choose how many days a user should be active before being disabled | |||
=== Metadata configuration === | ===Metadata configuration=== | ||
Select the Metadata setting used. See how to create or update users below. | Select the Metadata setting used. See how to create or update users below. | ||
=== SQL Sentence === | ===SQL Sentence=== | ||
In this field, you can define which records should be included from the students' table. It is only possible to use the SQL where sentence. | In this field, you can define which records should be included from the students' table. It is only possible to use the SQL where sentence. | ||
I.e. (Studienr = 'UMS) or (Fullname like 'inLogic%'). | I.e. (Studienr = 'UMS) or (Fullname like 'inLogic%'). | ||
== Metadata == | ==Metadata== | ||
This is the metadata used when you create or update user in Axpoint. The fields are described below.[[File:Axpoint Metadata.jpg|none|thumb|813x813px|This is the metadata used when you create or update user in Axpoint.]] | This is the metadata used when you create or update user in Axpoint. The fields are described below.[[File:Axpoint Metadata.jpg|none|thumb|813x813px|This is the metadata used when you create or update user in Axpoint.]] | ||
* Axpoint key name: The key that Axpoint uses | |||
* Static text before database field: Can be any text | *Axpoint key name: The key that Axpoint uses | ||
* UMS database field: Choose a field from the students' table | *Static text before database field: Can be any text | ||
* Static text after database field: Can be any text | *UMS database field: Choose a field from the students' table | ||
* Required in Axpoint: Check this to ensure that the field will not be empty in Axpoint. Please note that if the field is blank in UMS, the record will not be sent to Axpoint | *Static text after database field: Can be any text | ||
*Required in Axpoint: Check this to ensure that the field will not be empty in Axpoint. Please note that if the field is blank in UMS, the record will not be sent to Axpoint | |||
Revision as of 11:44, 14 June 2022
Integration with Axpoint's Office 365 SharePoint-based document management system.
Prerequisites
Module requirements
Template settings
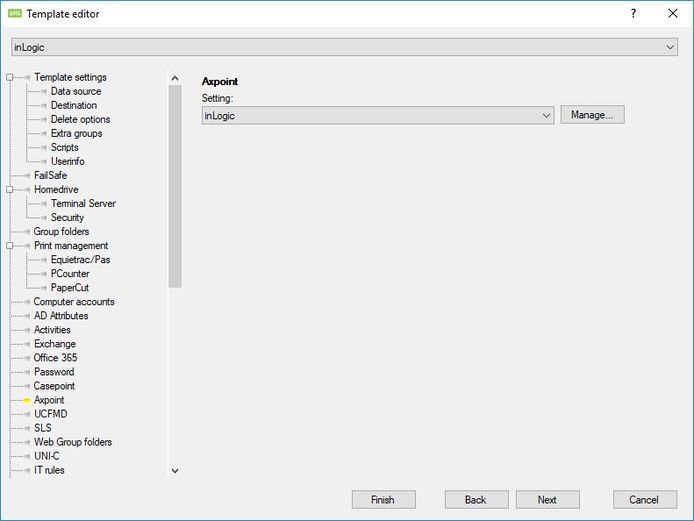
This is where you connect an Axpoint Setting to a template. Users that are on this template will be synchronized with Axpoint.

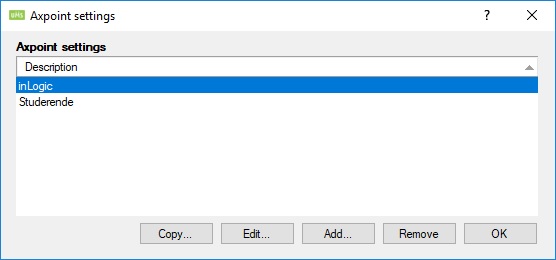
Start by selecting the setting you want to change or add a new one.

Settings
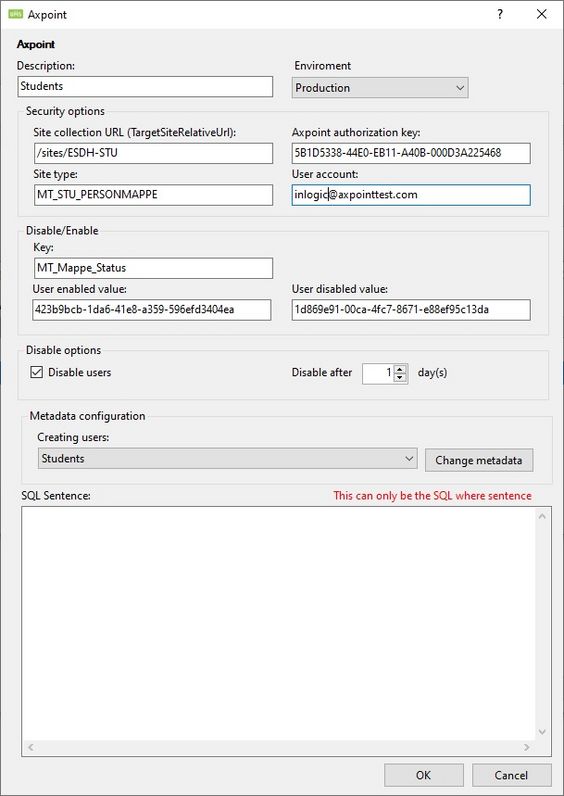
This is where you set up your Axpoint setting. The fields are described below.

Security options
- Site Collection URL: Insert the URL for the work area
- Security token: Value obtained from Axpoint
- Site type: Value obtained from Axpoint
- User account: The user who is allowed to access the site collection
- Waid: Value obtained from Axpoint
Disable/Enable
Please note that the key and values are different for each customer.
- Key: This is the key that Axpoint will look at when checking if a user is enabled or disabled (do not include this key in your metadata)
- User enabled value: The value which defines the user as active
- User disabled value: The value which defines the user as inactive
Disable options
- Disable users: Check this if users should be disabled when they leave the school. If left unchecked, users will not be disabled.
- Disable after: Choose how many days a user should be active before being disabled
Metadata configuration
Select the Metadata setting used. See how to create or update users below.
SQL Sentence
In this field, you can define which records should be included from the students' table. It is only possible to use the SQL where sentence.
I.e. (Studienr = 'UMS) or (Fullname like 'inLogic%').
Metadata
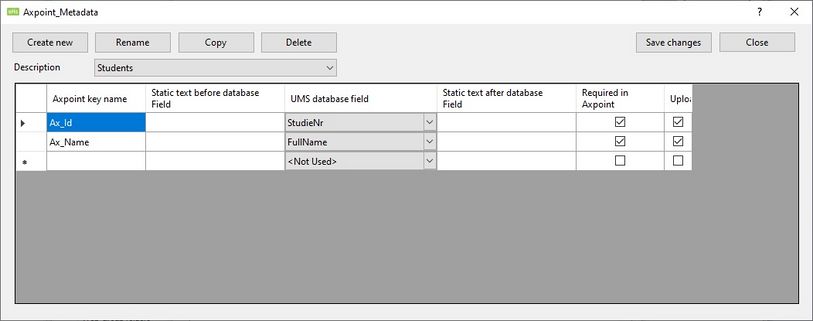
This is the metadata used when you create or update user in Axpoint. The fields are described below.

- Axpoint key name: The key that Axpoint uses
- Static text before database field: Can be any text
- UMS database field: Choose a field from the students' table
- Static text after database field: Can be any text
- Required in Axpoint: Check this to ensure that the field will not be empty in Axpoint. Please note that if the field is blank in UMS, the record will not be sent to Axpoint