Multiple Users: Difference between revisions
No edit summary |
|||
| Line 4: | Line 4: | ||
=== Supported administrative systems === | === Supported administrative systems === | ||
All | |||
=== Module requirements === | === Module requirements === | ||
[[UMS]] | |||
[[UMS Academic Web]] | |||
=== | === What to have ready === | ||
Active Directory | |||
== Installation == | |||
All settings regarding this module is via Template settings, just as “ordinary” users that UMS maintains | |||
[[File:Multipleusersdatasources.png|none|thumb]] | |||
=== | Simply create a new template and choose “Multiple Users” as data source for the template. All other settings for the Multiple users are controlled just like the “ordinary” users that UMS maintains from the admin system. | ||
All special settings regarding multiple users are controlled under “Data source” settings. | |||
==== User settings ==== | |||
This sections controls who the users loginnames are generated. In this example, the next user are created as “MASS_16” and subsequent users MASS_17, MASS_18 and so on. | |||
Max age indicates the max allowed duration for a multiple user created by UMS. | |||
=== | ==== Group settings ==== | ||
Enter a prefix for the groups created by multiple users module. Choose a prefix that will insure that groups created by multiple user module not will interfere with existing groups in Active directory. | |||
== | ==== Web settings ==== | ||
This sections controls which users can create multiple users on this template. Also its possible to indicate which mergelist template are default for users created with this template. | |||
== Technical settings == | == Technical settings == | ||
== FAQ == | == FAQ == | ||
Revision as of 08:45, 17 May 2017
Create groups of unnamed users easily. With the Multiple Users module, the school can welcome and manage groups of temporary users more efficiently. The module is particularly helpful, when you have courses participants and groups of guests, who need temporary access to the school’s system. UMS creates and manages guest users quickly and easily. Create users without assistance from the IT department. The module makes it easy for the school’s staff to create groups of unnamed users. No experience is necessary: You simply login online and press ’Create Multiple Users’. Everyone with the appropriate rights can create temporary users, without assistance from the IT department. All new users get their own login. Avoid clutter. It can be very valuable to avoid clutter in your system. With UMS Multiple Users, it only takes two clicks to remove temporary user accounts that are no longer in use. The module also lets you edit the user’s information, print or save the as CSV file and more.
Prerequisites
Supported administrative systems
All
Module requirements
What to have ready
Active Directory
Installation
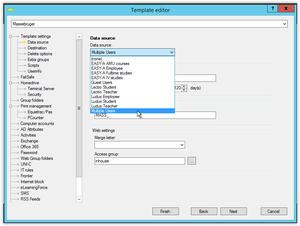
All settings regarding this module is via Template settings, just as “ordinary” users that UMS maintains

Simply create a new template and choose “Multiple Users” as data source for the template. All other settings for the Multiple users are controlled just like the “ordinary” users that UMS maintains from the admin system.
All special settings regarding multiple users are controlled under “Data source” settings.
User settings
This sections controls who the users loginnames are generated. In this example, the next user are created as “MASS_16” and subsequent users MASS_17, MASS_18 and so on.
Max age indicates the max allowed duration for a multiple user created by UMS.
Group settings
Enter a prefix for the groups created by multiple users module. Choose a prefix that will insure that groups created by multiple user module not will interfere with existing groups in Active directory.
Web settings
This sections controls which users can create multiple users on this template. Also its possible to indicate which mergelist template are default for users created with this template.