IT Rules: Difference between revisions
| Line 46: | Line 46: | ||
== Technical settings == | == Technical settings == | ||
After the initial setup of the module (installation manual), there is two recurring tasks: | |||
* Design of the displayed rules | |||
* Setup of UMS web so that some of the admin tasks can be done via the UMS frontend module. | |||
Design of the IT rules | |||
The IT rules that are shown to the users, are HTML documents. | |||
The documents can be found under each IT rule setting (found on the template). | |||
[[File:It rules document.jpg|none|thumb]] | |||
[[File:It rules Setting.jpg|none|thumb]] | |||
Click manage on the rule you want to edit. | |||
Below is shown an example of a simple IT rule: | |||
[[File:IT Rules editor.jpg|none|thumb]] | |||
As described earlier the IT rule are HTML documents. All standard HTML tags is supported. | |||
Please note that if you wish to use pictures or other linked objects, make sure that the referring links is located on a resource that will work for student (and not a file on a local drive)! | |||
It is possible to add UMS variables to the document, so that it possible to achieve more personalized message/IT rule. | |||
In the example shown above the variable <FirstName> is substituted with the loggedin users firstname at runtime. | |||
The preview button will show how the IT rule will look like for the user: | |||
[[File:IT Rules preview.jpg|none|thumb]] | |||
=== Reset IT rules for a user === | |||
UMS has a web interface where its possible to reset the IT rule for a user. The interface is found under the common “Controlpanel” in the UMS Frontend. | |||
Before the Controlpanel can be access, a AD group needs to have access granted through the UMS Configurator under “Web Setup”: | |||
[[File:IT Rules web setup.jpg|none|thumb]] | |||
The group needs to be placed under “Global admin group”. | |||
After the group is entered, the following button is available in the UMS Frontend (for members of the group): | |||
[[File:Control panel.jpg|none|thumb]] | |||
Under the control panel, the user will have access to find a user, and reset counters for the IT rule the user is under. | |||
== FAQ == | == FAQ == | ||
Revision as of 11:41, 13 March 2017
Introduction text.
Prerequisites
Supported administrative systems
Module requirements
Additional functionality
Testing after setup
What to have ready
Is there something to be obtained - physical
Should third party be contacted
Installation
This module is already installed with the standard UMS installation.
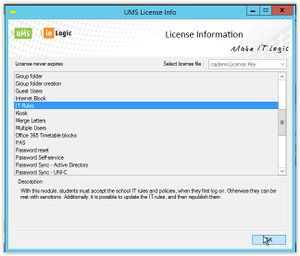
It requires a valid license for the module, which can be checked under “Help/License info”:

The required license is called “IT Rules”:
After the license has been verified, UMS is ready to be configured.
Configuration of IT rules
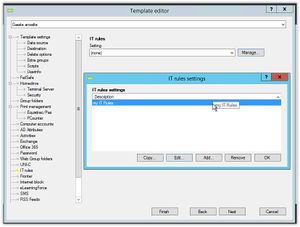
The IT rules is configured via the already created UMS-templates. This allows for different IT rules for different types of users, UMS supports one IT rule per template.
Settings are found under “Template\IT rules” on each template:
A IT rule consist of the following settings:
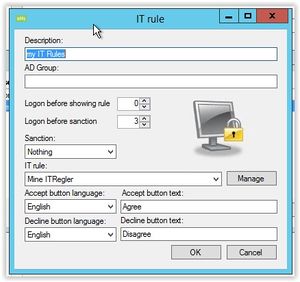
- Description Simply enter a saying description of the rule
- AD Group Enter a AD group in which the users are made members after they have accepted the IT rule
- Logon before showing rule Number of userlogins before the rule is shown
- Logon before sanction Number of login before the chosen sanction is applied
- Sanction Choose sanction for user that declines the rule.
- IT rule Choose which rule is displayed. The rules are html documents, and should be created for each language used on the school.
- Accept/decline buttons Enter which text that should be shown on the buttons.
Technical settings
After the initial setup of the module (installation manual), there is two recurring tasks:
- Design of the displayed rules
- Setup of UMS web so that some of the admin tasks can be done via the UMS frontend module.
Design of the IT rules
The IT rules that are shown to the users, are HTML documents.
The documents can be found under each IT rule setting (found on the template).
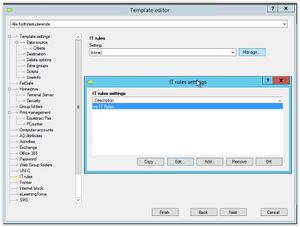
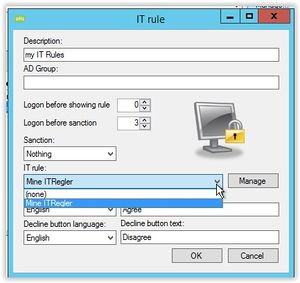
Click manage on the rule you want to edit.
Below is shown an example of a simple IT rule:
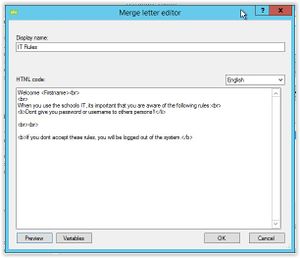
As described earlier the IT rule are HTML documents. All standard HTML tags is supported.
Please note that if you wish to use pictures or other linked objects, make sure that the referring links is located on a resource that will work for student (and not a file on a local drive)!
It is possible to add UMS variables to the document, so that it possible to achieve more personalized message/IT rule.
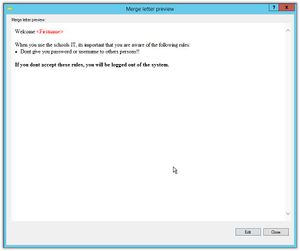
In the example shown above the variable <FirstName> is substituted with the loggedin users firstname at runtime.
The preview button will show how the IT rule will look like for the user:
Reset IT rules for a user
UMS has a web interface where its possible to reset the IT rule for a user. The interface is found under the common “Controlpanel” in the UMS Frontend.
Before the Controlpanel can be access, a AD group needs to have access granted through the UMS Configurator under “Web Setup”:
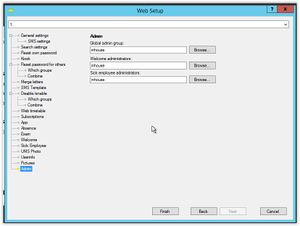
The group needs to be placed under “Global admin group”.
After the group is entered, the following button is available in the UMS Frontend (for members of the group):

Under the control panel, the user will have access to find a user, and reset counters for the IT rule the user is under.