Attendance Registration: Difference between revisions
No edit summary |
|||
| Line 91: | Line 91: | ||
E.g. the keyword 'Sick' means the student has to send a message containing 'sick' or 'sick %reason or message to the teacher%'. Both cases will be accepted by UMS. All text after the keyword will not be stored in UMS. | E.g. the keyword 'Sick' means the student has to send a message containing 'sick' or 'sick %reason or message to the teacher%'. Both cases will be accepted by UMS. All text after the keyword will not be stored in UMS. | ||
==== SMS absence Keyword ==== | ====SMS absence Keyword==== | ||
The keyword set in this box will define which keyword the student sends in a text message to notify absence. | The keyword set in this box will define which keyword the student sends in a text message to notify absence. | ||
| Line 170: | Line 170: | ||
If there are made changes to which [[Attendance_Registration#Granting_access_to_teachers.2Femployees_and_edit_access_to_registration_forward-looking|attendance types that are shown]] and the definitions of [[Attendance_Registration#Edit_attendance_types|these attendance types]] in the web configurator, it will affect the Absence Status code ie. removing Approved absence will leave only Status code 0, 1 and 3 to be used. | If there are made changes to which [[Attendance_Registration#Granting_access_to_teachers.2Femployees_and_edit_access_to_registration_forward-looking|attendance types that are shown]] and the definitions of [[Attendance_Registration#Edit_attendance_types|these attendance types]] in the web configurator, it will affect the Absence Status code ie. removing Approved absence will leave only Status code 0, 1 and 3 to be used. | ||
== Extra == | |||
If you want to change the color of the UI in the absence register module, you can achieve this with custom_styles.css | |||
.TimeLineAppointmentSelectedDiv { | |||
background-color: gray !important; | |||
border-color: #dcdcdc !important; | |||
background-image: none !important; | |||
} | |||
.TimeLineAppointmentDiv { | |||
background-color: #c8c8c8 !important; | |||
border-color: gray !important; | |||
background-image: none !important; | |||
} | |||
.TimeLineAppointmentSelectedDiv_Approved { | |||
background: gray !important; | |||
background-image: url("../Absence_protocol/Images/symbol_check.gif") !important; | |||
border-color: #dcdcdc !important; | |||
background-position: right !important; | |||
background-repeat: no-repeat, repeat-x !important; | |||
} | |||
.TimeLineAppointmentDiv_Approved { | |||
background-color: #c8c8c8 !important; | |||
background-image: url("../Absence_protocol/Images/symbol_check.gif") !important; | |||
border-color: gray !important; | |||
background-position: right !important; | |||
background-repeat: no-repeat, repeat-x !important; | |||
} | |||
.TimeLineAppointmentDiv_Approved .contentOnTimetable, | |||
.TimeLineAppointmentSelectedDiv_Approved .contentOnTimetable, | |||
.TimeLineAppointmentDiv .contentOnTimetable, | |||
.TimeLineAppointmentSelectedDiv .contentOnTimetable { | |||
color: black !important; | |||
} | |||
<br /> | |||
Revision as of 08:17, 2 June 2021
Attendance Registration is a tool for the educational sector that makes it easy to register attendance. Through a simple and intuitive interface, the teacher can register who is present, who is late, and who is absent. Registering attendance can be done in a matter of seconds, simply by clicking the button with the student’s name and picture. The interface uses colour codes, which makes it easy to see what the individual students are registered as. You decide which attendance options you want to use - i.e. options for being late, for legal absence, and illegal absence - as well as which colours are used for the different options. When attendance is registered, UMS automatically writes back to the administrative system - if supported. The interface also supports the possibility to see if the student has sent a text message to the school or if the staff has written notes regarding the student’s attendance.
There are references to other UMS modules, e.g. SMS, in this guide. In case the mentioned modules are not present in your environment, you can ignore these settings.
In order to edit templates, it is also required to have a basic knowledge about the UMS configurator.
Prerequisites
Supported administrative systems
- Easy-C
- Ludus
- SIS
- Other systems where it is possible to retrieve a timetable for students and teachers
Module requirements
Testing after setup
To start testing after setup, you must log in as a teacher. See if you have access to attendance registration on the front page of UMS portal.
Click on attendance registration and check that you can search for timetables for students, teachers, and classes.
Check that you can register individual students as absent.
What is necessary to get started
To get started, it is necessary to have a running UMS installation.
Installation
Install UMS and UMS Academic Web
Technical settings
Settings for UMS Attendance Basic
All settings for UMS Attendance Basic is set in the configurator. In the main menu under 'Settings/Services', it is necessary to set the 'Absence service' to run on a server. The service is responsible for sending text messages to students that are registered as absent. Please make sure the service has started and is running. See example of the set up below.

Global settings
Global settings are settings that are valid for the entire school. For settings that can be altered per education, class, or similar, see 'Individual settings'.
The Global settings are:
- Attendance colours
- Design text messages sent to the students
- Granting access to teachers/employees and edit access to registration forward-looking
- Edit attendance types (late, approved, not approved)
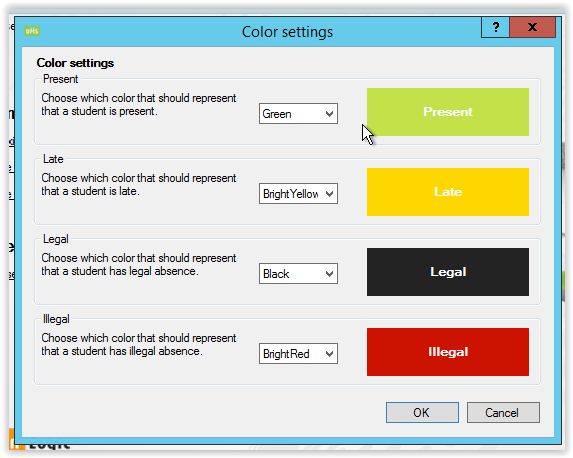
Attendance colours
Settings are found under 'Modules\Absence\colors' in the main menu. Simply select the colours you want to use for each type of attendance. See example below.
Designing text messages sent to the students
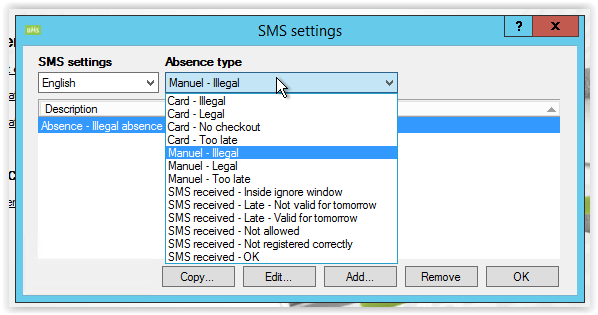
It is possible to preset text messages that will be sent to students if they are registered as absent. The settings are found under 'Modules\Absence\SMS' in the main menu. The text messages can be set for each type of attendance both in Danish and English. It is also possible to create multiple text messages for each type of attendance. If you create multiple messages, the system will randomise these messages. Meaning, the system will send different messages to a student each time attendance is registered. See example below.
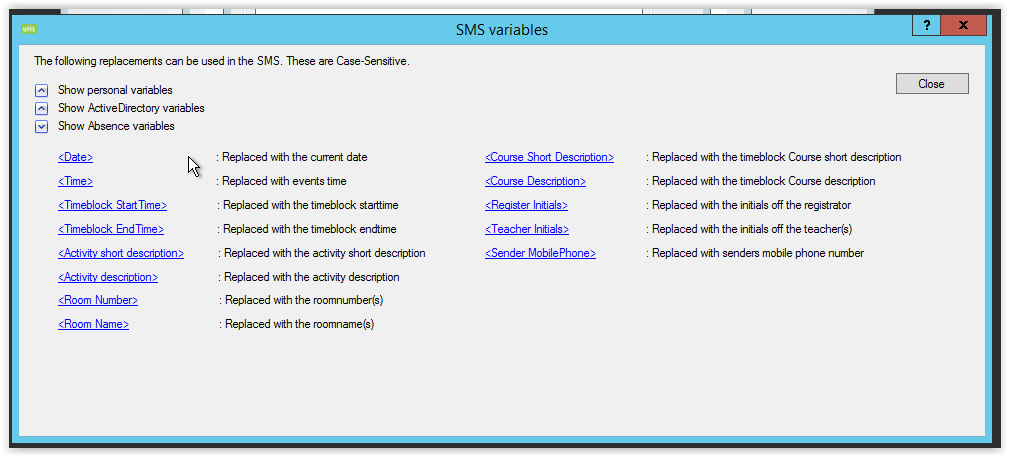
When you edit a message, there are several variables that can be used to ensuaking the messages more personalised. See example below.
Granting access to teachers/employees and edit access to registration forward-looking
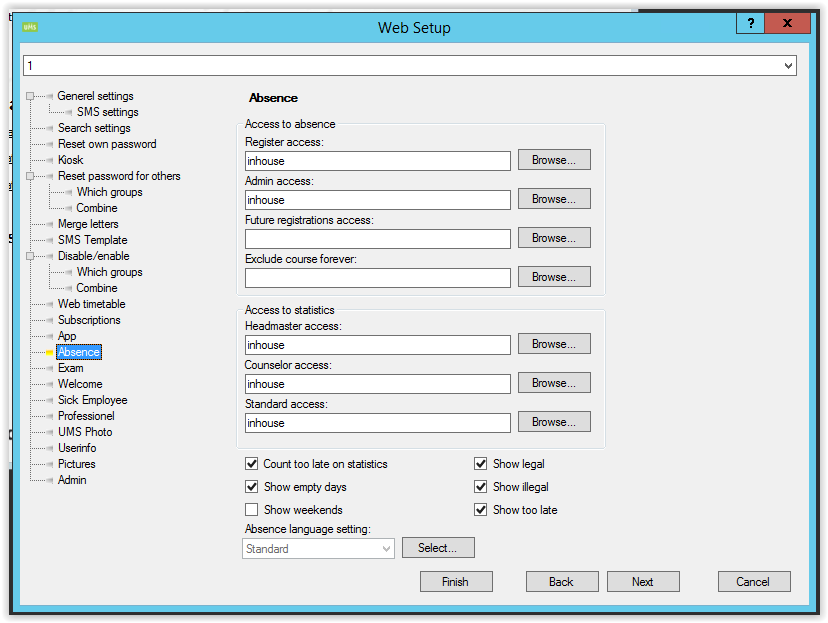
Granting access to functions in the registration interface is done under 'Setup web access/Absence'. Attendance basic allows 'register access' and 'Future registration access'. Enter a group (nested groups are allowed) with the teacher/employees that are allowed to use the specific function. See example below.
The checkboxes have the following meaning:
- 'Count too late on statistics' – Not used for Attendance basic
- 'Show empty days' – Should the day ruler show or omit days with no planned timetable?
- 'Show weekends' – Should the day ruler show or omit weekends?
- 'Show legal' – Is legal attendance used on the school/is it shown in the protocol?
- 'Show illegal' – Is illegal attendance used on the school/is it shown in the protocol?
- 'Show too late' – Is too late attendance used on the school/is it shown in the protocol?
Edit attendance types
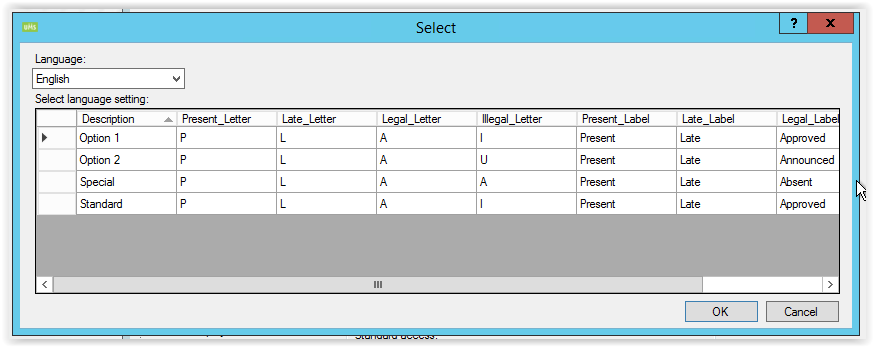
To edit letters and text used in the attendance module, choose the button 'Select' (see the window above).
Double-click on the row containing the settings you want to edit. See below.
Individual settings
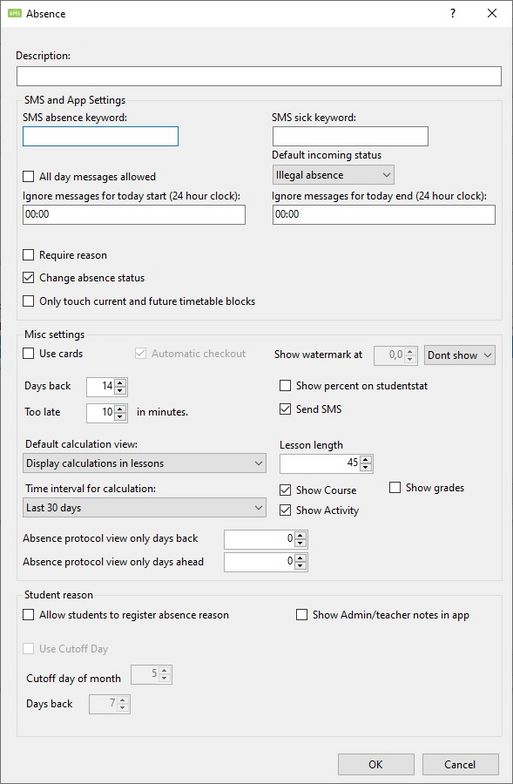
Individual settings can be altered per education, class, or similar. For settings valid for the entire school, see 'Global settings'. If an individual setting for a specific group is needed, it is necessary to create the group with the students in question beforehand. These settings can be altered under Configurator\Templates\Edit\Absence\Manage\Add a new or edit an existing setting.
SMS Sick Keyword
The keyword set in this box will define which keyword the student sends in a text message to notify absence.
E.g. the keyword 'Sick' means the student has to send a message containing 'sick' or 'sick %reason or message to the teacher%'. Both cases will be accepted by UMS. All text after the keyword will not be stored in UMS.
SMS absence Keyword
The keyword set in this box will define which keyword the student sends in a text message to notify absence.
E.g. the keyword 'Sick' means the student has to send a message containing 'absence' or 'absence %reason or message to the teacher%'. Both cases will be accepted by UMS. All text after the keyword will be stored in UMS.
SMS and App settings for notify absence
- 'Default incoming SMS status' - These are settings for which type of attendance the system should set as default when receiving a message from a student notifying absence. The teacher will see this status in the attendance registration interface. E.g. when the default type of attendance is 'Legal absence', students will be marked as 'Legal absence' when notifying absent
- 'Ignore messages for today start/end' - In the set time span, it is not possible for a student to send a text message to notify absence. This means that if the message is received before the given start time, e.g. 10 a.m., the system will check the students schedule for timetable blocks that day and mark the blocks with the default attendance status, e.g. 'Legal absence'. The system will then send a reply confirming the student is marked absent. If the message is received between the start and end time, e.g. 10 a.m. and 3 p.m., the system will send the student a reply, saying it is not allowed to notify absence at this time. If the message is received after the given end time, e.g. 3.pm., the system will check the schedule for timetable blocks the following day and mark those with the default attendance status, e.g. 'Legal absence' If this feature is set to 00:00 - 00:00 students cannot register as absent. If you want an "Always register for the current day"-functionality, set it to 23:59 - 00:00
- 'Require reason' - The school can require the students to give a reason when notifying absence. Check this box if students have to write a reason in order to register as absent
Misc settings
- 'Use cards' - This enables students to register via their student ID's via Bianco. Check this box if the student is allowed to register via card
- 'Show watermark at %' - If the school has a limitation for how high attendance percentage is allowed for a student, this can be set as visible. Check this box if it should be visible if the students are above the accepted limit
- 'Days back' - This setting decides how many days backwards a teacher is allowed to register and edit attendance. Set the number of days that are allowed in the drop-down menu 'Days back'. Please note that this setting cannot exceed the number of days backwards in the global timetable block data job!
- 'Too late' - This shows the number of minutes a late show should count. 'Too late' sets the number of minutes late attendance should count. If a student is late for class it will be registered as e.g. 10 minutes absence. Set the number of minutes that should count in this box
- 'Show percent on studentstat' - Check this box, if students are allowed to see their attendance percent under 'My attendance'
- 'Send SMS' - When a student is registered as absent, the system can reply with a text message. Check this box to enable the system to send a reply
- 'Default calculation view' - Choose between "Display calculation in lessons" or "Display calculations in minutes"
- 'Lesson length' - Number of minutes one lesson counts for
- 'Time interval for calculation' - Select the time interval for the calculation of my absence
- 'Show Course' - Check this box to show course view for students' 'My absence' in both web and app
- 'Show Activity' - Check this box to show activity view for students' 'My absence' in both web and app
- 'Show Grades' - Check this box to show grades in statistics
Student reason settings
- 'Allow students to register absence reason' - This setting allows students to create an absence reason when they are registered as absent
- 'Use Cutoff Day' - This setting changes the 'Register absence' feature from being reliant on a specific amount of days back, to instead be fixed to a specific amount of days into a month.
- 'Cutoff day of month' - At this day of the month the absence gets "locked" for the previous month.
- 'Days back' - This sets how many days backwards students are allowed to add an absence reason on a course. E.g. the student can register an absence reason 7 days backwards
- 'Show Admin/teacher notes in app' - Changes whether the student can see administration and teacher-written notes on absence entries. They are presented in the app with a lock icon and cursive text.
FAQ
What to do when a teacher can't register absence X days back ?
A specific day in the absence registration system has a green checkmark if the teacher is allowed to register according to "Days back" absence settings on the template in UMS Configurator.
Only members of the AD group configured in Websetup are allowed to register more days back than teachers.
What to do when abscence can't be registrated due to double registration ?
This error is due to double absence registration. Absence should be deleted in the administrativ program.
(UpdateEasyW031) Update Error Username = benj4896 - TimeStamp = 26-09-2018 10:14:55 - ErrorCode = 6 - ErrorText = elev. 2510015153, dato 26.09.2018, lektion: 2 eksisterende fravær kan ikke overskrives
How can a teacher know that if a student has a pause?
If a student has a pause, a small pause icon will be shown for that student.
Hovering with the mouse over the icon will show the pause interval.
The system will automatically handle how much absence a student should have, if they don't show up, but they have a pause.
What does the Absence Status code mean?
When checking up on absence registration in the database each type of attendence will be substituted by a number as such:
| Status | Attendance Type |
|---|---|
| 0 | Attended |
| 1 | Too Late |
| 2 | Approved Absence |
| 3 | Illegal Absence |
If there are made changes to which attendance types that are shown and the definitions of these attendance types in the web configurator, it will affect the Absence Status code ie. removing Approved absence will leave only Status code 0, 1 and 3 to be used.
Extra
If you want to change the color of the UI in the absence register module, you can achieve this with custom_styles.css
.TimeLineAppointmentSelectedDiv {
  background-color: gray !important;
  border-color: #dcdcdc !important;
  background-image: none !important;
}

.TimeLineAppointmentDiv {
  background-color: #c8c8c8 !important;
  border-color: gray !important;
  background-image: none !important;
}

.TimeLineAppointmentSelectedDiv_Approved {
  background: gray !important;
  background-image: url("../Absence_protocol/Images/symbol_check.gif") !important;
  border-color: #dcdcdc !important;
  background-position: right !important;
  background-repeat: no-repeat, repeat-x !important;
}

.TimeLineAppointmentDiv_Approved {
  background-color: #c8c8c8 !important;
  background-image: url("../Absence_protocol/Images/symbol_check.gif") !important;
  border-color: gray !important;
  background-position: right !important;
  background-repeat: no-repeat, repeat-x !important;
}

.TimeLineAppointmentDiv_Approved .contentOnTimetable,
.TimeLineAppointmentSelectedDiv_Approved .contentOnTimetable,
.TimeLineAppointmentDiv .contentOnTimetable,
.TimeLineAppointmentSelectedDiv .contentOnTimetable {
  color: black !important;
}
