User Lock: Difference between revisions
No edit summary |
|||
| (4 intermediate revisions by 2 users not shown) | |||
| Line 1: | Line 1: | ||
With User Lock, the school’s staff can deactivate a user’s account and thereby block the user’s access to the school’s IT system, without needing assistance from the IT department. It only takes a moment to deactivate an account, making it possible to intervene immediately, e.g. is a student is caught cheating. In the same way, reactivating the account also just takes a moment. When you deactivate an account, you can write why. This way it is easy to see if, e.g. at student violates the same rules repeatedly. | With User Lock, the school’s staff can deactivate a user’s account and thereby block the user’s access to the school’s IT system, without needing assistance from the IT department. It only takes a moment to deactivate an account, making it possible to intervene immediately, e.g. is a student is caught cheating. In the same way, reactivating the account also just takes a moment. When you deactivate an account, you can write why. This way it is easy to see if, e.g. at student violates the same rules repeatedly. | ||
== Prerequisites == | ==Prerequisites== | ||
=== Supported administrative systems === | ===Supported administrative systems=== | ||
All | All | ||
=== Module requirements === | ===Module requirements=== | ||
[[UMS Academic Web]] | [[UMS Academic Web]] | ||
=== Testing after setup === | ===Testing after setup=== | ||
Test of an existing user in AD. The user must be able to both disables / Enables again | Test of an existing user in AD. The user must be able to both disables / Enables again | ||
=== What to have ready === | ===What to have ready=== | ||
Active Directory | Active Directory | ||
== Installation == | ==Installation== | ||
=== Configuration of "Disable/Enable" === | ===Configuration of "Disable/Enable"=== | ||
The settings can be found under “Web setup\Edit”. | The settings can be found under “Web setup\Edit”. | ||
[[File:Configuration of Disable-Enable.png|none|thumb]] | [[File:Configuration of Disable-Enable.png|none|thumb|815x815px]] | ||
The configuration of “User lock” consist of 2 sets of settings: | The configuration of “User lock” consist of 2 sets of settings: | ||
* A number of groups (AD groups) which can have their account locked/unlocked. | *A number of groups (AD groups) which have access to lock/unlock users. | ||
*A number of groups (AD groups) which can have their account locked/unlocked. | |||
First one group needs to added with access to Lock/unlock users: | First one group needs to added with access to Lock/unlock users: | ||
[[File:Userlockaccesstodisableandenableusers. | [[File:Userlockaccesstodisableandenableusers.jpg|none|thumb|344x344px]] | ||
* Enter a saying display name | |||
* | |||
====Display name==== | |||
Enter a saying display name | |||
=====Group===== | |||
Browse for an existing AD group or write the samaccountname. | |||
=== Groups setup === | =====Show username===== | ||
Show the Username from UMS | |||
=====Templates===== | |||
Opens another window where you can select the templates you are allowed to disable and enable users for. | |||
=====Service account===== | |||
Choose a Service Account with access to the domain in which the group is residing. | |||
====Show UPN==== | |||
Show the Username from Active directory. This slows the loading in UMS web when showing users | |||
===Groups setup=== | |||
Next step is to choose the groups are can be lock/unlocked with this module: | Next step is to choose the groups are can be lock/unlocked with this module: | ||
[[File:Configuration of Disable-Enable.png|none|thumb]] | [[File:Configuration of Disable-Enable.png|none|thumb|815x815px]] | ||
Click “Add…” | Click “Add…” | ||
[[File:Userlockwhichuserscanhavetheirpasswordreset.png|none|thumb]] | [[File:Userlockwhichuserscanhavetheirpasswordreset.png|none|thumb|492x492px]] | ||
=== Combinations of groups === | *Enter a saying display name, and browse for an existing AD group. | ||
*Optional an OU search path can be entered. This means that the users both need to be in the group and placed in the “Search path” or below in AD. | |||
*Choose a Service Account with access to the domain in which the group is residing. | |||
===Combinations of groups=== | |||
The last step is combine the 2 groups: | The last step is combine the 2 groups: | ||
[[File:Userlockcombine.png|none|thumb]] | [[File:Userlockcombine.png|none|thumb|820x820px]] | ||
Click “Add…” | Click “Add…” | ||
[[File:Userlockeditcombinedrights.png|none|thumb]] | [[File:Userlockeditcombinedrights.png|none|thumb|393x393px]] | ||
Choose the 2 groups. | Choose the 2 groups. | ||
[[File:Userlockcombined1.png|none|thumb]] | [[File:Userlockcombined1.png|none|thumb|823x823px]] | ||
Now a basic setting is setup. | Now a basic setting is setup. | ||
| Line 54: | Line 73: | ||
Typical example: | Typical example: | ||
[[File:Userlockcombined2.png|none|thumb]] | [[File:Userlockcombined2.png|none|thumb|823x823px]] | ||
In the above example, “All teachers” can block “All students”. And “IT Staff” can block both “All students” and “All teachers”. | In the above example, “All teachers” can block “All students”. And “IT Staff” can block both “All students” and “All teachers”. | ||
== Technical settings == | ==Technical settings== | ||
=== Settings for Disable/enable === | ===Settings for Disable/enable=== | ||
All setting for UMS Attendance Basic is set through the configurator. | All setting for UMS Attendance Basic is set through the configurator. | ||
All settings for the ‘Disable/enable’ module is set under “Set web access” or under Modules/UMS Web setup: | All settings for the ‘Disable/enable’ module is set under “Set web access” or under Modules/UMS Web setup:[[File:Configuration of Disable-Enable.png|none|thumb|815x815px]] | ||
The setup consists of three steps: | The setup consists of three steps: | ||
#Setup a collection of groups, which have access to disable/enable users. | |||
#Setup a collection of group that can have their account disabled/enabled. | |||
#Combine the two settings above to achieve the access level needed. | |||
=== Group settings === | ===Group settings=== | ||
Define any number of Active Directory Groups, which can access the functionality of the module. | Define any number of Active Directory Groups, which can access the functionality of the module. [[File:Userlockaccesstodisableandenableusers.png|none|thumb|537x537px]] | ||
Make sure that the chosen Service account have access to resolve groups in the chosen domain. | Make sure that the chosen Service account have access to resolve groups in the chosen domain. | ||
Now setup a number of groups, which can have their accounts disabled/enabled. | Now setup a number of groups, which can have their accounts disabled/enabled.[[File:Userlockwhichuserscanhavetheirpasswordreset.png|none|thumb|492x492px]] | ||
As an extra option, it is possible to specify a “Search path”. If this setting has a value, the users is required to be both members of the group and reside in the specified OU-path or below. | As an extra option, it is possible to specify a “Search path”. If this setting has a value, the users is required to be both members of the group and reside in the specified OU-path or below. | ||
Now there should at least two groups defined: One for the users with access, and one for the users, which can have their account disabled/enabled. The last step is to combine them. | Now there should at least two groups defined: One for the users with access, and one for the users, which can have their account disabled/enabled. The last step is to combine them.[[File:Userlockeditcombinedrights.png|none|thumb|393x393px]] | ||
== FAQ == | ==FAQ== | ||
Latest revision as of 13:28, 25 March 2021
With User Lock, the school’s staff can deactivate a user’s account and thereby block the user’s access to the school’s IT system, without needing assistance from the IT department. It only takes a moment to deactivate an account, making it possible to intervene immediately, e.g. is a student is caught cheating. In the same way, reactivating the account also just takes a moment. When you deactivate an account, you can write why. This way it is easy to see if, e.g. at student violates the same rules repeatedly.
Prerequisites
Supported administrative systems
All
Module requirements
Testing after setup
Test of an existing user in AD. The user must be able to both disables / Enables again
What to have ready
Active Directory
Installation
Configuration of "Disable/Enable"
The settings can be found under “Web setup\Edit”.
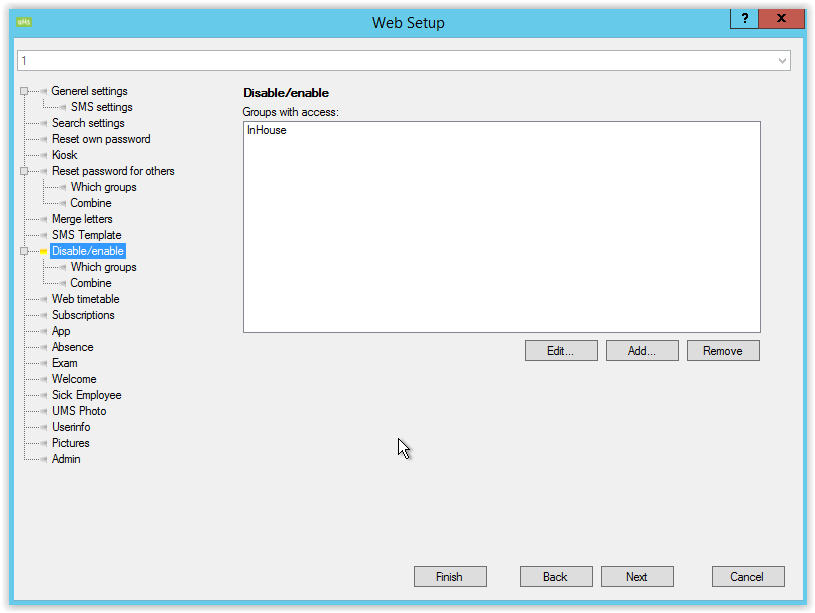
The configuration of “User lock” consist of 2 sets of settings:
- A number of groups (AD groups) which have access to lock/unlock users.
- A number of groups (AD groups) which can have their account locked/unlocked.
First one group needs to added with access to Lock/unlock users:
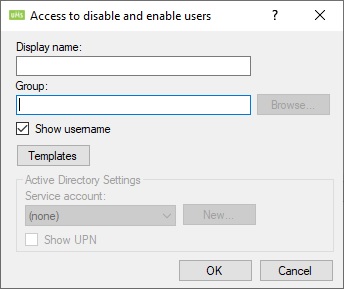
Display name
Enter a saying display name
Group
Browse for an existing AD group or write the samaccountname.
Show username
Show the Username from UMS
Templates
Opens another window where you can select the templates you are allowed to disable and enable users for.
Service account
Choose a Service Account with access to the domain in which the group is residing.
Show UPN
Show the Username from Active directory. This slows the loading in UMS web when showing users
Groups setup
Next step is to choose the groups are can be lock/unlocked with this module:

Click “Add…”
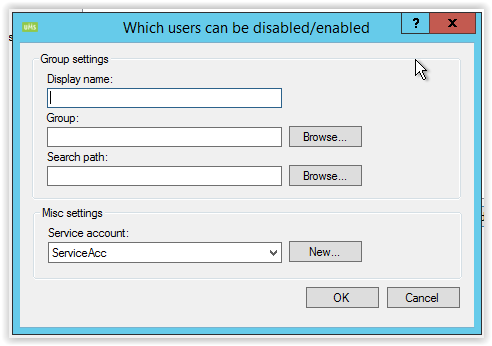
- Enter a saying display name, and browse for an existing AD group.
- Optional an OU search path can be entered. This means that the users both need to be in the group and placed in the “Search path” or below in AD.
- Choose a Service Account with access to the domain in which the group is residing.
Combinations of groups
The last step is combine the 2 groups:
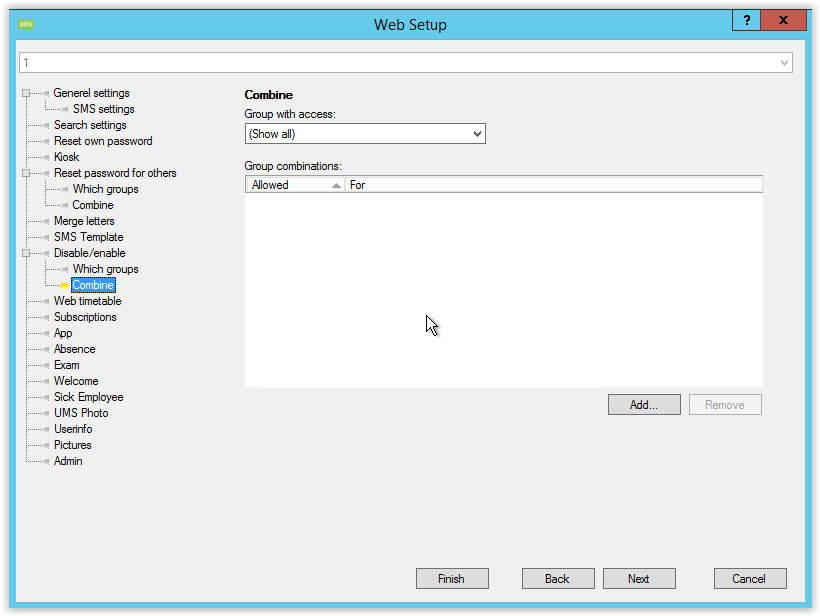
Click “Add…”
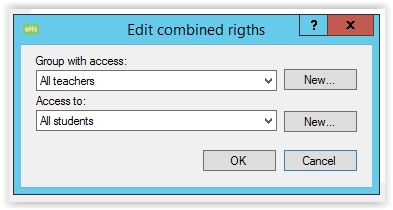
Choose the 2 groups.
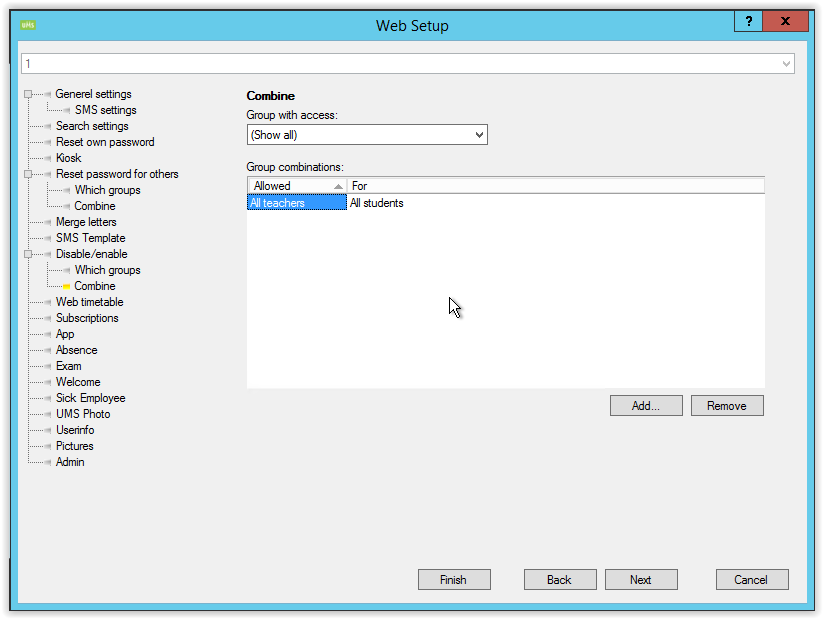
Now a basic setting is setup.
Remember that it’s possible to add a large number af groups if needed, so the needed resulting combined rights is correct.
Typical example:
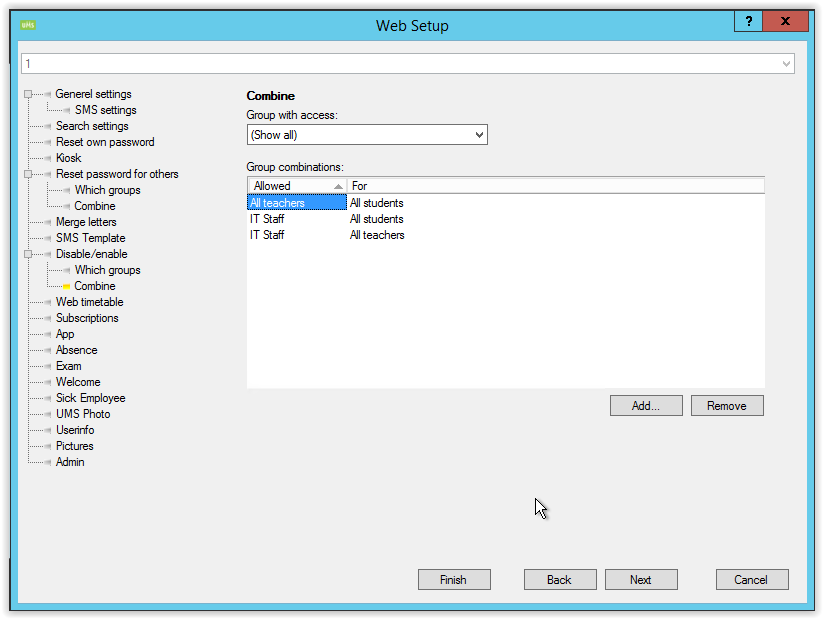
In the above example, “All teachers” can block “All students”. And “IT Staff” can block both “All students” and “All teachers”.
Technical settings
Settings for Disable/enable
All setting for UMS Attendance Basic is set through the configurator.
All settings for the ‘Disable/enable’ module is set under “Set web access” or under Modules/UMS Web setup:

The setup consists of three steps:
- Setup a collection of groups, which have access to disable/enable users.
- Setup a collection of group that can have their account disabled/enabled.
- Combine the two settings above to achieve the access level needed.
Group settings
Define any number of Active Directory Groups, which can access the functionality of the module.
Make sure that the chosen Service account have access to resolve groups in the chosen domain.
Now setup a number of groups, which can have their accounts disabled/enabled.

As an extra option, it is possible to specify a “Search path”. If this setting has a value, the users is required to be both members of the group and reside in the specified OU-path or below.
Now there should at least two groups defined: One for the users with access, and one for the users, which can have their account disabled/enabled. The last step is to combine them.
