InLogic SMS Gateway: Difference between revisions
| (32 intermediate revisions by 7 users not shown) | |||
| Line 1: | Line 1: | ||
== | ==Important== | ||
To be able to send SMS, the inLogic SMS Gateway requires GSM modems with USB interface. We recommend "HUAWEI LTE USB Stick Model: E3372". | To be able to send SMS, the inLogic SMS Gateway requires GSM modems with USB interface. We recommend "HUAWEI LTE USB Stick Model: E3372". | ||
| Line 23: | Line 23: | ||
|443 | |443 | ||
|HTTPS access | |HTTPS access | ||
|} | |} | ||
| Line 167: | Line 164: | ||
[[File:Modem Settings Shell.png|none|thumb|1240x1240px]] | [[File:Modem Settings Shell.png|none|thumb|1240x1240px]] | ||
===Root Settings=== | ===Root Settings=== | ||
Change of root password | Change of root password require putty.exe. Default root password can be requested from inlogic. | ||
Use Putty.exe to connect to Inlogic Gateway, run command ''(sudo passwd root'') and follow the instructions on screen. | |||
[[File:Modem Settings Root.png|none|thumb|1240x1240px]] | [[File:Modem Settings Root.png|none|thumb|1240x1240px]] | ||
==Additional information== | |||
Additional information about the product, users, and programs used in the tutorial. | |||
====Usernames and passwords==== | |||
====SSH Clients==== | |||
{| class="wikitable" | |||
|+A list of SSH Clients | |||
!Program name | |||
!URL | |||
|- | |||
|PuTTy | |||
|https://www.putty.org/ | |||
|} | |||
====Open source FTP Client==== | |||
{| class="wikitable" | |||
|+A list of FTP clients | |||
!Program name | |||
!URL | |||
|- | |||
|WinSCP | |||
|https://winscp.net/eng/index.php | |||
|- | |||
|FileZilla | |||
|https://filezilla-project.org/ | |||
|} | |||
==FAQ== | ==FAQ== | ||
===Linux commands=== | ===Linux commands=== | ||
==== Update ubuntu ==== | |||
sudo apt-get update -y | |||
sudo apt-get upgrade -y | |||
====Update inLogic files and Database from command line==== | |||
rm -rf /mnt/Update/update | |||
wget --no-check-certificate <nowiki>https://downloads.inlogic.dk/downloads/inlogicgatewaymodem/Update.zip</nowiki> -O /mnt/Update/Update.zip | |||
unzip /mnt/Update/Update.zip -d /mnt/Update/update | |||
chmod 777 /mnt/Update/update/mnt/flash/root/updateservice/update.sh | |||
/mnt/Update/update/mnt/flash/root/updateservice/update.sh | |||
'''Commands''' | |||
*Commands shows Status of Apache (systemctl status apache2.service) | |||
*update system ( apt-get udate apt-get update) | |||
====Update/Install USB modeswitch==== | |||
sudo wget <nowiki>https://www.draisberghof.de/usb_modeswitch/usb-modeswitch-2.6.0.tar.bz2</nowiki> -O /tmp/usb-modeswitch-2.6.0.tar.bz2 | |||
sudo tar xvf /tmp/usb-modeswitch-2.6.0.tar.bz2 -C /tmp | |||
sudo wget <nowiki>https://downloads.inlogic.dk/downloads/inlogicgatewaymodem/usb_modeswitch/usb_modeswitch_dispatcher.tcl</nowiki> -O /tmp/usb-modeswitch-2.6.0/usb_modeswitch_dispatcher.tcl | |||
cd /tmp/usb-modeswitch-2.6.0 | |||
make;make install | |||
====Update ubuntu from 18 to 20==== | |||
Use default answers when running these commands. | |||
sudo sed -i 's/bionic/focal/g' /etc/apt/sources.list | |||
sudo sed -i 's/bionic/focal/g' /etc/apt/sources.list.d/odroid.list | |||
sudo apt-get update -y | |||
sudo apt-get upgrade -y | |||
sudo apt-get dist-upgrade -y | |||
====How to change IP settings==== | ====How to change IP settings==== | ||
*nano /etc/ | *nano /etc/netplan/01-netconf.yaml | ||
*reboot | *reboot | ||
| Line 200: | Line 254: | ||
*lsusb | *lsusb | ||
==== See Apache error logs ==== | |||
* inlapache | |||
==Rest API== | ==Rest API== | ||
Theres a REST API to use, to send messages from the inLogic SMS Gateway. | Theres a REST API to use, to send messages from the inLogic SMS Gateway. | ||
=== Send SMS === | ===Send SMS=== | ||
{| class="wikitable" | {| class="wikitable" | ||
!Title | !Title | ||
| Line 247: | Line 305: | ||
curl -X POST <nowiki>https://modem.ums.dk/source/send_sms.php?username=</nowiki><USERNAME>&pwd=<PASSWORD>&from=ums&to=<RECIEPIENT>&message=<MESSAGE> | curl -X POST <nowiki>https://modem.ums.dk/source/send_sms.php?username=</nowiki><USERNAME>&pwd=<PASSWORD>&from=ums&to=<RECIEPIENT>&message=<MESSAGE> | ||
=== Check SMS Status === | ===Check SMS Status=== | ||
{| class="wikitable" | {| class="wikitable" | ||
!Title | !Title | ||
| Line 270: | Line 328: | ||
ScheduledToSend = -1 | |||
OK = 0 | |||
OK_WithError = 1 | |||
InUMSQueue = 2 | |||
InModemQueue = 3 | |||
Failed = 4 | |||
IDNotFound = 5 | |||
SentViaMail = 100 | |||
FailedSendingViaMail = 101 | |||
FailedSendingViaMail = 101 | |||
|- | |- | ||
|Error Response | |Error Response | ||
| Line 313: | Line 364: | ||
Example | Example | ||
curl -X POST https://modem.ums.dk/webservice/getstatus.php?username=<USERNAME>&pwd=<PASSWORD>&id=<ID> | curl -X POST https://modem.ums.dk/webservice/getstatus.php?username=<USERNAME>&pwd=<PASSWORD>&id=<ID> | ||
==Deleting the SMS queue== | |||
Locate the "mnt/flash/spool/all#" and use the "rm *" command to purge everything within the folder. | |||
== Updating from 20.04 or lower == | |||
Updating your SMS modem from Ubuntu 20.04 or lower might result in the following message: "No new release found" | |||
This is fixed by replacing the text in /etc/apt/sources.list.d/odroid.list using WinSCP with the follwing:<blockquote>deb <nowiki>http://ports.ubuntu.com/ubuntu-ports/</nowiki> jammy main universe restricted | |||
deb-src <nowiki>http://ports.ubuntu.com/ubuntu-ports/</nowiki> jammy main universe restricted | |||
deb <nowiki>http://ports.ubuntu.com/ubuntu-ports/</nowiki> jammy-updates main universe restricted | |||
deb-src <nowiki>http://ports.ubuntu.com/ubuntu-ports/</nowiki> jammy-updates main universe restricted | |||
deb <nowiki>http://ports.ubuntu.com/ubuntu-ports/</nowiki> jammy-backports main restricted | |||
deb-src <nowiki>http://ports.ubuntu.com/ubuntu-ports/</nowiki> jammy-backports main restricted | |||
deb <nowiki>http://ports.ubuntu.com/ubuntu-ports/</nowiki> jammy-security main restricted | |||
deb-src <nowiki>http://ports.ubuntu.com/ubuntu-ports/</nowiki> jammy-security main restricted | |||
deb <nowiki>http://ports.ubuntu.com/ubuntu-ports/</nowiki> jammy-security universe | |||
deb-src <nowiki>http://ports.ubuntu.com/ubuntu-ports/</nowiki> jammy-security universe | |||
deb <nowiki>http://ports.ubuntu.com/ubuntu-ports/</nowiki> jammy-security multiverse | |||
deb-src <nowiki>http://ports.ubuntu.com/ubuntu-ports/</nowiki> jammy-security multiverse</blockquote>And replace the text in /etc/apt/sources.list.d/odroid.list with the following:<blockquote>deb <nowiki>http://deb.odroid.in/5422-s/</nowiki> jammy main</blockquote> | |||
== Certificate not updating when uploading new certificate == | |||
Some certificate providers give out certificates which the Ubuntu modem will reject, because it uses legacy protocols. | |||
This can sometimes be avoided if you install the certificate on your local machine, and then export it again with TripleDES encryption. | |||
Latest revision as of 07:17, 23 April 2024
Important
To be able to send SMS, the inLogic SMS Gateway requires GSM modems with USB interface. We recommend "HUAWEI LTE USB Stick Model: E3372".
Hardware Compatibility List
Huawei E3372 (inLogic's choice)
Network Port Openings
TCP port openings from server to gateway. TCP port opening where UMS sms sever service run.
| Port | Usage |
|---|---|
| 22 | SSH access |
| 443 | HTTPS access |
TCP port openings from gateway to server.
| Port | Usage |
|---|---|
| 80 | HTTP access |
| 443 | HTTPS access |
Prepare Modem
 |
Plug-in Modems | ||
|---|---|---|---|
 |
Plug-in Ethernet cable
Plug-in power cable |
||
System Login
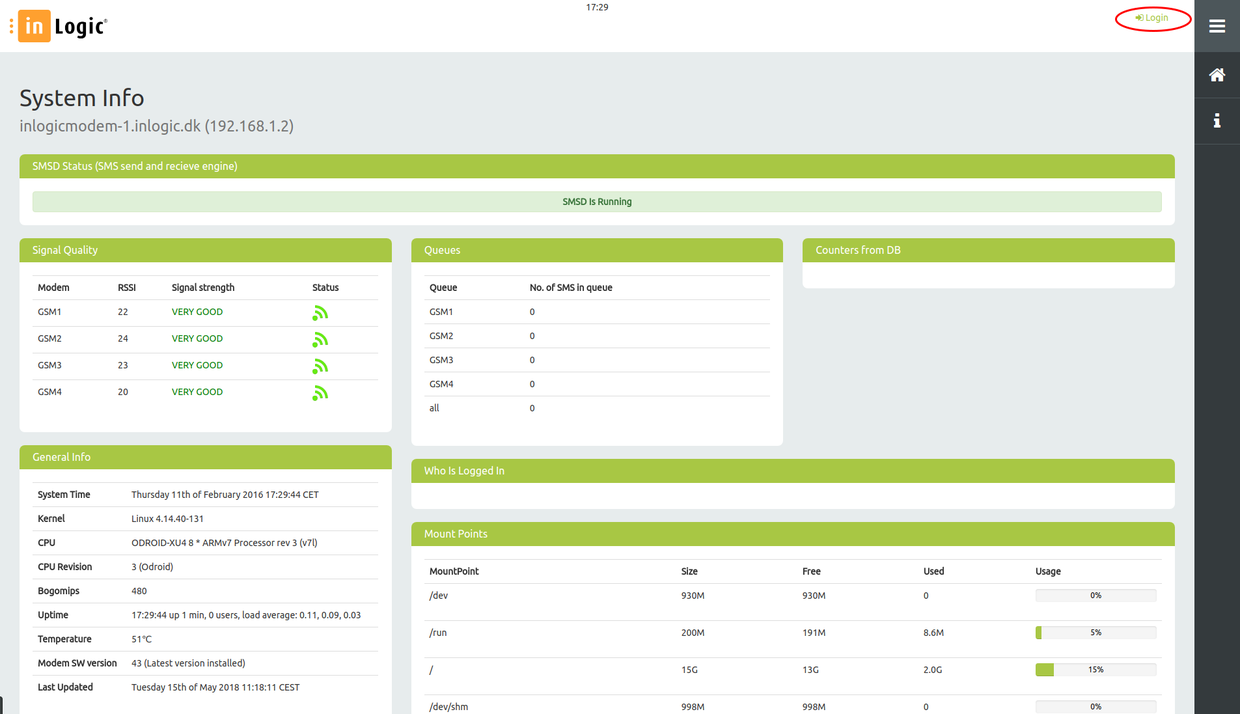
Once the gateway is prepared and booted, open a browser and go to http://192.168.1.2. Login through the 'Login' button in the top right corner.
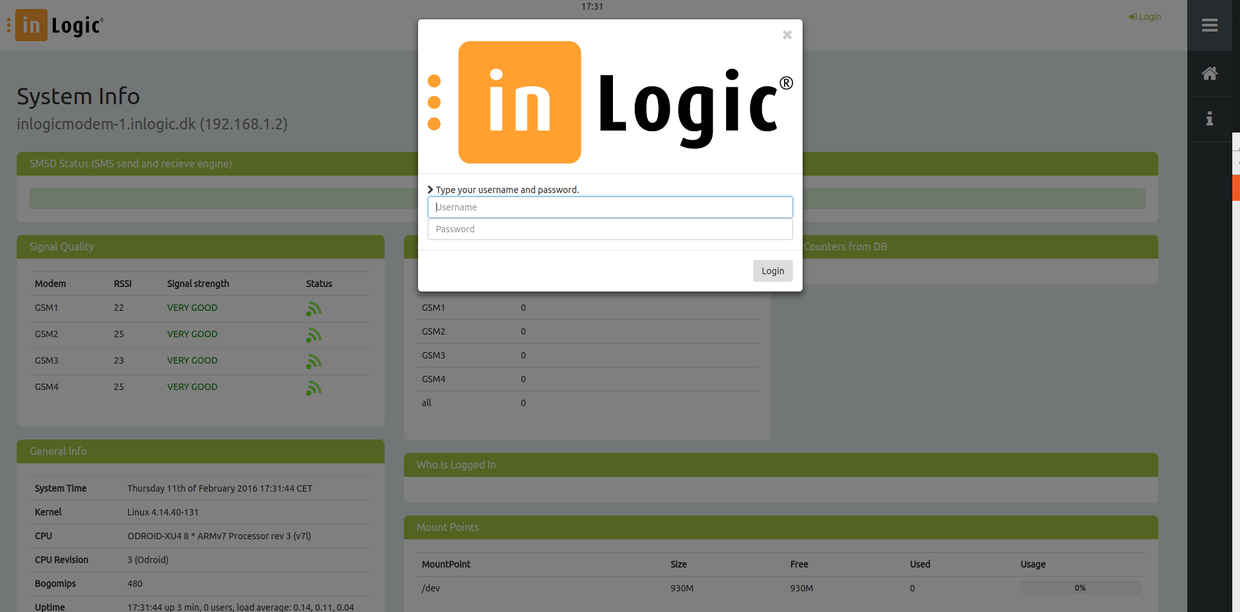
You will now see a login box where you can log in with with USERNAME: admin and PASSWORD: admin.
Main Page
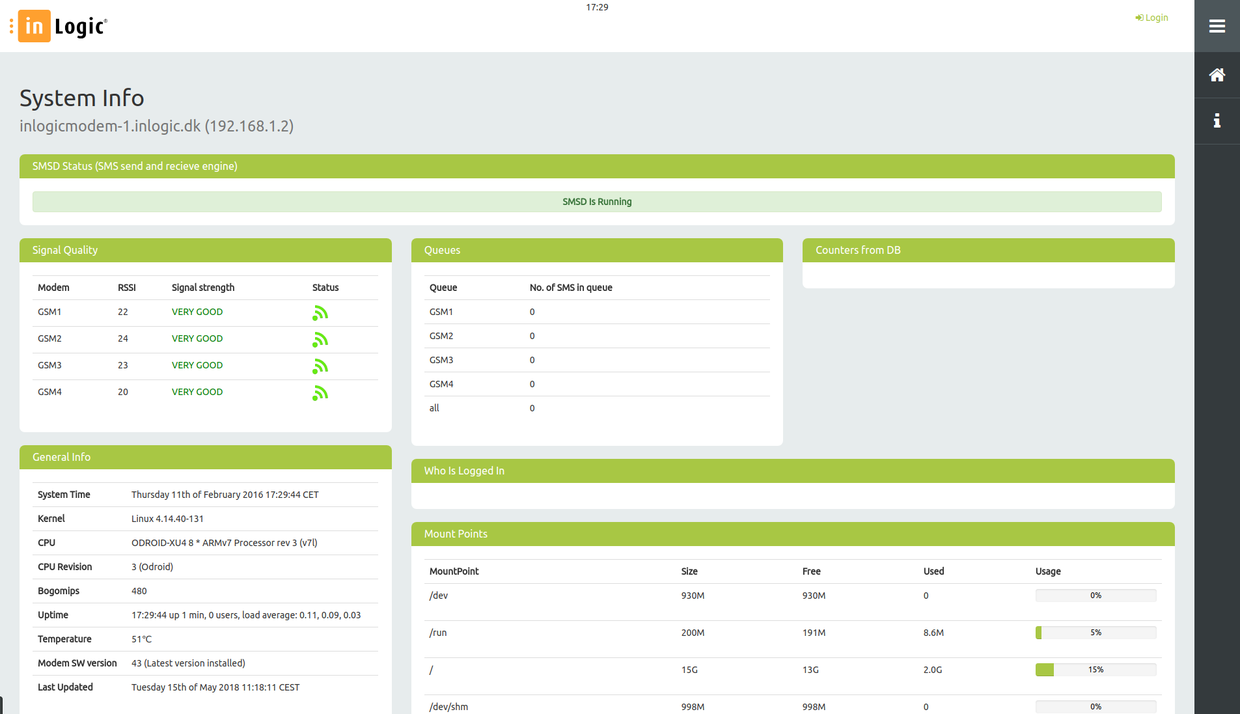
After logging in, the system info page appears. This page shows the gateway's status.
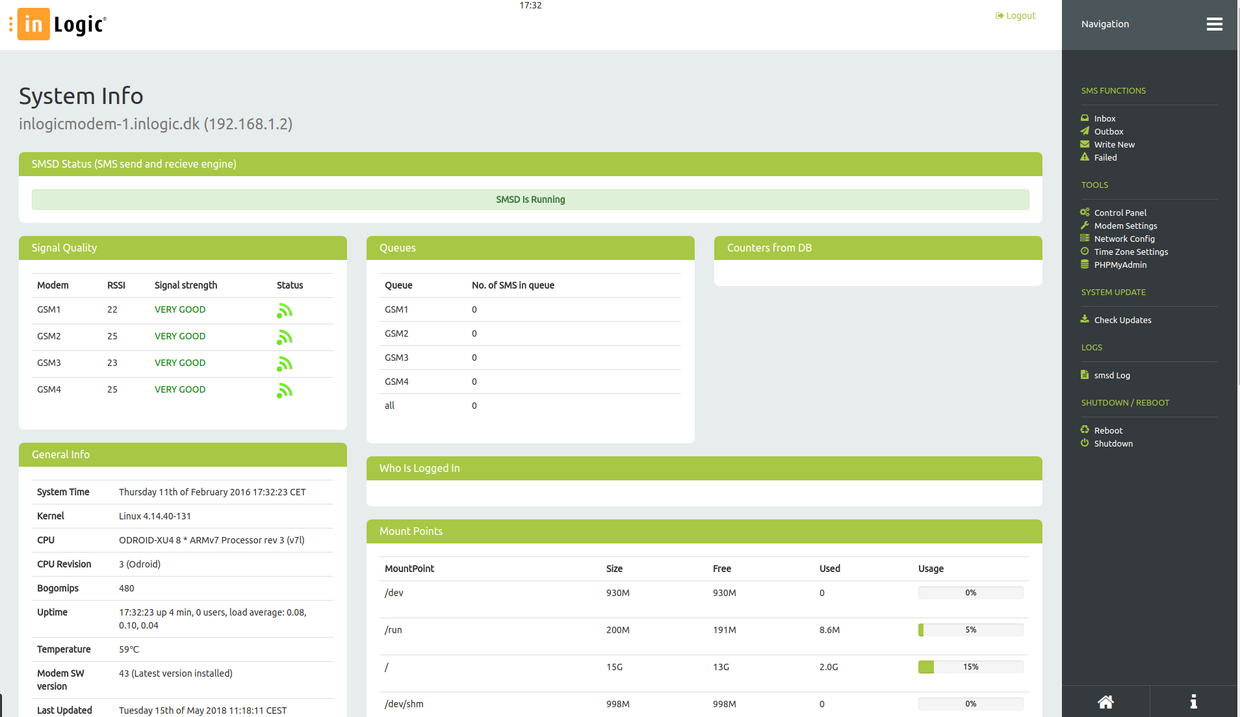
To open the menu, click on this icon: ![]()
Network Configuration
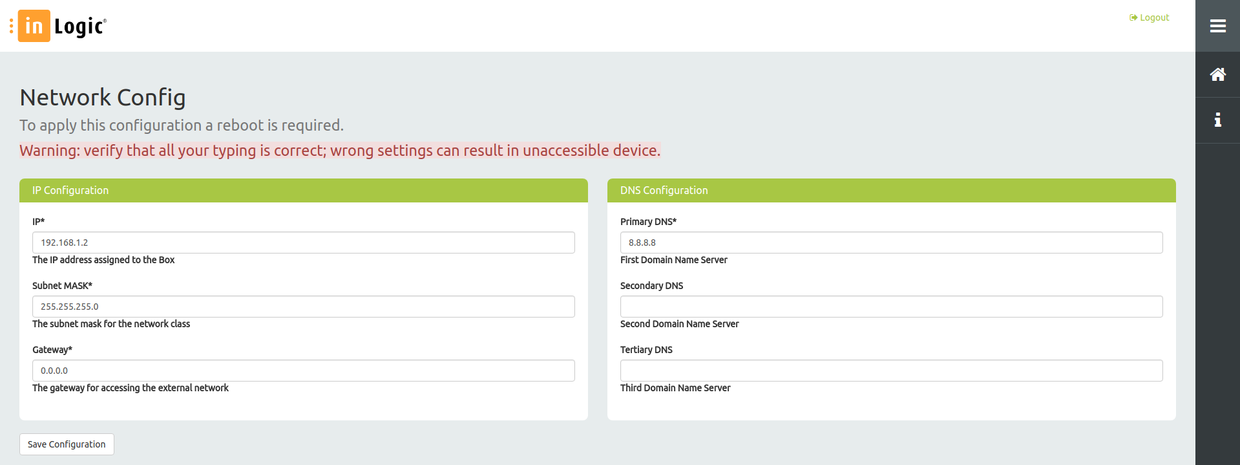
Click on menu tab 'Network config'.
Change the IP settings and press 'Save Configuration'. When you have saved your settings, Reboot the gateway as instructed below in 'Modem Settings'.
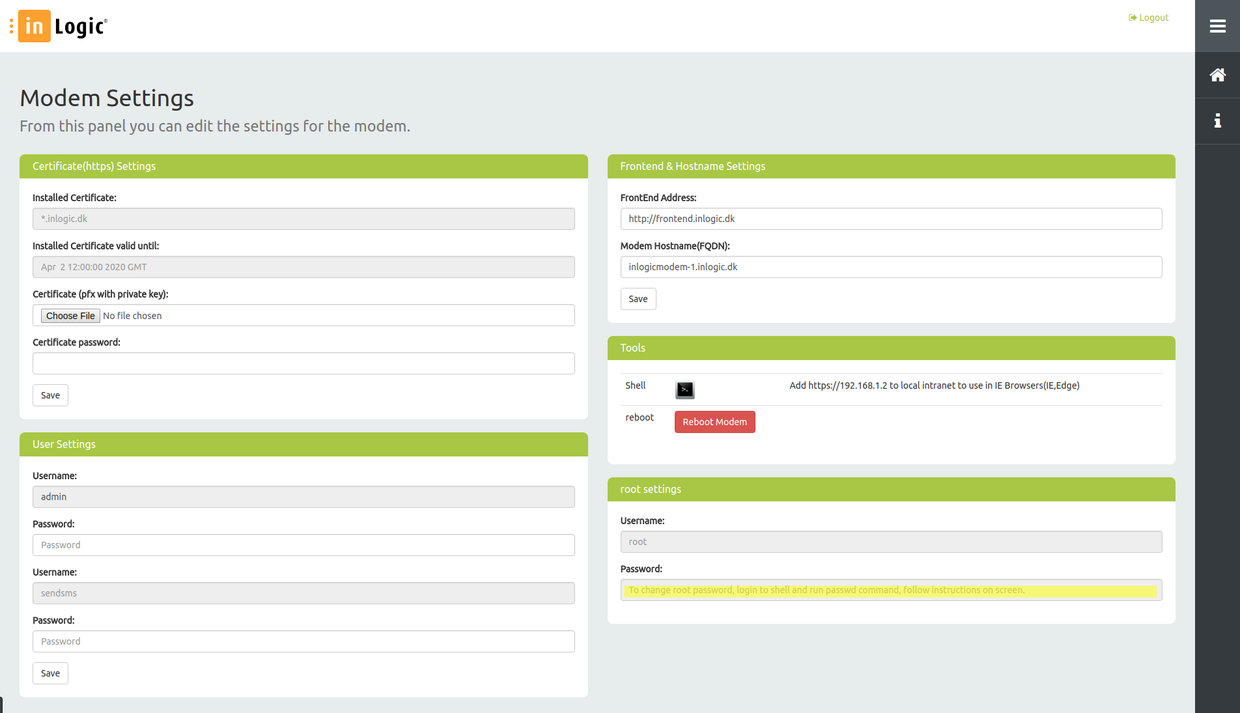
Modem Settings
Hostname and Frontend Settings
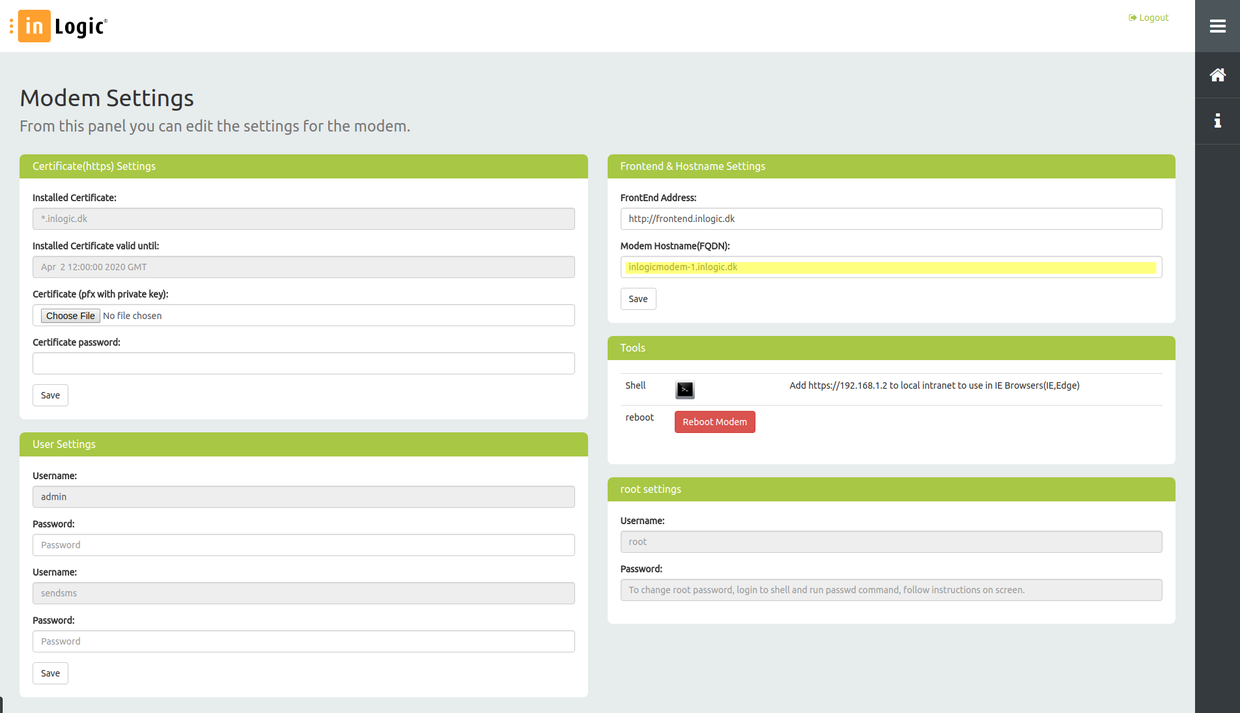
Hostname
Open the menu and go to 'Modem Settings'.
Set 'Modem Hostname' as FQDN and save your changes. Your modem will now restart.
Frontend
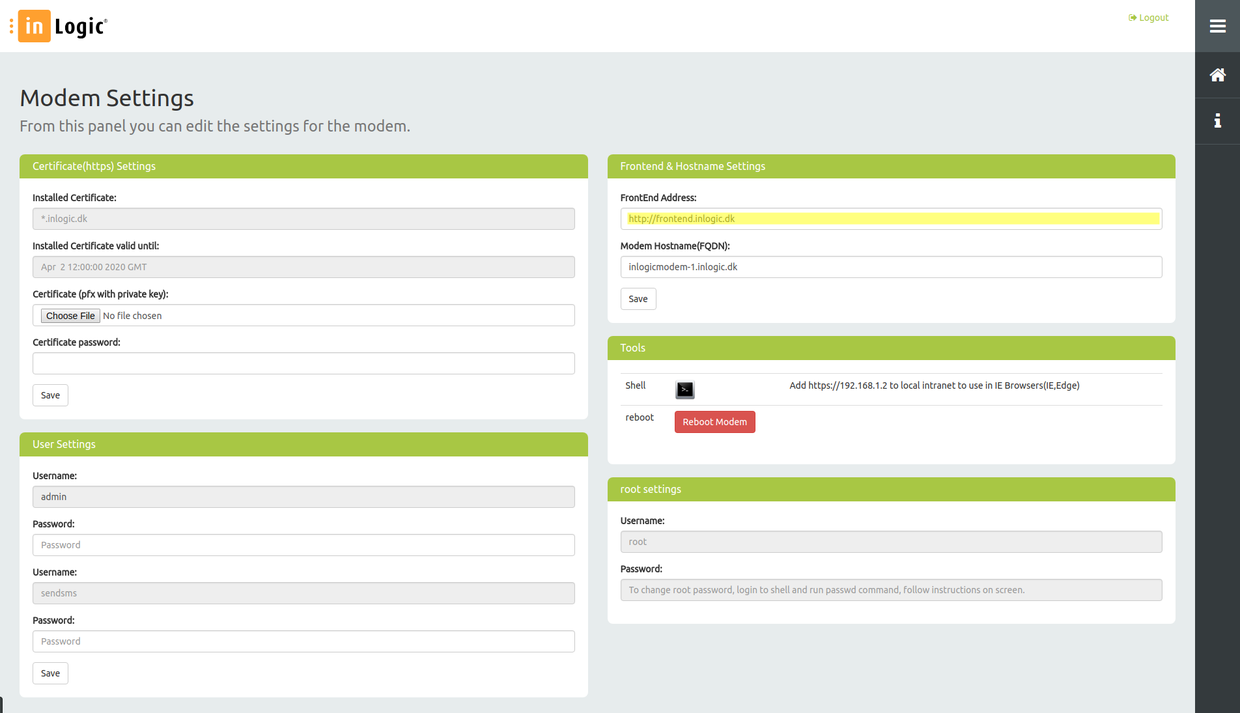
Open the menu and go to 'Modem Settings'.
If redirect is enable on iis set (HTTPS)
Change 'FrontEnd Address' to fit your configuration and save your settings.
Certificate Settings (https)
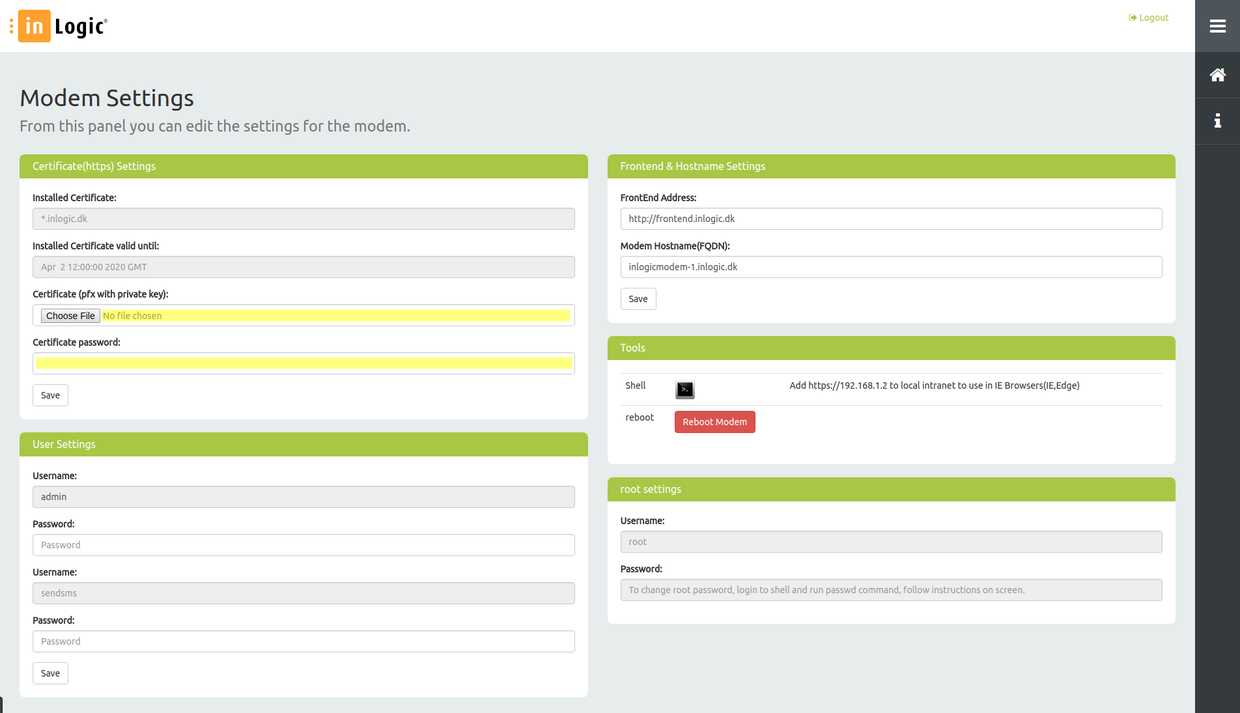
Open the menu and go to 'Modem Settings'.
Click 'Choose File' and choose a .pfx certificate from your computer.
Entera a .pfx certificate password in the 'Certificate Password' field and click 'Save'.
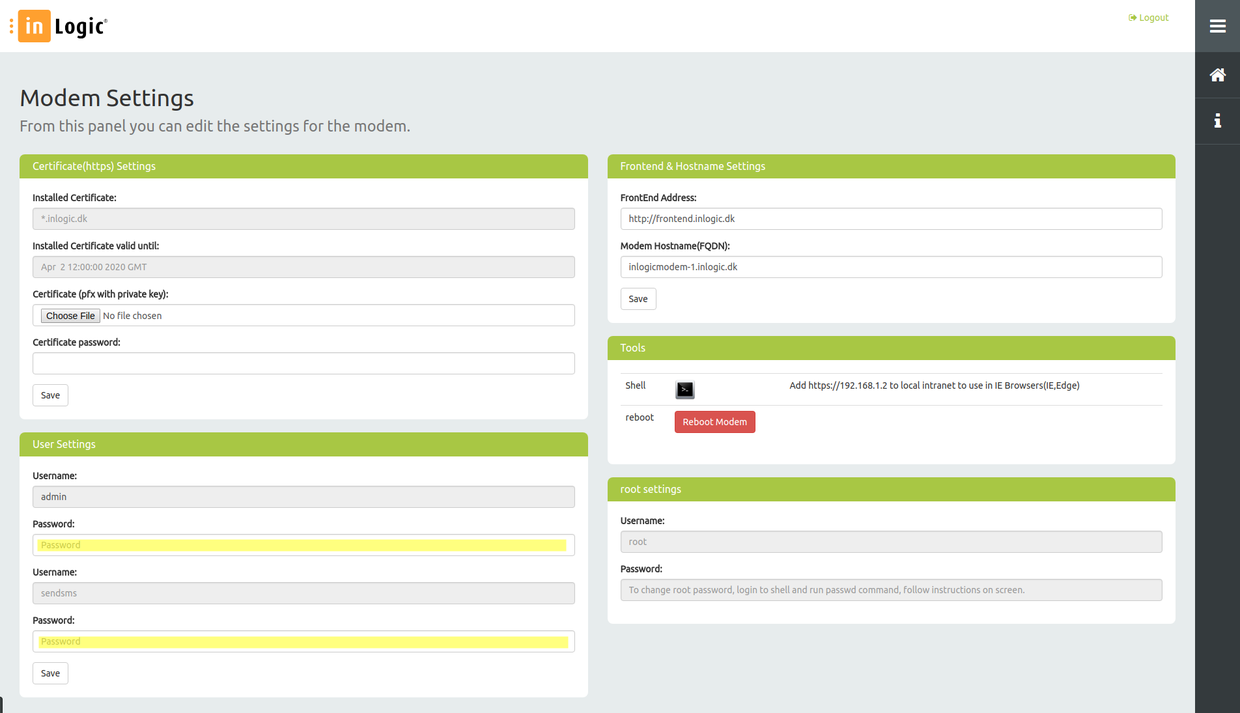
User Settings
Open the menu and go to 'Modem Settings'.
The default admin user password is 'admin'. To change the default admin user password, write the new password in the 'Password' field just below the 'Username' field admin.
The default sendsms user password is 'sendsms'. To change the default sendsms user password, write the new password in the 'Password' field just below the 'Username' field sendsms.
Click 'Save' to confirm the password change.
Control Panel
Open the menu and go to 'Control Panel'.
Here, you can see staus, as well as turn on and off, the SMS Engine.

SMS
Inbox
To see a log for incoming messages, open the menu and go to 'Inbox'.

Outbox
To see a log for outgoing messages, open the menu and go to 'Outbox'.

Failed
To see a log for failed messages, open the menu and go to 'Failed'.

Write New
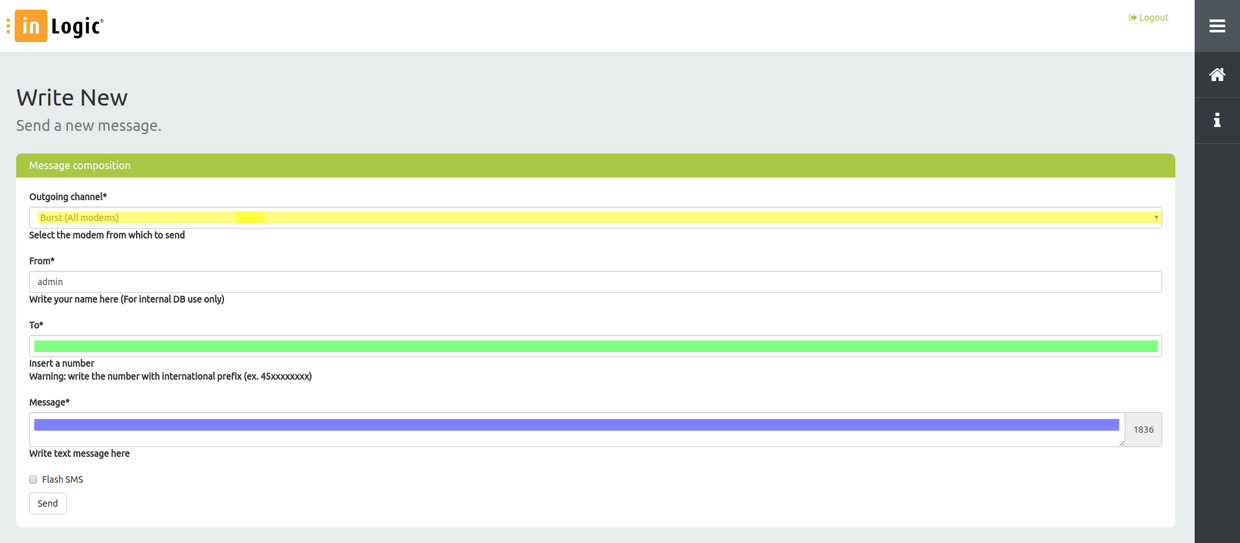
To write a new SMS, open the menu and go to 'Write New'.
Choose the modem you wish to send your message from in the drop down menu 'Outgoing channel'. If left blank, the system will choose the first available modem.
Enter the phone number you wish to send your SMS to in the 'To' field. Pleas note that international prefix is mandatory.
Write your message in the 'Message' field.
When you have finished, click 'Send'.
Time Zone Settings
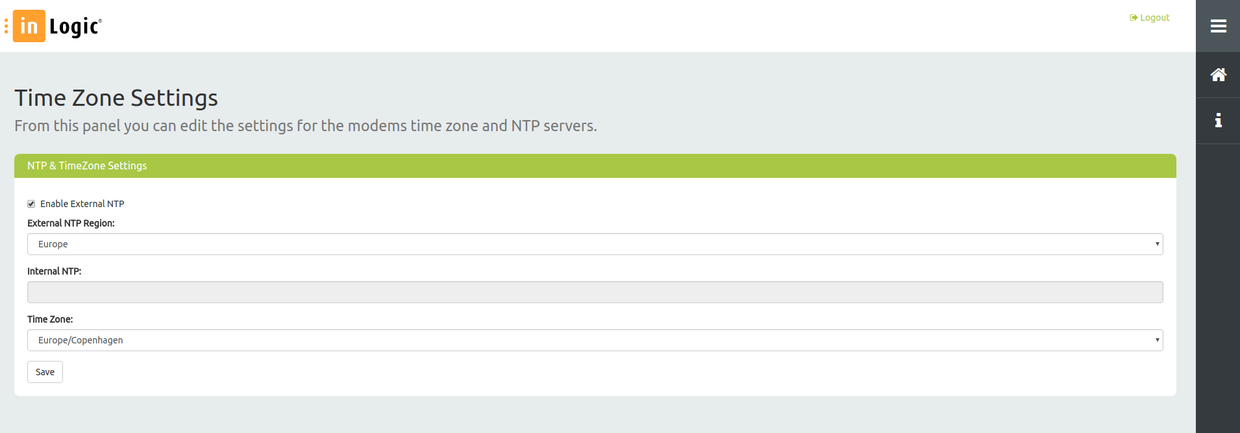
Open the menu and go to 'Time Zone Settings'.
The NTP & Time Zone Settings is by default set to enable external NTP.
For internal NTP, uncheck the 'Enable External NTP' box and write a list of NTP servers separated by comma, in the 'Internal NTP' field.
To change your time zone, choose a time zone from the 'Time Zone' drop down menu.
Click 'Save' to change your settings.
Tools
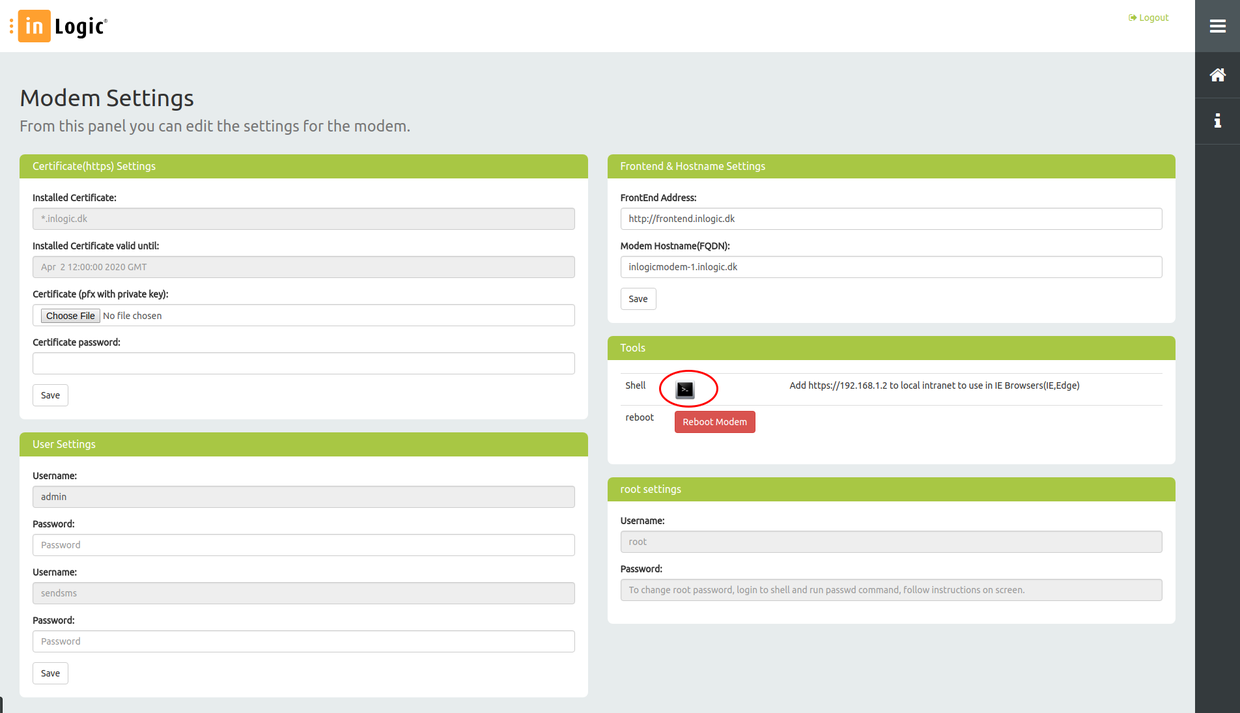
Open the menu and go to 'Modem Settings'.
Shell
Use 'in browser' shell to change advanced settings.
Use with caution! Please note that if you make any changes without consulting us first, support will be charged accordingly with our hourly rate.
Root Settings
Change of root password require putty.exe. Default root password can be requested from inlogic.
Use Putty.exe to connect to Inlogic Gateway, run command (sudo passwd root) and follow the instructions on screen.
Additional information
Additional information about the product, users, and programs used in the tutorial.
Usernames and passwords
SSH Clients
| Program name | URL |
|---|---|
| PuTTy | https://www.putty.org/ |
Open source FTP Client
| Program name | URL |
|---|---|
| WinSCP | https://winscp.net/eng/index.php |
| FileZilla | https://filezilla-project.org/ |
FAQ
Linux commands
Update ubuntu
sudo apt-get update -y
sudo apt-get upgrade -y
Update inLogic files and Database from command line
rm -rf /mnt/Update/update
wget --no-check-certificate https://downloads.inlogic.dk/downloads/inlogicgatewaymodem/Update.zip -O /mnt/Update/Update.zip
unzip /mnt/Update/Update.zip -d /mnt/Update/update
chmod 777 /mnt/Update/update/mnt/flash/root/updateservice/update.sh
/mnt/Update/update/mnt/flash/root/updateservice/update.sh
Commands
- Commands shows Status of Apache (systemctl status apache2.service)
- update system ( apt-get udate apt-get update)
Update/Install USB modeswitch
sudo wget https://www.draisberghof.de/usb_modeswitch/usb-modeswitch-2.6.0.tar.bz2 -O /tmp/usb-modeswitch-2.6.0.tar.bz2
sudo tar xvf /tmp/usb-modeswitch-2.6.0.tar.bz2 -C /tmp
sudo wget https://downloads.inlogic.dk/downloads/inlogicgatewaymodem/usb_modeswitch/usb_modeswitch_dispatcher.tcl -O /tmp/usb-modeswitch-2.6.0/usb_modeswitch_dispatcher.tcl
cd /tmp/usb-modeswitch-2.6.0
make;make install
Update ubuntu from 18 to 20
Use default answers when running these commands.
sudo sed -i 's/bionic/focal/g' /etc/apt/sources.list
sudo sed -i 's/bionic/focal/g' /etc/apt/sources.list.d/odroid.list
sudo apt-get update -y
sudo apt-get upgrade -y
sudo apt-get dist-upgrade -y
How to change IP settings
- nano /etc/netplan/01-netconf.yaml
- reboot
Logs
Log viewers
- tail
- tail -f (this is similar to using cmtrace in windows)
- nano
- vim
Log files
- /var/log/smstools/smsd.log
- /var/log/syslog
- /var/log/mysql/error.log
- /var/log/apache2/error.log
See USB devices
- lsusb
See Apache error logs
- inlapache
Rest API
Theres a REST API to use, to send messages from the inLogic SMS Gateway.
Send SMS
| Title | |
|---|---|
| URL | source/send_sms.php |
| Method | POST |
| URL Parameters | Username
Password To Message |
| Success Response | 200 - Success
Returns ID of send SMS |
| Error Response | 401 - Unauthorized |
| Error Resposne | 403 - Forbidden |
| Error Response | 500 - Internal server error |
| Sample Request | source/send_sms.php?username=smsuser&pwd=testpassword123&from=ums&to=22446688&message=Dette er en test besked |
| Notes |
Example
curl -X POST https://modem.ums.dk/source/send_sms.php?username=<USERNAME>&pwd=<PASSWORD>&from=ums&to=<RECIEPIENT>&message=<MESSAGE>
Check SMS Status
| Title | |
|---|---|
| URL | webservice/getstatus.php |
| Method | POST |
| URL Parameters | Username
Password ID |
| Success Response | 200 - Success
Returns status of send SMS
OK = 0 OK_WithError = 1 InUMSQueue = 2 InModemQueue = 3 Failed = 4 IDNotFound = 5 SentViaMail = 100 FailedSendingViaMail = 101 |
| Error Response | 401 - Unauthorized |
| Error Resposne | 403 - Forbidden |
| Error Response | 500 - Internal server error |
| Sample Request | webservice/getstatus.php?=smsuser&pwd=testpassword123&id=1 |
| Notes |
Example
curl -X POST https://modem.ums.dk/webservice/getstatus.php?username=<USERNAME>&pwd=<PASSWORD>&id=<ID>
Deleting the SMS queue
Locate the "mnt/flash/spool/all#" and use the "rm *" command to purge everything within the folder.
Updating from 20.04 or lower
Updating your SMS modem from Ubuntu 20.04 or lower might result in the following message: "No new release found"
This is fixed by replacing the text in /etc/apt/sources.list.d/odroid.list using WinSCP with the follwing:
deb http://ports.ubuntu.com/ubuntu-ports/ jammy main universe restricted
deb-src http://ports.ubuntu.com/ubuntu-ports/ jammy main universe restricted
deb http://ports.ubuntu.com/ubuntu-ports/ jammy-updates main universe restricted
deb-src http://ports.ubuntu.com/ubuntu-ports/ jammy-updates main universe restricted
deb http://ports.ubuntu.com/ubuntu-ports/ jammy-backports main restricted
deb-src http://ports.ubuntu.com/ubuntu-ports/ jammy-backports main restricted
deb http://ports.ubuntu.com/ubuntu-ports/ jammy-security main restricted
deb-src http://ports.ubuntu.com/ubuntu-ports/ jammy-security main restricted
deb http://ports.ubuntu.com/ubuntu-ports/ jammy-security universe
deb-src http://ports.ubuntu.com/ubuntu-ports/ jammy-security universe
deb http://ports.ubuntu.com/ubuntu-ports/ jammy-security multiverse
deb-src http://ports.ubuntu.com/ubuntu-ports/ jammy-security multiverse
And replace the text in /etc/apt/sources.list.d/odroid.list with the following:
deb http://deb.odroid.in/5422-s/ jammy main
Certificate not updating when uploading new certificate
Some certificate providers give out certificates which the Ubuntu modem will reject, because it uses legacy protocols.
This can sometimes be avoided if you install the certificate on your local machine, and then export it again with TripleDES encryption.