Student / Employee ID: Difference between revisions
Added explanation and exaple for conditional fields. |
|||
| (2 intermediate revisions by one other user not shown) | |||
| Line 5: | Line 5: | ||
*Make sure Anonymous Authentication is enabled for the folder ‘Webservices’ in Internet Information Services (IIS) Manager for the Default Web Site | *Make sure Anonymous Authentication is enabled for the folder ‘Webservices’ in Internet Information Services (IIS) Manager for the Default Web Site | ||
*To let the users change their student ID card profile image go to the chapter for [[My Information]]. | *To let the users change their student ID card profile image go to the chapter for [[My Information]]. | ||
*Configure a 'Student card setting' under Templates -> App -> Student card | |||
[[File:Updated Studentcard configurator.png|left|thumb|Studentcard setup view]] | |||
=== Student ID Barcode === | |||
The value 'Select column for card ID field' determines what value in the Students-table will be used to generate the barcode on the backside of the card. | |||
The value 'Show Card ID label' determines whether to show or hide the label on the backside, containing a text representation of the Card ID value. This is useful in cases where a scanner cannot read the barcode, but you instead have the option to input the card ID manually. | |||
''Note: It is recommended to select a specific column, as only students imported from Lectio will have the 'CardID'-column set by default.'' | |||
___ | |||
You can set a default bar code format which the students Card ID will be shown as. ''Note that not all card IDs can be displayed in all formats.'' | |||
Web tasks -> Web setup -> General settings (scroll to bottom) | |||
Select the barcode format that your scanners support. | |||
[[File:Available_barcode_formats.png|frameless|324x324px]] | |||
<br /> | <br /> | ||
== | === Layout === | ||
You now have the option to configure what fields from the Students-column you wish to show, along with what translations you want to attach to each field. | |||
This is done by dragging the desired field from the left column into the right one, and add translations for each language. | |||
The order is arranged as following: | |||
{| class="wikitable" | |||
|+''Name'' | |||
|1 | |||
|2 | |||
|- | |||
|3 | |||
|4 | |||
|- | |||
|5 | |||
|6 | |||
|} | |||
You can add the <Empty> field to provide an empty field, meaning it can go '1, 2, <Empty>, 4'. Rows are autosizing to fit the content within, so know that if you make both entries in a row <Empty>, it will autosize to no height, effectively nullifying the Empty-row. | |||
<br /> | |||
==== Standard layout ==== | |||
Default layout, in case nothing is configured, will be 'Studienr' and 'BirthDay'. | |||
====== Conditional Fields ====== | |||
You can select a field and give it an SQL criteria, which coincides with a "Where" statement, in order to make the field conditional on the value of another field. | |||
* example: You have a student with multiple educations at your institution and he/she has multiple rows in the database because the keep alive still maintains the old one. You want the studentcard to show the currently active education. You use the fields "StudyStart_education and StudyEnd_Education to mark when the education starts and ends. | |||
** Convert(Date,GETDATE()) between DateAdd(DAY, -1, StudyStart_Education) and DateAdd(DAY, 1,StudyEnd_Education) | |||
*** As long as the current date is between the start and end dates of the education that one will be selected, as long as there isn't an overlap between the former education end date and the current education start date.<br /> | |||
==Constant values== | |||
*Full name: An aggregation of 'FORNAVNE' and 'EFTERNAVN' columns from the Students table. | *Full name: An aggregation of 'FORNAVNE' and 'EFTERNAVN' columns from the Students table. | ||
*Expiration date: Either 'Current_Education_EndDate' column from the Students table, or if that's empty, 'SLUTDATO' column. | *Expiration date: Either 'Current_Education_EndDate' column from the Students table, or if that's empty, 'SLUTDATO' column. | ||
''Note that if some of these values are missing. it's usually a result of them missing in the database''. | ''Note that if some of these values are missing. it's usually a result of them missing in the database''. | ||
| Line 24: | Line 71: | ||
===Ludus=== | ===Ludus=== | ||
The SLUTDATO-column used for 'Expiration date' is derived from the LUDUS database. First it tries to use 'DBA.ModulKursist.udmeldingsdato', and if that's null, it instead uses 'DBA.UndervisningPeriode.SLUTDATO' | The SLUTDATO-column used for 'Expiration date' is derived from the LUDUS database. First it tries to use 'DBA.ModulKursist.udmeldingsdato', and if that's null, it instead uses 'DBA.UndervisningPeriode.SLUTDATO' | ||
<br /> | <br /> | ||
==Student backside== | ==Student backside== | ||
Latest revision as of 14:37, 8 February 2023
This is a submodule available in UMS App
Student and Employee ID is a module that is automatically available in the App. These ID's uses user information and UMS Photo and has no configuration specific to the app.
Setup
- Make sure Anonymous Authentication is enabled for the folder ‘Webservices’ in Internet Information Services (IIS) Manager for the Default Web Site
- To let the users change their student ID card profile image go to the chapter for My Information.
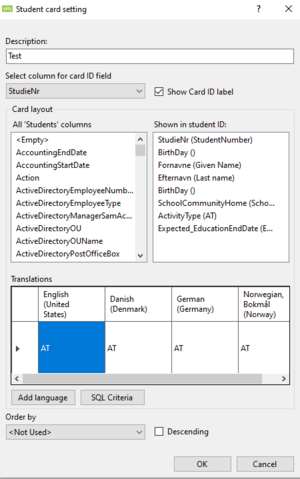
- Configure a 'Student card setting' under Templates -> App -> Student card

Student ID Barcode
The value 'Select column for card ID field' determines what value in the Students-table will be used to generate the barcode on the backside of the card.
The value 'Show Card ID label' determines whether to show or hide the label on the backside, containing a text representation of the Card ID value. This is useful in cases where a scanner cannot read the barcode, but you instead have the option to input the card ID manually.
Note: It is recommended to select a specific column, as only students imported from Lectio will have the 'CardID'-column set by default.
___
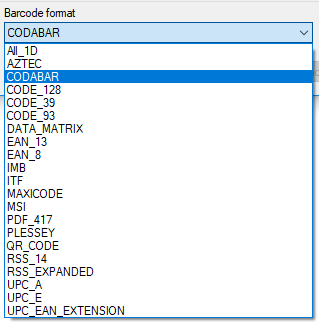
You can set a default bar code format which the students Card ID will be shown as. Note that not all card IDs can be displayed in all formats.
Web tasks -> Web setup -> General settings (scroll to bottom)
Select the barcode format that your scanners support.
Layout
You now have the option to configure what fields from the Students-column you wish to show, along with what translations you want to attach to each field.
This is done by dragging the desired field from the left column into the right one, and add translations for each language.
The order is arranged as following:
| 1 | 2 |
| 3 | 4 |
| 5 | 6 |
You can add the <Empty> field to provide an empty field, meaning it can go '1, 2, <Empty>, 4'. Rows are autosizing to fit the content within, so know that if you make both entries in a row <Empty>, it will autosize to no height, effectively nullifying the Empty-row.
Standard layout
Default layout, in case nothing is configured, will be 'Studienr' and 'BirthDay'.
Conditional Fields
You can select a field and give it an SQL criteria, which coincides with a "Where" statement, in order to make the field conditional on the value of another field.
- example: You have a student with multiple educations at your institution and he/she has multiple rows in the database because the keep alive still maintains the old one. You want the studentcard to show the currently active education. You use the fields "StudyStart_education and StudyEnd_Education to mark when the education starts and ends.
- Convert(Date,GETDATE()) between DateAdd(DAY, -1, StudyStart_Education) and DateAdd(DAY, 1,StudyEnd_Education)
- As long as the current date is between the start and end dates of the education that one will be selected, as long as there isn't an overlap between the former education end date and the current education start date.
- As long as the current date is between the start and end dates of the education that one will be selected, as long as there isn't an overlap between the former education end date and the current education start date.
- Convert(Date,GETDATE()) between DateAdd(DAY, -1, StudyStart_Education) and DateAdd(DAY, 1,StudyEnd_Education)
Constant values
- Full name: An aggregation of 'FORNAVNE' and 'EFTERNAVN' columns from the Students table.
- Expiration date: Either 'Current_Education_EndDate' column from the Students table, or if that's empty, 'SLUTDATO' column.
Note that if some of these values are missing. it's usually a result of them missing in the database.
Integrations
Ludus
The SLUTDATO-column used for 'Expiration date' is derived from the LUDUS database. First it tries to use 'DBA.ModulKursist.udmeldingsdato', and if that's null, it instead uses 'DBA.UndervisningPeriode.SLUTDATO'
Student backside
By using our Custom Terms and Localization module, we've added a backside to the Student Card
By adding a translation entry in your localization file with the following key, you can add whatever custom text you want to show on the backside of the Student card:
- Key: "StudentCardBacksideText"
FAQ
- I've taken a new photo and it's showing in Your Information, but not on my Student/Employee Card
When you take a new photo with Your Information, it's stored with a 'Pending'-tag. To ensure only valid photos are used for user IDs, the student and employee cards only uses photos that has been marked as Approved.
See UMS Photo for more info on this module.
- The student card backside isn't showing
By default the translated entry is empty, and as a result the student card backside is disabled. It will only become enabled once you have added a translated entry for the specified key.
- How do I get the student card backside to show?
Tap the student card to flip between front and back side.

