SSO UMS: Difference between revisions

From UmsWiki
Jump to navigation Jump to search
Cbe (talk | contribs)
No edit summary
Cbe (talk | contribs)
No edit summary
 
(One intermediate revision by the same user not shown)
Line 13: Line 13:
*An UMS installation, licensed to SSO from inLogic.
*A star or new certificate for the address that the AD FS server needs.
<br />
==Installation==
=====Log on Web & ADFS Servers=====
<br />
=====Open AD FS Management on the primary ADFS Server.=====
#Retrieve necessary ADFS information from '''"Edit Federation Service Properties"'''
##Name:
##SingleSignOnServiceURL
##[[File:SSO_Federation.png|center|thumb|581x581px]]SingleLogoutServiceURL 
#Export token-signing Certificate
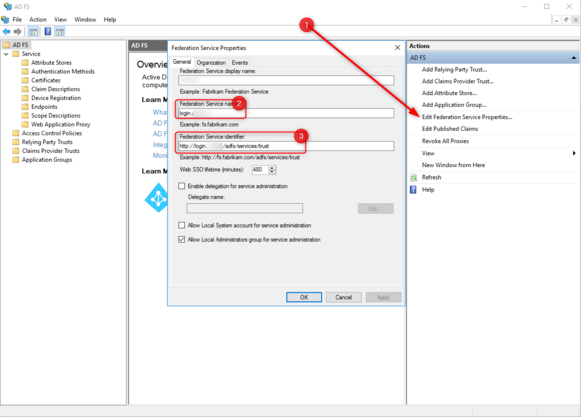
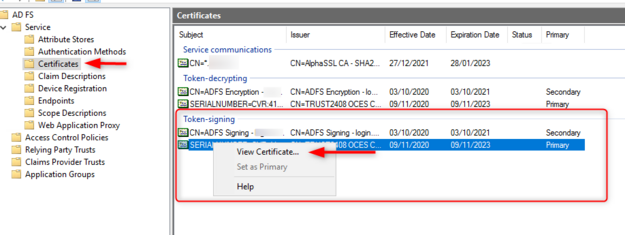
##Click on "'''Service'''" > "'''Certificates'''" - Right click on the primary under "'''Token-Signing'''"
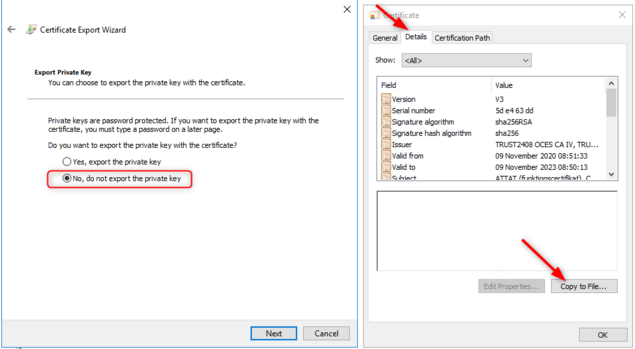
##[[File:SSO_Certificate.png|center|frameless|625x625px]][[File:Export_Certificate_SSO.png|center|thumb|635x635px]]Click on "'''View Certificate'''" > "'''Details'''" > "'''Copy to File'''" - export without the Private Key > Chose destination of Certificate 
#Copy files to IIS Server at the desktop for now.
<br />
=====Open "Internet Information Services (IIS) Manager"=====
#Create Selfsigned Certificate
##Click on the Server Name on the IIS > "'''Server Certificates'''" > "'''Create Self-Signed Certificate'''"
##Specify a friendly name for the certificate: UMS-SSO <Year>
##Export the Certificate to the desktop as ums-sso.pfx - '''REMEMBER THE PASSWORD'''
#Copy certificates to wwwroot folder (default path: C:\inetpub\wwwroot\bin)
<br />
=====Log on UMS Web=====
#Enter the settings in the Web
##Click on "'''Controlpanel'''" > "'''UMS Login Setup'''"
##Click on "'''Single Sign On'''"
##Click on "'''Add'''" and give it a name. For example SSO
##Chose the created Single Sign On Setting and press Edit > Edit
###Change '''Name''':
###Change '''SingleSignOnServiceUrl''' & '''SingleLogoutServiceUrl'''
###Select Token Certificate file at: '''PartnerCertificateFile'''
###Select Self-signed Certificate at: '''LocalCertificateFile''' & Password to the PFX in '''LocalCertificatePassword'''
[[File:UMS_WEB_SSO_Settings.png|center|thumb|582x582px]]
<br />

Latest revision as of 09:52, 16 September 2022

Our Single Sign-on (SSO) module is designed for schools that would like to make it easy for employees and students to use the school's various electronic systems. With the SSO module, users get one login and password that logs them into all the associated services at once.

For example, students can Access the school's LMS system, library system, digital dictionaries and databases with scientific publications - all by signing in with SSO once and for all.

This saves time and effort whenever users need to use one of the school's systems. At the same time, it gives users a simpler everyday life because they do not have to worry about having to keep in mind several logins.


Prerequisite

This requires that:

  • An installed Active Directory federation services (AD FS) server.
  • Access to configuration snap in. Either via Remote PowerShell or directly on the server.
  • An UMS installation, licensed to SSO from inLogic.
  • A star or new certificate for the address that the AD FS server needs.


Installation

Log on Web & ADFS Servers


Open AD FS Management on the primary ADFS Server.
  1. Retrieve necessary ADFS information from "Edit Federation Service Properties"
    1. Name:
    2. SingleSignOnServiceURL
    3. SingleLogoutServiceURL
  2. Export token-signing Certificate
    1. Click on "Service" > "Certificates" - Right click on the primary under "Token-Signing"
    2. Click on "View Certificate" > "Details" > "Copy to File" - export without the Private Key > Chose destination of Certificate
  3. Copy files to IIS Server at the desktop for now.


Open "Internet Information Services (IIS) Manager"
  1. Create Selfsigned Certificate
    1. Click on the Server Name on the IIS > "Server Certificates" > "Create Self-Signed Certificate"
    2. Specify a friendly name for the certificate: UMS-SSO <Year>
    3. Export the Certificate to the desktop as ums-sso.pfx - REMEMBER THE PASSWORD
  2. Copy certificates to wwwroot folder (default path: C:\inetpub\wwwroot\bin)


Log on UMS Web
  1. Enter the settings in the Web
    1. Click on "Controlpanel" > "UMS Login Setup"
    2. Click on "Single Sign On"
    3. Click on "Add" and give it a name. For example SSO
    4. Chose the created Single Sign On Setting and press Edit > Edit
      1. Change Name:
      2. Change SingleSignOnServiceUrl & SingleLogoutServiceUrl
      3. Select Token Certificate file at: PartnerCertificateFile
      4. Select Self-signed Certificate at: LocalCertificateFile & Password to the PFX in LocalCertificatePassword